DIY Google Pixel 6a vibration motor Replacement Guide
Duration: 45 minutes
Steps: 27 Steps
Hey there! This awesome repair guide was put together by the talented folks at Salvation Repair, and just a heads up, it’s not officially backed by Google. If you’re curious about our repair guides, feel free to check them out here!
Safety first! Make sure to drain your battery to below 25% before diving into disassembling your device. It’s just a little precaution to keep things smooth sailing!
This handy guide comes straight from the folks at Salvation Repair, and while Google hasn’t given it a thumbs up, it’s still packed with great tips! Ready to swap out the vibration motor in your Google Pixel 6a? Before diving in, make sure to discharge your battery to below 25%. This simple step helps keep things safe by reducing the chance of a fire if the battery takes a hit during the repair. And if your battery looks a bit swollen, please be careful! Don’t forget, you’ll need some fresh adhesive to wrap things up nicely. If you need help, you can always schedule a repair.
Step 1


Before you start, make sure your battery is below 25% charged. We want to avoid any accidents, like a battery fire, so let’s play it safe. If you need help, you can always schedule a repair
– First, let’s get started by completely powering down your phone and unplugging any cables – we want to make sure it’s safe to work on.
Step 2


Before diving into your repair adventure, keep these tips in mind:
Step 3


Here come the next three steps featuring our nifty Anti-Clamp! It’s our handy little tool designed to simplify the opening process. If you decide to go without the Anti-Clamp, feel free to jump ahead three steps for another method.
Got a cracked screen? No worries! Just slap on a layer of clear packing tape before you bring out the suction cup. It’ll stick like a charm.
Want to master the Anti-Clamp? Check out our detailed guide for all the tips and tricks you need.
If your phone’s surface feels a bit too slick for the Anti-Clamp’s liking, just add some tape to create a better grip. Easy peasy!
– First, let’s get started by pulling the blue handle backwards to release the Anti-Clamp’s arms. This will give you the room you need to work on your phone.
– Next, slide the arms over the right edge of your phone – it’s like giving your phone a big hug.
– Now, position the suction cups near the middle of the right edge of the phone, one on the front and one on the back. This will help you get a good grip on your phone.
– Finally, squeeze the cups together to apply suction. If you need help or feel unsure at any point, you can always schedule a repair with Salvation Repair.
Step 4


– Give that blue handle a gentle tug forward to lock those arms in place!
– Now, twist the handle clockwise a full 360 degrees or until you see those cups start to stretch out. You got this!
– Keep an eye on those suction cups to ensure they’re staying in sync. If they start to wobble, just loosen them a tad and realign the arms. Easy peasy!
Step 5


Take it easy! Just turn it halfway and pause for a minute between each twist. Let the Anti-Clamp and a little patience do their magic for you.
A hair dryer or heat gun can also be your allies in this repair mission — just keep an eye on the heat, as too much can be a downer for the display or the internal battery, so use caution!
If the Anti-Clamp isn’t making enough of a gap for you, no worries! Just add a little extra heat to the area and give the handle a half-turn clockwise. You’ve got this!
– Get your iOpener warmed up and thread it through the Anti-Clamp’s arms, so it’s snug against the right edge of your phone.
– Give the adhesive a minute to loosen up – this will help create a gap for you to work with.
– When the gap is big enough, carefully slide an opening pick under the screen frame.
– Go ahead and skip the next two steps – you’re making great progress!
Tools Used

Step 6

You can also use a hair dryer, heat gun, or hot plate, but make sure not to overheat the phone—the screen and internal battery are both sensitive to heat. If you need help, you can always schedule a repair.
– Warm up your iOpener and gently press it against the right edge of the screen for about two minutes. You’ve got this!
Tools Used
Step 7


If your display is looking a bit rough, try sticking a layer of clear packing tape on top. This might help the suction cup stick to the screen. You can also use some really strong tape instead of the suction cup. If all else fails, you can use a little superglue to secure the suction cup to the broken screen.
Don’t worry if you’re having trouble, it can be tricky depending on how old your phone is. If you’re stuck, just apply a little more heat to the edge and try again. If you need help, you can always schedule a repair
– First, attach a suction cup to the screen, positioning it as close to the center of the right edge as you can.
– Now, pull up on the suction cup with a firm, steady force to create a gap between the bezel and the frame – you’re making progress!
– Next, take an opening pick and carefully insert it into the gap you just created. If you need help, you can always schedule a repair
Step 8


Keep the pick at a cool 3.5mm max to save those precious internals. If you need help, you can always schedule a repair
– While maintaining your suction grip, tilt the pick upward at a sharp angle for better leverage.
– Gently slide the pick in as you pry, nudging the opening pick into the bezel seam for optimal placement.


Step 10


Hey there! Just a friendly reminder to only slide that pick in about 4 mm. We want to keep those internals safe and sound! If you need help, you can always schedule a repair.
– Twist that opening pick around the top-right corner of your phone to pop those clips loose!
– Keep that pick right where it is in the top-right corner to stop those clips from locking back into place.
Step 11


When you’re getting cozy with that front camera, remember to keep your tool within 3mm! We want to keep that lens safe and sound.
– Now it’s time to add a new opening pick to the gap you’ve created – this is where the magic happens!
– Gently slide the pick along the top edge to release those clips and get things moving.
Step 12


– Swipe the opening pick around the top-left corner of your device to work the clips loose, friend! 😊
– Keep that pick up in the corner to make sure those mischievous clips don’t go back to their shenanigans before you’re ready, tech guru! 🤓
Step 13


Just a heads up! Keep that pick handy, but only insert it up to 3mm. We don’t want to mess up the internal parts, so be gentle. If you need help, you can always schedule a repair.
Alright, let’s get this screen off the frame! If it’s not coming off easily, use an opening pick to gently pry it free. You got this! Just be careful, we don’t want to damage anything. If you need help, you can always schedule a repair
– Alright, let’s get this party started! Grab that opening pick and gently slide it into that little gap you just created.
– Now, slide the pick along the left edge to release those pesky clips holding things together. It’s like a little dance, but with tools!
– Repeat the slide-and-rotate action for the rest of the edge. You got this! If you need a helping hand, you can always schedule a repair
Step 14


Feeling a little nervous about removing that screen? Don’t sweat it! Gently keep it connected to the frame with that nifty flex cable for now. And no screen twisting or moving too far – let’s keep that cable safe and sound. If you need a hand, just schedule a repair!
Step 15


The display cable bracket is held in place by some trusty metal clips. No worries, just a little finesse is all it takes!
– Let’s get this display cable bracket out! Use tweezers to bend the bottom side of the bracket upwards, releasing the metal clip.
– Now, let’s take that display cable bracket out! Careful, this little guy is important.
– When you’re putting everything back together, pop the top side of the bracket in first before pressing down the other side. Trust us, this is a good idea – you don’t want to risk any sparks and logic board damage. If you need help, you can always schedule a repair.
Tools Used

Step 16


Hey there! Take it easy on this step. Those little parts around the press connector are pretty delicate. If you’re feeling nervous, you can always schedule a repair.
– Slide the tip of your opening pick under the bottom right edge of the display cable press connector, just above that sneaky little screw hole.
– Gently pry up and disconnect the display cable press connector; it’s easier than it sounds!
– When you’re ready to reconnect those press connectors, line them up like a pro and press down on one side until you hear that satisfying click. Then, give the other side a little love until it clicks too. Avoid pressing down in the middle – that’s a recipe for bent pins and heartache. If things get misaligned, you might just end up causing some permanent damage.
Step 17


Don’t forget to pop that display cable bracket back in place!
– Let’s start by removing that screen of yours.
– Now, onto reassembly:
– If you’ve got a shiny new screen, take a peek at the front-facing camera hole and the sensor cutout. Make sure to clear away any pesky leftover liners from your replacement screen.
– Don’t forget to check if the rubber gasket for your proximity sensor is still hanging around—it might be playing hide and seek on the back of your old screen. If it’s MIA, go ahead and put a new one in place.
– Before you seal everything up, it’s a great time for a quick test! Hook up your screen, power on your phone, and make sure all is running smoothly. Just remember to power down your phone again before moving on with reassembly.
– Need to replace the screen adhesive? Follow this helpful guide.
– If you’re installing a brand-new screen, be sure to check out this guide to get your fingerprint sensor calibrated just right.
Step 18


No need to pull off all the tape. Just lift the part connecting the midframe to the top speaker. If you need help, you can always schedule a repair
– Grab those tweezers and gently lift up the shiny silver tape that’s holding together the midframe and the top speaker. You’ve got this!
Tools Used
Step 19


– Grab those tweezers and gently lift the tape that’s hiding the two screws on either side of the USB-C port. You’ve got this!
Tools Used
Step 20


– Grab your trusty T3 Torx screwdriver and let’s get those 16 screws out of the way to free the midframe from the frame:
– First, tackle eight of those 4.3 mm screws with confidence.
– Next, move on to five 2.9 mm screws that could use your attention.
– Don’t forget the two 4.9 mm screws, they are hanging in there!
– And finally, we have one lonely 4.6 mm screw waiting to be set free.
Tools Used


Step 23


You might encounter a little bit of resistance during this step, and that’s totally normal! The midframe is just giving a gentle hug to the heat sink thanks to that thermal paste. No worries, just keep going!
– Alright, let’s take that midframe off! Piece of cake, right?
– Now, before you put everything back together, go ahead and turn your phone on and give it a quick test. Make sure everything’s working like it should before you seal it up. Power it back down completely before you continue. If you need help, you can always schedule a repair
Step 24


– Alright, let’s gently peel back that tape holding the midframe and loudspeaker together. We’re almost there!
Step 25
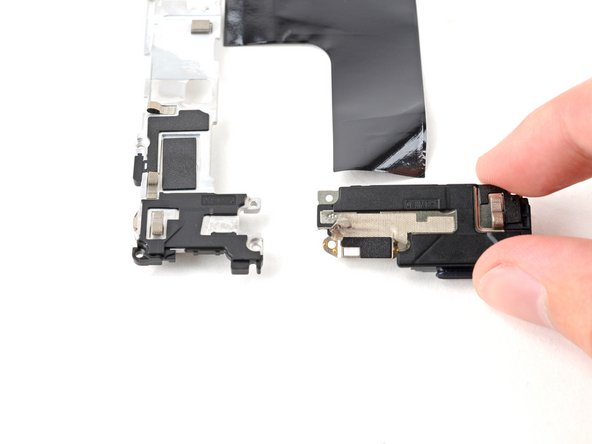

– Alright, let’s get this party started! Use tweezers, or your fingers, to gently separate the loudspeaker from the midframe. Take your time, we want to make sure everything stays in good shape! If you need help, you can always schedule a repair.
Tools Used
Step 26


– Now it’s time to get this repair started – carefully insert an opening pick between the midframe and the vibration motor to begin the process.
Step 27


– Give the opening pick a little twist to free the vibration motor from the midframe—like a boss.
– Take out the vibration motor with confidence.
