DIY Google Pixel 8 Pro Earpiece Speaker Replacement Guide
Duration: 45 minutes
Steps: 52 Steps
Hey there, repair hero! This repair guide is here to help you get your device back in tip-top shape. We’re with you every step of the way! If you hit a snag, don’t sweat it. You can always schedule a repair.
Welcome to your go-to guide for swapping out the earpiece speaker in your Pixel 8 Pro! If your speaker is sounding a bit funky—think distorted sounds, crackling, or even silence—it’s time for a change. Grab some replacement screen adhesive, and let’s get started! Just a heads up: this guide is tailored for the 5G mmWave antenna model, but if you have the non-mmWave version, no worries! You can still follow along; just skip the steps that mention the 5G mmWave antenna. If you need help, you can always schedule a repair.
Step 1


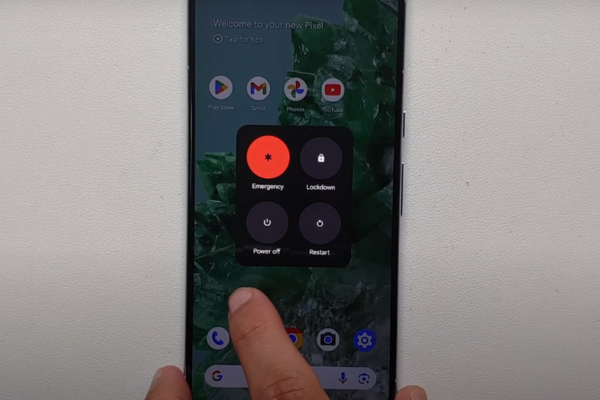
Hey, before you get started with this repair, let your phone’s battery power down to below 25%. That way, you’ll be extra safe and you’ll avoid any battery surprises. Let’s get this done!
Hold down both the power and volume up buttons simultaneously to pop up the shutdown menu.
– Disconnect all cables from your device.
– Turn off your device completely.
Step 2


Get ready to use some trusty opening picks to gently pry the screen from the frame. Just remember, if you push too hard, you might accidentally harm your device. So, take it easy and mark your pick to keep everything safe and sound.
As a fun alternative, you can stick a coin to your pick about 3 mm from the tip. It’s a nifty trick to help you out!
– Take a moment to measure out 3 mm from the tip, then grab a permanent marker and make your mark on that opening pick like a pro!


Step 4

The screen is held tight to the frame by adhesive and clips. A little heat works wonders by softening that adhesive, making it a breeze to pop the screen off.
If you’re feeling creative, grab a hair dryer, heat gun, or even a hot plate. Just keep an eye on the heat—too much can be a no-go for your screen and battery. Stay cool!
– Warm up an iOpener and place it on the bottom edge of the screen for two minutes to loosen the adhesive.
Tools Used


Step 5


In the next few steps, we’ll introduce the Anti-Clamp! It’s a nifty little gadget we came up with to simplify the opening process. If you don’t have an Anti-Clamp handy, no worries—just hop down three steps for another way to tackle it.
Curious about how to master the Anti-Clamp? Check out this handy guide.
– Give that blue handle a gentle tug back to release the Anti-Clamp’s arms. You’ve got this!
– Set your phone screen-side up on a flat surface so it sits nicely between the Anti-Clamp’s arms—just let the bottom edge hang off a bit.
– Slide those arms right over the left edge of your phone, making sure you can easily reach the bottom edge.
– Position those suction cups as close to the center of the bottom edge as you can. Aim for perfection!
– Squeeze the cups together to create a solid suction. You’re doing great!
Step 6


– Give that handle a gentle pull forward to lock those arms in place.
– Now, twist the handle clockwise all the way around (360 degrees) or until you see those suction cups start to stretch out.
– As those cups stretch, keep an eye on their alignment. If they start to slip, no worries! Just take off the Anti-Clamp and use some tape to help those cups stick.
Step 7


Keep your pick adventure tame and only go 3mm deep to avoid hurting springy pals!
If the adhesive doesn’t give in, twist the handle a quarter turn to the right and give it another minute. Keep the heat going if things start to cool down.
– Give your device a moment to cool down and let a little gap appear between the screen and the frame. We’re talking about a teeny tiny gap, but we’ll work with it!
– Gently slide an opening pick into that gap. Think of it like you’re opening a door to a secret world of fixin’!
– Now grab the blue handle and give it a little tug backwards. This will unlock the clamps and let you remove the Anti-Clamp using the pull tabs on the suction cups. It’s like a little victory dance for your device!
– You’re on a roll! Skip the next two steps and keep going! You’re almost there!
Step 8


– Grab a suction handle and stick it right in the middle of the bottom edge of your screen. Let’s get things moving!
Tools Used

Step 9


If you’re finding it tricky to make that gap, just crank up the heat a bit more and give it another go!
– Give that suction handle a good, strong pull until you create a little gap between the screen and the frame – you got this!
– Slide in an opening pick into that gap you just made. Nice work!
Tools Used
Step 10


– The screen cable is located just shy of halfway up the left edge of the phone. Handle with care to keep that cable intact!
– You’ll find a bunch of spring contacts all around the phone’s perimeter. Tread lightly in these areas to avoid bending those little guys.
Step 11


– Let’s get this party started! Slide the opening pick along the bottom edge to gently separate the adhesive holding things together.
– Keep that pick in the bottom right corner to make sure the adhesive doesn’t sneakily reseal itself.
Step 12

You can also get creative with a hair dryer, heat gun, or hot plate! Just remember to keep the heat at a friendly level, as too much can put your screen and battery at risk. Stay cool while you heat things up!
– Warm up that iOpener and give it a cozy two-minute hug on the right edge of the screen!
Tools Used
Step 13


– Slide a second opening pick under the bottom right corner of the screen. You’ve got this!
– Gently glide the new pick all the way to the top right corner to break free the adhesive holding down the screen’s right edge. Almost there!
– Keep that pick in place at the top right corner to stop that pesky adhesive from making a comeback.
Step 14


– Pop in a third opening pick right under the bottom edge of that screen!
– Gently glide that new pick over to the bottom left corner.
– Keep the pick snug in the bottom left corner to stop that pesky adhesive from sealing up again.
Step 15

You could also grab a hair dryer, heat gun, or hot plate for some extra warmth—but watch out! Too much heat can be a total screen and battery buster. Stay chill while you work!
– Give that left edge of the screen a warm embrace with a heated iOpener for a sweet two minutes. It’s like a spa day for your device!
Tools Used
Step 16


– Pop a fourth opening pick into the bottom left corner of the screen.
– Gently slide that pick all the way up to the top left corner to break the adhesive sticking to the left edge of the screen.
– Keep that pick in place at the top left corner to stop the adhesive from getting all clingy again.
Step 17

Want to try a different approach? You can also use a hair dryer, heat gun, or even a hot plate. Just remember, too much heat can be bad for your screen and battery. So, be careful, okay?
– Take that heated iOpener and give the top edge of the screen a warm embrace for a solid two minutes. It’s like a cozy spa day for your device!
Tools Used
Step 18


– Slide a fifth opening pick under the top edge of the screen, just by the left corner. You’re doing great!
– Gently glide that opening pick over to the top right corner to break free the adhesive holding the screen’s top edge. Keep it up!
Step 19


If the screen seems a bit stubborn, take your trusty opening pick and gently glide it around the edges to break free any leftover adhesive. You’ve got this!
– Grab a little box or a few books and set them to the left of your phone. This will give your screen a cozy place to rest while you tackle that cable.
– Lift the right edge of the screen like you’re opening a book—smooth and easy does it!
– Once the screen is propped up, you’ll have all the room you need to reach the screen cable without any awkward stretches.
Step 20


– Let’s get this screen cable cover off! Use an opening tool to gently lift the top edge of the cover.
– Now, carefully remove the cover. Easy peasy, right?
Step 21


– Slide the tip of your spudger into the top right corner of the screen’s press connector with finesse.
– Gently nudge that cable up and disconnect it like a pro.
– Carefully lift off the screen as if you’re unveiling a masterpiece.
– When it’s time to reconnect, position the press connector over its socket and give one side a gentle press until it clicks — then do the same on the other side. Avoid pressing down in the middle, as that could bend the pins and lead to a bad day. If things get tricky, remember, you can always schedule a repair.
Tools Used

Step 22


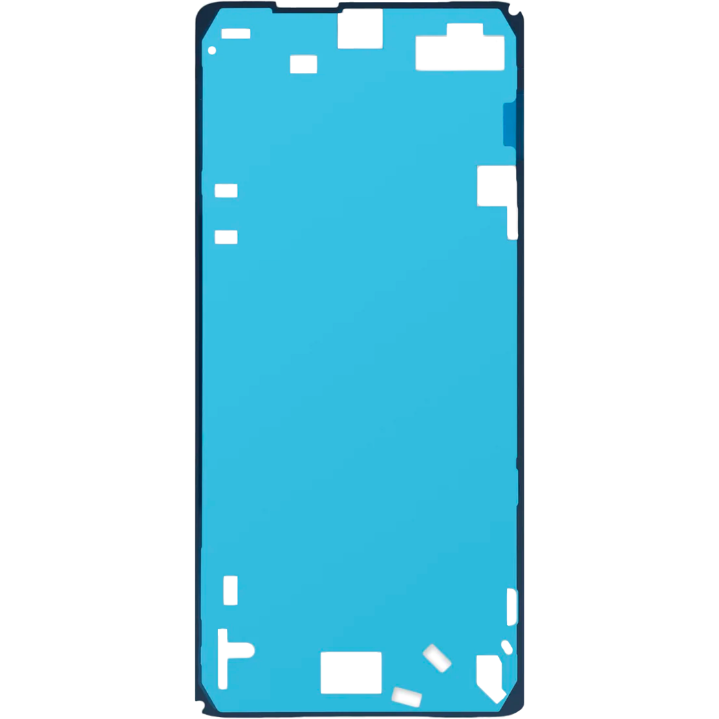
Got a shiny new screen with adhesive all ready to go? Awesome! Just keep this step in mind as you put everything back together. If you’re working with an old screen, no worries! Check out the guide for tips on how to apply adhesive like a pro.
And hey, if you really want that adhesive to stick, give your phone a gentle, even squeeze. It’ll help create a solid bond!
– Give your screen a good once-over for any sneaky plastic liners or tape, and use those handy pull tabs to peel them off. Don’t forget to check around the front camera cutout, the back of the screen, and the edges.
– Reconnect the screen cable and pop its cover back on.
– Now’s a great time to give your phone a quick test before sealing everything up. Power it on temporarily and make sure it’s working like a charm. Remember to turn it off again before moving on.
– Press the screen firmly into the frame—you should hear those clips click into place like they’re saying, ‘I’m home!’
– Give the perimeter of the screen a solid press to make sure it sticks down with the new adhesive.
– Check out this guide to get your fingerprint sensor calibrated just right.
Step 23


Heads up! Be careful not to scratch up or damage any of those little parts sticking up during this step.
Alright, let’s get this 5G mmWave antenna cable out of the way! We’re going to disconnect and detach it. If your phone doesn’t have a 5G mmWave antenna, just skip the next four steps and keep on rockin’!
– Slide the tip of your trusty spudger under the upper edge of the 5G mmWave antenna’s press connector with a gentle touch.
– Carefully lift up to disconnect the cable, and you’re on your way!
Tools Used
Step 24

Stick the 5G mmWave antenna cable to the midframe using three strong adhesive pieces. It’s like giving your cable a cozy little hug!
If you’re feeling a bit adventurous, use a hair dryer, heat gun, or hot plate to warm things up. Just keep it cool, as too much heat can give your battery a bad day!
– Warm up that iOpener and rest it on the 5G mmWave antenna cable for a cozy two minutes to help the adhesive chill out and loosen up.
Tools Used


Step 26


– Grab the bottom of the 5G mmWave antenna cable and give it a gentle peel from the midframe. It’s like removing a stubborn sticker, but way cooler (and hopefully less sticky!).
– When you’re putting everything back together, press the cable back onto the midframe to secure it with the old adhesive. If it’s feeling a little loose, don’t sweat it – just use some thin, double-sided tape to give it a helping hand. You got this!
Step 27


To get this repair done, you’ll need to carefully take out and replace a sizable graphite sheet. This little hero connects the top of the battery, midframe, and the rear cameras like a trusty bridge.
As you navigate this adventure, keep in mind that the graphite sections between the rear cameras and the battery might tear. If that happens, just grab the torn piece and give it a gentle pull to remove that section. You’ve got this!
– Gently slide the tip of a spudger under various sections of the graphite sheet and lift it up until you can comfortably grab it with your fingers.
– Carefully peel away and completely remove the graphite sheet.
– When putting everything back together, make sure to ditch the old graphite sheet. Check out this guide to swap it out for a fresh one.
Tools Used
Step 28


– Let’s loosen up that USB-C port cover! Take your trusty spudger and gently pry up the plastic shim that runs along the top.
– Now, carefully remove the shim and stash it somewhere safe. You’ll need it later, but for now, it’s outta the way so you can get to the USB-C port cover screws.
Tools Used
Step 29


– Alright, let’s get this show on the road! As you piece everything back together, don’t forget to swap out that plastic shim at the bottom of the midframe and loudspeaker. If you’ve got the old one still hanging around, just give it a little push back into its cozy spot.
– Time to say goodbye to the larger rectangular liner that’s been hanging out with the shim. Off it goes!
– Now, position the shim so the tiny foam piece lines up nicely with the USB-C port cover. It’s all about that perfect alignment!
– Grab your spudger and use the flat end to press down firmly along the shim. We want it to feel snug and secure. You got this!
– Finally, peel away the last liner. You’re almost there!
Tools Used
Step 30


Keep track of your screws as you go! It’s like a puzzle, but with tiny metal pieces. Make sure each screw goes back to its original spot. You wouldn’t want to mix things up!
The Pixel 8 Pro uses those special Torx Plus screws. But hey, regular Torx bits will also work. Just remember to keep the pressure steady and even when you’re turning those screws – you don’t want to strip them!
– Grab your trusty T3 Torx screwdriver and get ready to tackle those two 5 mm-long 3IP Torx Plus screws holding down the USB-C port cover. You’ve got this!
– Now, gently lift off the cover and reveal the magic inside.
Tools Used

Step 31


– Grab your trusty T3 Torx screwdriver and get ready to tackle those seven 5 mm-long 3IP Torx Plus screws holding the midframe in place. You’ve got this!
Tools Used
Step 32


– First up, let’s ditch that midframe! It’s time for it to go.
– As you put everything back together, take a moment to check on the thermal pad’s health. If it looks worse for wear, gently remove it. Grab some high-concentration (over 90%) isopropyl alcohol and a microfiber or lint-free cloth to clean the area thoroughly. After that, it’s time to pamper your device with a fresh thermal pad!

Step 34


– Grab your trusty spudger and gently wiggle its point under the front camera press connector. Give it a little lift to disconnect it, and you’re on your way!
Tools Used

Step 36


– Gently use the tip of a spudger to lift and disconnect all three rear camera press connectors from the top edge of the logic board. You’ve got this!
Tools Used
Step 37


Hold the 5G mmWave antenna cable out of the way while removing the rear camera assembly screws. You got this!
– Grab your trusty T3 Torx screwdriver and let’s get to work! Start by removing those two screws that are holding the rear camera assembly in place:
– There’s one 3.5 mm-long 3IP Torx Plus screw snugly secured in the top left corner, just waiting for you to take it out.
– And don’t forget about the 5 mm-long 3IP Torx Plus screw sitting comfortably in the top right corner. It’s time to set it free!
Tools Used
Step 38


– Feelin’ groovy? Let’s groove our way through this repair! First, check out that spudger like it’s a magical wand. Gently wave it between the right edge of that sneaky rear camera assembly and the frame, and then give it a little shimmy-shake to loosen it up! Next, let’s shimmy the rear camera assembly up and slide it away like it’s doing the salsa all by itself. Keep those digits dancing and you’ll have this repair wrapped up in no time! If you need a break from the dance floor, you can always schedule a repair by clicking here. schedule a repair
Tools Used
Step 39


– Slide one arm of your trusty angled tweezers under the metal neck of the black antenna cable coaxial connector, which is hanging out in the top left corner of the logic board.
– Gently lift straight up to free the cable from its cozy spot.
– To get the cable back in action, hold the connector right above its socket and give it a gentle press down with the flat end of a spudger—listen for that satisfying snap! If it’s being a bit stubborn, don’t force it; just reposition and give it another go.

Step 40


– Grab your trusty T3 Torx screwdriver and get ready to tackle those two 5 mm-long 3IP Torx Plus screws holding down the 5G mmWave antenna bracket. You’ve got this!
Tools Used
Step 41


– Gently wedge the tip of your spudger into one of the screw holes on the 5G mmWave antenna bracket.
– Carefully pry up with the spudger to free the bracket from its hold.
– Take out the bracket and set it aside for now.
– When it’s time to put everything back together, angle the bracket downwards so that those spring contacts and foam pads snuggle up against the 5G mmWave antenna. Give the bracket a gentle press down to lock it in place!
Tools Used
Step 42


No need to panic if the cable pops off the antenna! Just gently detach the antenna using your fingers. Remember to plug that antenna cable back in when you’re putting everything back together.
– Alrighty, let’s swing into action! Time to gently grab that 5G mmWave antenna cable and delicately lift the antenna out of its cozy little hole. Easy peasy, right? If you’re feeling stuck, no worries, you can always schedule a repair and let the pros handle it. But we believe in you, superstar!


Step 44


– Carefully slide that black antenna cable out of its cozy spot in the bottom right corner of the daughterboard. It’s like giving it a little hug! But remember, when you’re putting everything back together, be sure to tuck that cable back into its home. If it decides to wander off, it might not be too happy when you reinsert the rear camera assembly!
Step 45


– Grab your trusty T3 Torx screwdriver and get ready to rock! It’s time to unscrew that 3.5 mm-long 3IP Torx Plus screw that’s holding the earpiece speaker in place. You’ve got this!
Tools Used
Step 46


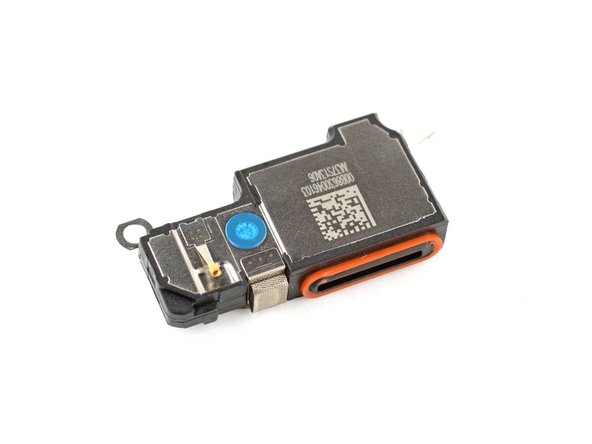
You might need to apply a little muscle here! When the speaker pops out, you’ll definitely know it—just listen for that satisfying ‘pop’ sound.
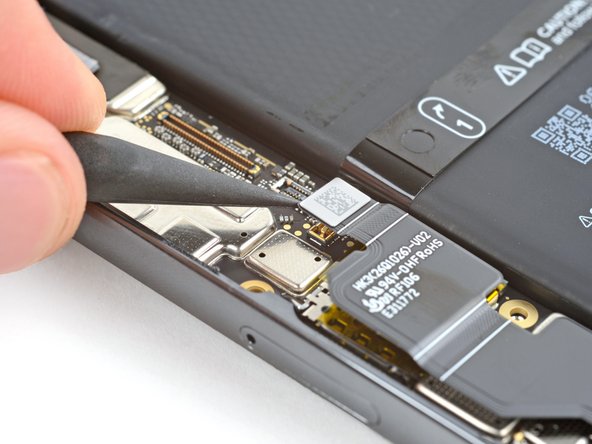
– Slide the flat end of a spudger under the earpiece speaker, right in the middle of the bottom edge.
– Gently pry the speaker up, and then give it a little wiggle to pop it out.
– When you put it back together, make sure the orange gasket on the speaker’s edge is angled downward before you slide it back in place. Push down firmly on the speaker until it clicks to secure it.
Tools Used
Step 47


– Slide one arm of your trusty angled tweezers right under the shiny metal neck of the black antenna cable coaxial connector, which is hanging out at the bottom of the earpiece speaker.
– Now, with a gentle touch, lift straight up to unplug that cable like a pro!
Tools Used
Step 48

– Gently free the antenna cable from its metal clip that’s waving at you from the speaker. You’ve got this!
Step 49


– Let’s give that antenna cable a little lift! Carefully lift it out of its groove in the earpiece speaker. You’ll see some yellow tape holding it in place.
– Now, using tweezers or your fingers, gently peel off the yellow tape. Think of it like removing a sticker, but be careful not to damage anything underneath!
Tools Used
Step 50

– Gently wiggle the antenna cable free from its snug little groove and take it out. You’ve got this!
Step 51


That little L-shaped antenna board is glued to the bottom of the earpiece speaker with some light adhesive. You got this!
– Time to get this antenna board off the earpiece speaker! Grab your trusty spudger and give it a gentle pry.
– Now, carefully remove that board.
– Alright, let’s put everything back together!
– Before you stick that antenna board back on the speaker, make sure it’s facing the right way – the antenna socket should be on the same edge as that cable groove.
– If your replacement speaker has adhesive already on it, peel off the plastic liner and press the board down. That’ll hold it in place.
– If your new speaker doesn’t have adhesive, use some thin double-sided tape like Tesa Tape to stick that board to the speaker.
Tools Used
Step 52
– Time to put your device back together! Just retrace your steps in reverse, and you’ll be all set.
– Want to check your device’s health? Give the built-in diagnostics tool a whirl – just click here.
– Got some e-waste? Make sure to drop it off at an R2 or e-Stewards certified recycler. Mother Earth will thank you!
– If things didn’t go quite as planned, don’t sweat it! A little basic troubleshooting can work wonders, or feel free to reach out to our awesome Answers community for a hand.
– Changed your mind? No problem! Just hit cancel and take a breather.
–
Success!