DIY Google Pixel 8 Pro Loudspeaker Replacement Guide
Duration: 45 minutes
Steps: 27 Steps
This repair guide was created by our awesome team at Salvation Repair. While we’re not officially backed by any big names, we’re here to help you every step of the way. For more info on our repair guides, check it out here.
Welcome to your go-to guide for swapping out the loudspeaker in your Pixel 8 Pro! If your speaker is sounding more like a broken record—think distorted sounds, crackles, or silence—then it’s time for a change. Grab some replacement screen adhesive, and let’s get cracking! Just a heads up: this guide is tailored for the 5G mmWave antenna model, but don’t fret if you have the non-mmWave version; just skip the steps that mention the 5G mmWave antenna, and you’ll be good to go. If you hit any bumps along the way, remember, you can always schedule a repair for a helping hand!
Step 1


Hey, before you get started, let your Pixel’s battery chill out and go below 25%. A fully charged battery can be a bit feisty if you’re messing with it, so let it relax a bit first. No worries, it’s all part of the adventure!
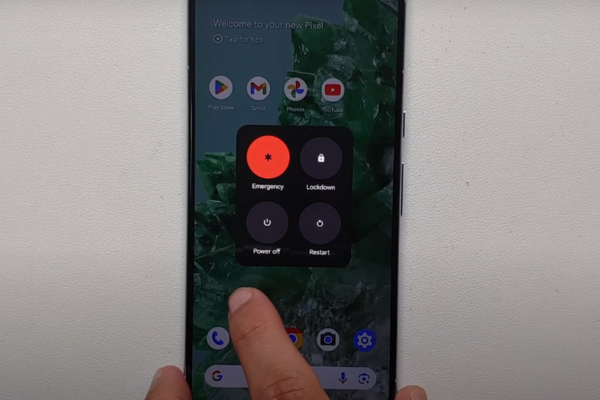
Hold down the power and volume up buttons at the same time and watch the magic happen! You’ll see the shutdown menu pop up. It’s like a secret menu for your device, but it’s not actually secret, it’s just cool.
– First things first, let’s give your phone a little break—unplug all those cables and let it breathe.
– Now, it’s time for a power nap! Completely shut down your phone so we can get started.
Step 2


Break out the opening picks to separate the screen from the frame! Just don’t go too deep, or you might accidentally harm your device. Use this tip to mark your pick and prevent any damage.
Or, you could tape a coin 3 mm from the tip of your pick.
– Grab your trusty ruler and measure out 3 mm from the tip. Give that opening pick a little love tap with a permanent marker to make your mark!
Step 3


Dealing with glass shards can be a real headache—not to mention, a safety hazard! If your phone’s screen is looking a bit worse for wear, don’t fret! Just follow these handy steps:
Be sure to only cover the glass area—steer clear of the frame when applying tape!
– Stick on some overlapping strips of packing tape to cover that cracked glass like a pro! Keep going until the entire screen is wrapped up snug and secure.
– Don those safety glasses to keep your peepers safe from any sneaky glass shards that might pop free during the repair. Better safe than sorry!
Step 4

The screen is held tight to the frame by adhesive and clips. A little heat works wonders, softening the adhesive and making it a breeze to peel apart.
You could also use a hair dryer, heat gun, or hot plate—but remember, too much heat can lead to screen or battery drama, so keep it cool!
– Get your heat gun nice and toasty and give the bottom edge of the screen a little love with some heat for about two minutes. This will help loosen up that sticky adhesive holding the screen in place.
Tools Used


Step 5


Get ready to meet the Anti-Clamp! In the next three steps, we’ll show you how this clever little tool can turn your opening procedure from a hassle into a breeze. Not using the Anti-Clamp? No worries! Just hop down three steps for a different approach.
Looking for the full scoop on using the Anti-Clamp? Dive into this guide for all the juicy details!
– Grab that blue handle and give it a good pull backwards—that’ll unlock those Anti-Clamp arms.
– Now, let’s get your phone comfy. Place it screen-side up on something stable, so it’s resting level between the Anti-Clamp’s arms. Make sure the bottom edge is hanging off a bit.
– Slide those arms over the left edge of your phone, so you can get to that bottom edge—we’re about to get cozy with those suction cups.
– Position those suction cups as close to the center of the bottom edge as possible. Think of it like finding the sweet spot.
– Now, give those cups a squeeze to create some suction. Hold on tight—we’re about to get things moving!
Step 6


– Gently slide that handle forward to give those arms a snug lock.
– Give the handle a cheerful clockwise twist—a whole turn should do it (that’s 360 degrees!), or until you notice those suction cups getting their stretch on.
– While they’re stretching, keep an eye on their alignment! If they start to dance out of line, just pop off the Anti-Clamp and a little tape will help those cups stick securely.
Step 7


Whoa there, partner! Don’t go crazy with that opening pick. Keep it chill and slide it in no more than 3 mm. You don’t want to mess with those spring contacts, right?
– Take a minute to chill while a little gap forms between the screen and the frame.
– Slip an opening pick into that sweet spot.
– Gently pull the blue handle back to release the arms and let the Anti-Clamp go using those handy pull tabs on the suction cups.
– Feel free to skip the next two steps and keep it moving!
Step 8


– Get ready to rock and roll! Grab your trusty suction handle and center it right on the bottom edge of your screen. It’s gonna be a smooth ride, trust me!
Tools Used

Step 9


Having trouble creating a gap? Add a bit more heat and give it another go.
– Give that suction handle a good tug! You’re gonna see a little gap open up between the screen and the frame. Just a little more pressure, you got this!
– Now, gently slip that opening pick into that little gap. Careful, we don’t want to scratch anything!
Tools Used
Step 10


– The screen cable is located just shy of halfway up the left edge of the phone. Handle with care to keep that cable intact!
– You’ll find a bunch of spring contacts all around the phone’s perimeter. Tread lightly in these areas to avoid bending those little guys.
Step 11


– Let’s slide that opening pick along the bottom edge to get that adhesive loose. It’s like giving the phone a little massage!
– Keep that pick in the bottom right corner, so the adhesive doesn’t get all cozy and stuck together again.
Step 12

If you’re feeling adventurous, grab a hair dryer, heat gun, or hot plate for a little warmth—but remember, too much heat can be a real screen and battery buster! Stay safe out there!
– Warm up that iOpener and give it a cozy two-minute hug on the right edge of the screen. It’s like a spa day for your device!
Tools Used
Step 13


– Slide a second opening pick under the bottom right corner of the screen, just like tucking in a cozy blanket.
– Gently glide that new pick all the way to the top right corner to break free the adhesive holding the screen’s right edge hostage.
– Keep that pick in the top right corner to ensure the adhesive doesn’t decide to play hide and seek again.
Step 14


– Slide a third opening pick right under the bottom edge of the screen, just like a ninja!
– Gently glide that new pick over to the bottom left corner, making sure to keep it smooth.
– Now, let that pick chill in the bottom left corner to stop that pesky adhesive from sticking back together!
Step 15

Alternatively, if you’re feeling resourceful, grab a hair dryer, a heat gun, or even a hot plate! Just be cautious, as using too much heat can be a real screen and battery buster. Keep it cool, and you’ll be fine!
– Warm up the left edge of the screen with a cozy iOpener for a delightful two minutes.
Tools Used
Step 16


– Slide a fourth opening pick under the bottom left corner of your screen, like you’re tucking in a cozy blanket.
– Gently glide that new pick up to the top left corner to break free the adhesive that’s holding the screen’s left edge hostage.
– Keep the pick in that top left corner to make sure the adhesive doesn’t decide to play hide and seek again.
Step 17

Alternatively, you can grab a hair dryer, heat gun, or hot plate—but tread lightly! Too much heat can be a screen and battery’s worst nightmare.
– Warm up that iOpener and give it a cozy two-minute hug on the top edge of the screen. It’s like a spa day for your device!
Tools Used
Step 18


– Let’s get this screen separated! Slide your trusty opening pick under the top edge of the screen, near the left corner.
– Now, smoothly slide the opening pick to the top right corner. You’re practically done with this part – you’ve got this!
Step 19


If your screen is feeling a bit clingy, take a moment to glide that opening pick around the edges again to break free any stubborn adhesive that might be holding it back.
– Grab a little box or a few books and place them to the left of your phone. This will give your screen the perfect lift while you disconnect its cable.
– Next, swing the right edge of your screen up like the cover of your favorite book – nice and easy.
– Now, prop that screen up so you can reach the cable without any awkward straining. You’re doing great!
Step 20


– Grab your trusty opening tool and gently lift the top edge of the screen cable cover. You’ve got this!
– Now, go ahead and take that cover off. Easy peasy!
Step 21


– Slip the spudger’s tip right under the top right corner of the screen’s press connector like you’re sneaking a snack.
– Gently nudge it up to disconnect the cable, like lifting the lid on a treasure chest.
– Carefully take out the screen, as if unwrapping a precious gift.
– To get that press connector back in action, line it up with its socket and give one side a gentle press until you hear that satisfying click. Then, do the same on the other side. Remember, no middle pressing! If you misalign it, those tiny pins could bend and end up in a world of hurt.
Tools Used

Step 22


Got a shiny new screen with adhesive all set? Perfect! Just follow this step while putting everything back together. If you’re working with an older screen, no worries—check out the guide to get that adhesive on right.
Feeling extra? You can give that adhesive bond a boost by pressing down evenly on your phone. It’ll help keep everything snug!
– Give your screen a good look-over for any sneaky plastic liners or tape hiding out. Grab those pull tabs and peel them away. Don’t forget to check around the front camera cutout, the back of the screen, and along the edges.
– Time to reconnect that screen cable and pop its cover back on!
– Here’s a perfect moment to put your phone to the test before sealing everything up. Power on your device temporarily to make sure it’s all good. Just be sure to power it down again before we move on.
– Press the screen firmly onto the frame—you’ll love the satisfying ‘pop’ as the clips lock into place.
– Give a solid press around the edges of the screen to make sure it’s stuck down tight with that fresh adhesive.
– Check out this guide to get your fingerprint sensor calibrated just right.
Step 23


– Let’s gently pry off that little plastic shim along the top of the USB-C port cover using the tip of your trusty spudger.
– Now that we’ve freed it, set the shim aside for safekeeping. You’ll need it again later, so don’t lose it! Now we can get to those USB-C port cover screws.
Tools Used
Step 24


– Alright, let’s put things back together! First, get that plastic shim that goes across the bottom of the midframe and loudspeaker. If you’re missing one, just nudge the old one back into its cozy spot.
– Next up, peel off the larger rectangular liner from the shim. Time to make some space!
– Now, position the shim so that the smaller foam piece lines up perfectly with the bottom of the USB-C port cover. It’s all about that alignment!
– Grab your trusty spudger and with the flat end, give the shim a solid press down along its length to secure it nice and tight.
– Finally, strip off the remaining liner and you’re all set!
Tools Used
Step 25


As you tackle this repair, keep an eye on those little screws! They have a knack for wandering off, so make sure each one finds its way back home.
The screws you’re dealing with might be Torx Plus, but don’t sweat it if you only have standard Torx bits on hand; they’ll do the job just fine. Just remember to apply steady, downward pressure to keep things from going sideways!
– Grab your trusty T3 Torx screwdriver and give those two 5mm-long 3IP Torx Plus screws securing the USB-C port cover a little spin. They’re ready to come out!
– Now, gently remove the cover. You’re doing great!
Tools Used

Step 26


– Alright, let’s get that speaker out! Grab your trusty T3 Torx screwdriver and give that 5mm-long 3IP Torx Plus screw holding the speaker in place a little twist. It’s like a tiny dance to loosen up that speaker.
Tools Used
Step 27


– Ready to put your device back together? Just retrace your steps in reverse and you’ll be all set!
– Want to check if everything’s working smoothly? Give the built-in diagnostic tool a whirl by clicking here.
– Got some old gadgets lying around? Make sure to recycle them responsibly at an R2 or e-Stewards certified recycler.
– Things not going as smoothly as you hoped? No worries! A little troubleshooting can work wonders, or you can always reach out to our awesome community for advice.
– Not quite finished with this guide? No problem, just hit cancel!
–
Tools Used
Success!