DIY Google Pixel 8 Pro Screen Replacement Tutorial
Duration: 45 minutes
Steps: 22 Steps
This repair guide was created by our awesome team at Salvation Repair. While we’re not officially backed by any big names, we’re here to help you every step of the way. For more info on our repair guides, check it out here.
This handy guide is brought to you by the awesome folks at Salvation Repair. While we’re not officially backed by any big names, we’re here to help you tackle that pesky broken screen on your Pixel 8 Pro. Grab some replacement screen adhesive, and let’s get to work! If you find yourself in a jam, remember, you can always schedule a repair.
Step 1


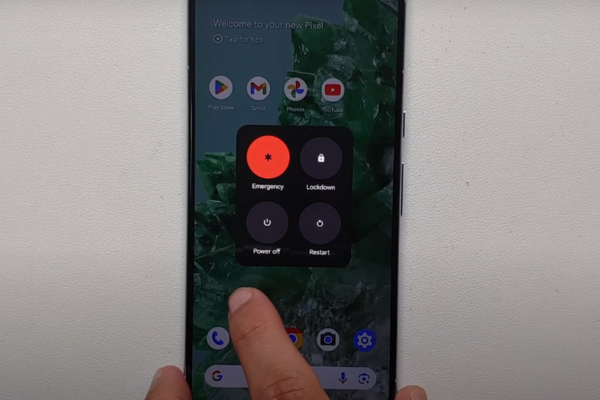
Make sure your Pixel’s battery dips below 25% before diving into this repair. A fully charged lithium-ion battery can be a fire hazard if it gets damaged.
Hold down the power and volume up buttons together to bring up the shutdown menu. You’ve got this!
– First things first, let’s disconnect those cables from your phone. Give it some breathing room!
– Now, it’s time to say goodbye to the power! Completely turn off your phone to get ready for the next steps.
Step 2


Get ready to use those opening picks to gently pry the screen away from the frame. Remember, if you push a pick in too deep, it could cause some trouble for your device. So, take a moment to mark your pick to keep everything safe and sound!
As a fun little tip, you can stick a coin to a pick about 3 mm from the end. It’s a handy trick to help you out!
– Take your trusty permanent marker and measure 3 mm from the tip of the opening pick. Give it a little mark to guide your way!
Step 3


Those glass shards are like a bunch of tiny ninjas—super tricky to work around, and not to mention dangerous! If your phone’s got a cracked screen, just follow these easy steps:
Tape up that glass just right—just the glass, no sticky business on the frame, you know what I mean?
– Get ready to be a superhero! First, we’re going to wrap up that cracked screen in packing tape like it’s getting ready for a wild adventure. We’ll need to cover the whole thing, so make sure those strips overlap like they’re best friends.
– Now, put on those safety glasses. We don’t want any stray shards of glass getting too close to your beautiful eyes. Safety first, right?
Step 4

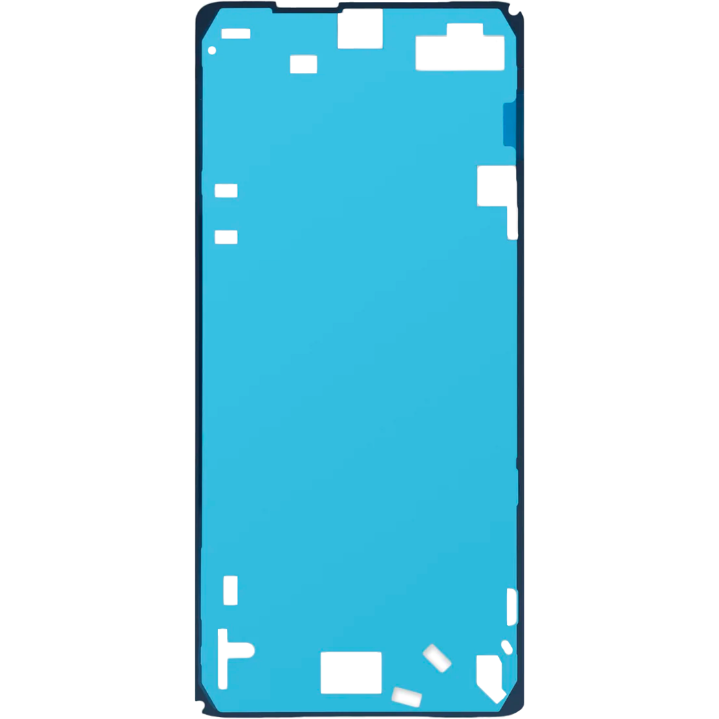
To secure the screen to the frame, adhesive and clips do the job. Warming the screen makes the adhesive more pliable and easier to part.
A hair dryer, heat gun, or hot plate can also be used, but handle with care—excessive heat might damage the screen and/or battery.
– Warm up an iOpener and place it along the bottom edge of the screen for a cozy two minutes to loosen that sticky adhesive. Get ready to make some magic happen!
Tools Used


Step 5


In the next three steps, we’ll introduce you to the Anti-Clamp, our nifty little tool designed to make opening your device a breeze. If you’re not using the Anti-Clamp, feel free to skip ahead three steps for a different approach.
For detailed instructions on how to master the Anti-Clamp, check out this guide.
– Give that blue handle a good yank backwards to unlock the Anti-Clamp’s arms. You’ve got this!
– Now, gently lay your phone screen-side up on a flat surface, so it rests comfortably between the Anti-Clamp’s arms—make sure the bottom edge hangs over a bit.
– Slide those arms over the left edge of your phone, so you can get to that bottom edge. You’re almost there!
– Position those suction cups as close to the center of the bottom edge as possible. You’re on a roll!
– Now, give those cups a good squeeze to create a strong suction. Let’s do this!
Step 6


– Give that handle a gentle pull forward to lock those arms in place.
– Now, twist the handle clockwise all the way around (that’s a full 360 degrees!), or until you see those suction cups starting to stretch out.
– As those cups stretch, keep an eye on their alignment. If they start to slip, no worries! Just take off the Anti-Clamp and use some tape to help those cups stick.
Step 7


Be careful not to push your opening pick more than 3 mm in, or you might accidentally give those spring contacts a bad day.
If that sticky stuff doesn’t budge, give the handle a little twist to the right – just a quarter turn! – and let it hang out for another minute. If things start to cool down, just give ’em another blast of heat to keep things toasty.
– Hang tight for about a minute while a little gap opens up between the screen and the frame.
– Slide an opening pick into that gap like a pro.
– Gently pull the blue handle back to unlock the arms, and then use the pull tabs on the suction cups to remove the Anti-Clamp—easy peasy!
– Feel free to skip the next two steps; you’ve got this!
Step 8


– Grab your trusty suction handle and give the center of the screen’s bottom edge a friendly hug!
Tools Used

Step 9


Having trouble making some space? Give that heat another go and try again!
– You won’t believe how much fun you’ll have breaking into this! Go ahead and give that suction handle a good ol’ strong, steady pull. Awesome! Now, let’s make that opening pick unpack the secret compartment with a click!
Tools Used
Step 10


Hey there, sunny-side up, keep that pickie pup within 3 mm reach as you work on separating the screen adhesive. These spots are where it’s at! If you need a hand, our pals at Salvation Repair are just a click away: schedule a repair
– The screen cable is positioned just shy of the halfway mark up the left edge of your phone. Tread carefully to keep that cable intact!
– You’ll find a bunch of spring contacts all around the edge of the phone. Approach these areas with caution to prevent any bending of the contacts.
Step 11


– Gently glide that opening pick along the bottom edge to break free the adhesive that’s holding everything together.
– Pop the pick into the bottom right corner and let it chill there to keep the adhesive from sticking back.
Step 12

Alternatively, you could grab a hair dryer, heat gun, or hot plate—but tread carefully! Too much heat might just throw a party for your screen and/or battery, and we don’t want that kind of drama.
– Warm up the right edge of the screen with a heated iOpener for a couple minutes. You’ll be ready to go in no time!
Tools Used
Step 13


– Pop a second opening pick right under that bottom right corner of the screen!
– Now, glide that pick all the way to the top right corner to break free the adhesive holding down the screen’s right edge.
– Keep that pick snugly in the top right corner to stop the adhesive from getting all clingy again.
Step 14


– Slip a third opening pick under the bottom edge of the screen like a pro.
– Gently slide that new pick over to the bottom left corner.
– Keep the pick in place at the bottom left to stop that pesky adhesive from sticking back down.

Step 16


– Slide a fourth opening pick under the bottom left corner of the screen, like tucking in a cozy blanket.
– Gently glide that pick to the top left corner to break free the adhesive holding the screen’s left edge in place.
– Keep that pick snug in the top left corner to stop the adhesive from playing tricks and resealing.
Step 17

Alternatively, you can try using a hair dryer, heat gun, or hot plate—but be warned that too much heat can damage the screen and/or battery. If you’re feeling lost, you can always schedule a repair!
– Warm up that iOpener and give it a cozy two-minute hug on the top edge of the screen.
Tools Used
Step 18


– Let’s get this screen separated! Slide a fifth opening pick under the top edge of the screen, close to the left corner. Now, slide the pick to the top right corner to gently loosen the adhesive holding the screen in place.
Step 19


If that screen is feeling a little stubborn, just go back around the edges with your opening pick and gently work that adhesive loose. You’ve got this!
– Grab a small box or a stack of books and set it to the left of your phone. This will give your screen a little lift while you disconnect its cable.
– Gently swing up the right edge of the screen, just like flipping open the front cover of a book.
– Prop the screen up comfortably so you can easily access the screen cable without putting any strain on it.
Step 20


– Grab your trusty opening tool and gently lift the top edge of that screen cable cover. You’ve got this!
– Now, go ahead and take that cover off with care.
Step 21


– Slide the spudger gently under the top right corner of the screen’s press connector—like a secret agent on a mission!
– Carefully lift up to disconnect the cable; think of it as giving it a little hug goodbye.
– Now, let’s say goodbye to the screen—remove it with care.
– When it’s time to reconnect the press connector, line it up just right over its socket. Gently press down on one side until you hear that satisfying click, then do the same for the other side. Avoid pressing down in the middle, as that can lead to some wonky pin issues. If things get misaligned, those little pins can bend and create lasting damage.
Tools Used

Step 22


Got a shiny new screen with adhesive already on it? Awesome! Just remember to follow this step when putting everything back together. If you’re working with your old screen, no worries—check out this guide to get that adhesive on just right.
For an even stronger hold, give your phone a little love by applying even pressure across the surface. It’s like a gentle hug for your device!
– Time to bring your device back together! Just follow these steps in the reverse order, and you’ll be all set.
– Want to check if everything’s working smoothly? Run a diagnostics test with the built-in Diagnostic tool; just click here.
– When it’s time to say goodbye to your old tech, make sure to take it to an R2 or e-Stewards certified recycler—let’s keep our planet happy!
– If things didn’t go quite according to plan, no worries! Try some basic troubleshooting, or swing by our Answers community for a hand.
– Oh no, didn’t finish the guide? No problem, feel free to cancel anytime!
– You’re not alone on this journey—it’s a repair adventure!
Success!