DIY Google Pixel 8a Battery Replacement Guide: Step-by-Step Tutorial
Duration: 45 minutes
Steps: 31 Steps
This handy repair guide is brought to you by the amazing team at Salvation Repair! While it’s not officially endorsed by any big names, it’s packed with all the info you need. If you want to dive deeper into our guides, just click here.
Welcome to your go-to guide for swapping out the battery on your Google Pixel 8a! Keep in mind that lithium-ion batteries don’t last forever. If your device struggles to hold a charge or suddenly powers down, it could be time for a new battery. And if you notice any swelling, be sure to handle it with care. To tackle this repair, you’ll need a replacement battery, back cover, and flash unit adhesives. Just a heads up: any repair might affect your phone’s water resistance, so make sure to reapply that back cover adhesive properly to maintain it. If you need help, you can always schedule a repair.
Step 1


Hey, before we get started, it’s good to let your phone’s battery power drop below 25%. That way we can keep everyone safe and avoid any unexpected sparks or surprises. Don’t worry, it’s all part of the process! If you’re not comfortable with this step, you can always schedule a repair.
Give those power and volume up buttons a simultaneous squeeze to pop up the shutdown menu. You’ve got this!
– First things first, let’s loosen things up! Go ahead and unplug all those cables from your phone.
– Now it’s time to give your phone a little break. Make sure to power it down completely.
Step 2


The back cover is held in place with some sticky stuff all around the edges and near the cameras. To keep your phone’s insides safe and sound, pay attention to the following:
– When you’re working around the edges, keep your tool on the lighter side! Aim to avoid going deeper than 3 mm, which is about the width of your trusty opening tool’s flat section.
– And hey, when it comes to the camera bump, give it some space—no sneaking your tool underneath those edges!
Step 3


Your opening tool has a flat side and a curved side. When it’s time to start the opening adventure, grab the flat side and tilt it so the sharp edge is facing up!
– Whoa, awesome! It’s time to get your hands a little dirty and free that phone or tablet! Start by finding the sharpest corner of your friendly neighborhood opening tool and slide it between the back cover and the frame, great job!
Step 4


– Let’s get this party started! Slide your trusty opening tool along the bottom edge to loosen that glue holding the back cover in place. It’s like giving the cover a little dance move!
Step 5


– Gently glide your opening tool around the bottom right corner and up the right edge, pausing just before you reach the bottom of the camera bump.
– Carefully lift your opening tool out from under the back cover.
Step 6


– Slip your opening tool under the top right corner of the back cover, just above the camera bump.
– Glide your opening tool along the top edge, stopping at the top left corner just above the camera bump.
– Take out your opening tool from under the back cover.
Step 7


– Gently slide your trusty opening tool beneath the left edge of the back cover, right below that camera bump—it’s like a secret entrance!
– Now, glide that tool down the left edge to break free all that sticky adhesive. You’re making progress!
Step 8


– Gently slide an opening pick beneath the top left corner of the back cover, aiming for the tip to snuggle up to the upper edge of the camera bump.
– Now, glide that pick over to the right, halting when you meet the right edge of the cameras. Nice and easy!
Whoa, this strip of adhesive is a real camera bump-kin, holding down the top edge of the back cover! Time to let it go and insert your opening pick more than 3mm along the top edge. Don’t worry if it’s a little tricky, we’ve all been there. If you need help, you can always schedule a repair. Keep up the great work!
Step 9


A final strip of adhesive just below the camera bump helps keep that back cover snug and secure.
– Slide the flat edge of your trusty opening pick right under the back cover, just a hair below that camera bump. You’re doing great!
– Now, grab a second opening pick and pop it in the same spot on the opposite side. Keep it steady, and you’re on your way!
Step 10


Hey there! Just a friendly reminder to keep that back cover straight and narrow—bending is a no-go! If the adhesive is playing hard to get, give the cover a little shimmy side-to-side to help it loosen up. You’ve got this!
If the adhesive is being stubborn, try gently warming the back cover just below the camera bump with a hair dryer or iOpener to make the adhesive more pliable.
– Use both picks to gently pry upwards at the same time, applying steady pressure to break free the last bit of adhesive holding on the back cover. You’re almost there!
Tools Used


Step 11


– Time to pop off that back cover!
– As you piece everything back together:
– Now’s the perfect moment to give your phone a little test run before you seal it up. Power it on, make sure it’s working like a charm, then shut it down again before diving back into reassembly.
– Check out this guide to apply some fresh adhesive and snugly fit your back cover back in place.
Step 12


Just warm up the flash until it’s cozy to the touch! Remember, the battery and its buddies are pretty sensitive to heat, so let’s keep it safe.
If you’re feeling a bit chilly, you can always bust out your trusty iOpener or heat gun to warm up that flash. It’s like giving it a little warmth hug before you work your magic!
– Grab your hairdryer and give that flash unit a little warm-up. It’ll help loosen the glue holding it to the logic board cover, making it easier to remove.
Tools Used

Step 13


Hey, those flash cables are pretty delicate, so be gentle! You don’t want to accidentally tear it, right?
Step 14


As you dive into this repair, remember to keep a close eye on each screw and return them to their original homes! They’ll appreciate the trip back.
The Pixel 8a might seem like a Torx Plus fan, but don’t worry, standard Torx bits are totally invited to the party! Just be sure to apply steady, downward pressure to avoid any stripping mishaps.
– Grab your trusty Torx Plus 3IP screwdriver and let’s tackle those 15 screws holding the logic board cover in place:
– You’ll find thirteen screws, each measuring 4.3 mm long, waiting to be removed.
– And don’t forget about the two little guys that are 1.9 mm long – they need some love too!
Step 15


Handle with care! The spring contacts around your phone’s edges are delicate little guys. Make sure to only pop your tool in where we’ve told you to!
– Let’s start by gently inserting an opening pick under the bottom right corner of the logic board cover. Give it a little wiggle to release the clip. You got this!
– Now, let’s do the same thing on the top right corner. Find the notch near the top right corner of the logic board cover (just below the screw hole), and give it a little pry with the tip of a spudger. You’ll release another clip and be one step closer to victory!
Tools Used

Step 16


– Gently lift the top edge of the logic board cover and guide the flash unit through its designated cutout. You’ve got this!
– As you put everything back together, make sure to thread the flash through its cutout while lowering the logic board cover into position. Take your time; it’s all part of the fun!
Step 17


– Time to unveil the magic! Gently lift off the logic board cover, making sure to watch out for that sneaky wireless charging coil that’s still attached. You’ve got this!
Step 18


– Grab some tweezers or your trusty fingers to gently lift off the metal cover on the right edge of your phone. You’ve got this!
– As you put everything back together, remember to tuck the upper left corner of the cover under the hook on the logic board before laying it down in its cozy spot.
Tools Used

Step 19

This guide is based on the Verizon model (G8HHN) Pixel 8a, which comes with an additional cable and connector for the 5G mmWave antenna, located just to the left of the battery connector. If you’re rocking the non-mmWave version, feel free to breeze past any steps that mention the antenna cable.
Step 20


Hey there! Just a friendly reminder to be gentle when prying around the battery and those 5G mmWave connectors. Stick to the spots we’ve indicated to avoid any accidental mishaps with those delicate components!
Ready to reattach that connector? Simply line it up over the socket and gently press down on one side until you hear that satisfying click! Then, do the same for the other side. It might take a couple of attempts to get it just right, but don’t sweat it—you’re doing great!
– Time to give that battery connector a little nudge! Slide the flat end of your spudger under the right side of the battery connector and gently pry it upward. You’re disconnecting it, so be careful not to damage anything!
Tools Used


Step 24

– Flip that side button tab over to the left edge of your phone to keep it clear from the battery. Easy peasy!
Step 25

Watch out for overheating that screen! It’s a bit of a drama queen when it comes to heat, so spread that warmth around and don’t focus it in one area.
– Flip your phone over and give that screen a little love! Use a hairdryer, heat gun, or hot plate to warm up the whole frame. You want it to be toasty all over, like a warm hug for your phone!
Tools Used
Step 26


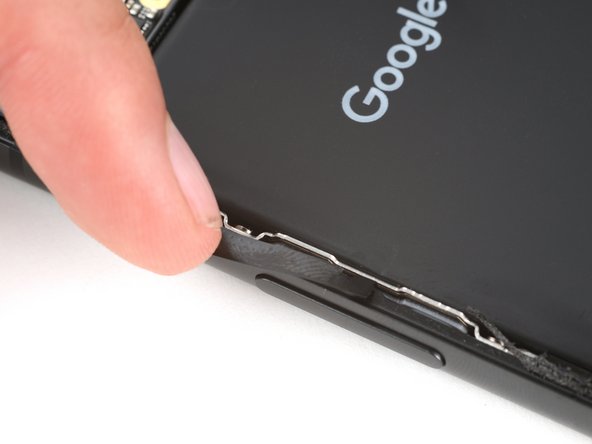
– Now, take your trusty opening pick and slide the flat end gently between the left edge of the battery and the frame. It’s like giving your battery a little hug, but with a tool!
Step 27


Be super careful not to squish or poke that battery—an injured battery can be a real safety concern!
If you’re getting frustrated, try using a bobby pin or two side by side to get more traction. If the battery’s not budging, add a few drops of a super strong rubbing alcohol to the left edge, lift up your phone, and wait a minute for that gum to lose its stickiness!
– Hold that frame tight with one hand, and with your free hand, sneak in the opening pick to gently lift that battery out! Keep the pick steady for about a minute; patience is key!
– Once you feel the adhesive loosening its grip, gently slide the pick deeper under the battery and keep prying it up. You got this!
Tools Used

Step 28
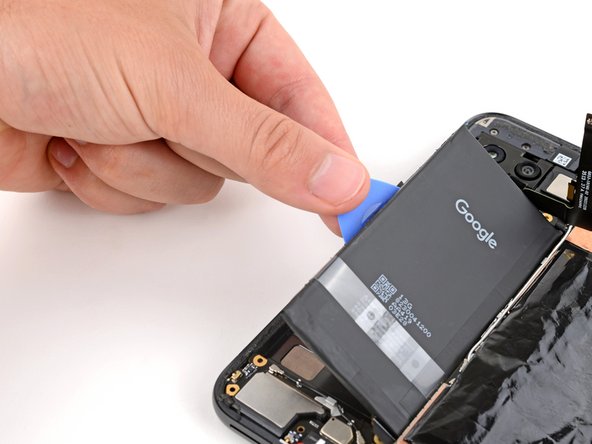

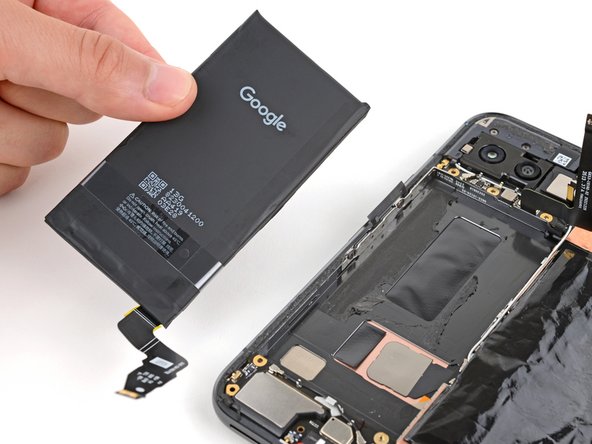
– Grab your trusty opening pick and gently pry up the battery, making sure to break free any stubborn adhesive hanging on for dear life.
– Now, go ahead and lift that battery out like it’s your favorite gadget’s grand finale.
Step 29

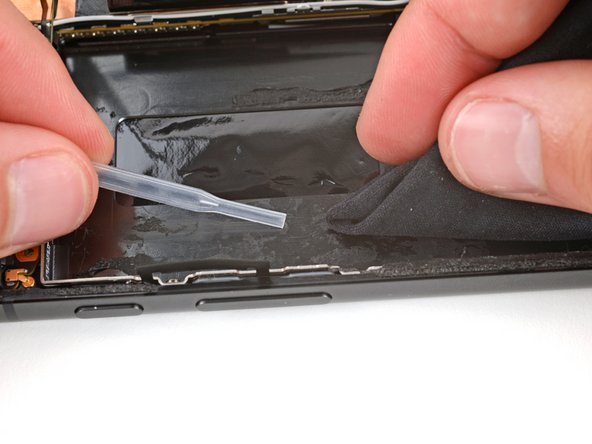
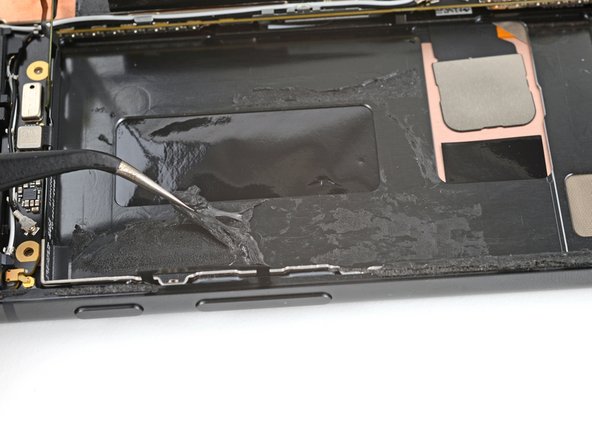
– Grab that spudger and use its flat end to scrape a bit of the old adhesive into a nice little ball – big enough to grab with your trusty tweezers.
– With your tweezers (or fingers, if you’re feeling bold), gently peel away and toss the old adhesive from the frame.
– For any sticky residue that’s still hanging around, add a few drops of some potent isopropyl alcohol (over 90%) and give it a good wipe with a lint-free or microfiber cloth.
Tools Used
Step 30


Got a battery with adhesive already on it? Just peel off those adhesive liners and you can skip ahead to the next step! No fuss, no muss.
If you’re rolling with a battery that needs a little extra love, grab some thin, double-sided tape to keep it snug and secure.
– Let’s get started! Begin by peeling off that big, clear liner from the two battery


