DIY Google Pixel XL Daughterboard Replacement Guide
Duration: 45 minutes
Steps: 27 Steps
This guide was put together by the awesome folks at Salvation Repair. While Google thinks our guide is cool, they haven’t officially given it a thumbs up.
Heads up! The Pixel XL’s display is a bit delicate, so handle it with care!
Hey there! This handy guide is brought to you by the awesome folks at Salvation Repair. While we haven’t gotten a thumbs up from Google, we’re here to help you through the process of swapping out the daughterboard (also known as the charging assembly or charging port board) on your Google Pixel XL. Just a heads up: the Pixel XL’s display panel is a bit of a diva – it’s fragile and stuck on with some serious adhesive, which can make things tricky. If your display has any micro-fractures, be extra cautious; there’s a good chance it could break. Remember to heat things up nicely and take your time during the prying phase. If you need help, you can always schedule a repair!
Step 1


You can use a hair dryer, heat gun, or hot plate to help out, but remember to keep it cool! Overheating your phone can lead to some serious heat damage to the display and internal battery. So, let’s keep it chill while we work our magic! If you need help, you can always schedule a repair.
– Let’s get started by heating an iOpener and applying it to the top edge of the display for about two minutes – this will help loosen things up.
– Before you dive in, take a moment to familiarize yourself with the following areas to avoid any potential pitfalls:
– There’s a thin layer of adhesive stuck to the display panel, so be gentle
– And some thicker adhesive in other spots, which we’ll tackle together
– You’ll also want to be mindful of the OLED display panel, which can be pretty delicate
– Not to mention the display cable, which is easy to damage if you’re not careful while prying – but don’t worry, we’ve got you covered. If you need help, you can always schedule a repair
Tools Used

Step 2


Be careful not to insert the pick more than 13 mm (0.5 inches) – going too far can damage the display assembly. If you’re unsure, don’t hesitate to schedule a repair and let the pros at Salvation Repair help you out.
Feel free to grab a playing card instead of an opening pick to help you get started with that first entry.
– When the edge feels nice and warm, grab your suction cup and place it close to the edge.
– Give that suction cup a little lift, then sneak an opening pick into the gap you’ve created.
– If you’re having a tough time making that gap, just reheat the edge and give it another shot!
Step 3


Don’t cut deeper than 13 mm (0.5 inches) or you might mess up the display!
There’s a mesh over the earpiece speaker on the top edge of the screen. No replacement mesh? Just take care not to damage or lose it. If you need help, you can always schedule a repair
– Time to get started – slide that opening clip across the top edge to carefully cut through the adhesive. Take your time, you got this!
– Now, leave an opening pick in the edge to keep the adhesive from resealing. If you need help, you can always schedule a repair
Step 4


Keep it cool—don’t push the pick more than 1 mm (1/32″) in, or you might mess up the display assembly. If you need help, you can always schedule a repair.
– Warm up that iOpener and give it a cozy spot on the right edge of your phone for a solid two minutes.
– Slide an opening pick in near the top edge of the phone, right where you’ve already tackled that adhesive.
– Gently guide the pick around the right corner like you’re taking a leisurely stroll.
– Carefully slide the pick down the right edge of the phone to slice through the adhesive like a pro.
– Now, let’s do the same for the left edge of the phone. You’ve got this!
Tools Used
Step 5


Keep your slicing to a maximum of 8.5 mm (1/3″)—going deeper could put a serious dent in that display cable!
– Warm up the bottom edge using an iOpener for a cozy two minutes.
– Gently pop in a pick at the right edge where the adhesive is feeling a bit loose.
– Carefully navigate the pick around that tricky corner.
– Slide the pick along the bottom edge to smoothly cut through the adhesive.
Tools Used
Step 6

Hey there! Just a friendly reminder: don’t try to take off the display assembly just yet. It’s still connected by a flex cable, and we wouldn’t want any accidental mishaps!
– After you’ve made your way around the edges of the phone, gently lift the display assembly a bit from the right corners.
– Grab an opening pick and glide it through any leftover adhesive like a pro.
Step 7


Just a friendly reminder: be gentle with that flex cable while you’re swinging the assembly around!
Step 8


As you go through this repair, keep track of every screw—put it back exactly where it came from.
Step 9


To reconnect press connectors like this one, line it up carefully and press down on one side until you hear a click, then do the same on the other side. Avoid pressing down in the middle. Misaligned connectors can bend pins and cause permanent damage.
– Grab your trusty spudger and gently pry up to disconnect the display cable from its connector. If you need help, you can always schedule a repair.
Tools Used

Step 10


– Start by gently removing the display assembly. You’ve got this!
– For a detailed walkthrough on reinstalling the Pixel XL display, check out this guide.
– If your new display is missing a speaker grille, no worries! Use tweezers to carefully peel the adhesive grille from your old display and transfer it to the new one.
– Before you pop in that shiny new display, make sure to clear away any leftover adhesive from the frame. A spudger or opening tool will do the trick, and a little high-concentration isopropyl alcohol will help eliminate any stubborn residue.
– If you’re putting back the same display assembly, don’t forget to clean off all adhesive residue from both the panel and the frame before applying fresh adhesive.
– Remember to power on your phone and test your repair before sealing everything up with new adhesive. It’s always good to double-check!
– During the boot-up after reassembly, the screen will go through a calibration sequence. Hands off the screen during this time to avoid any touch calibration hiccups!
Tools Used
Step 11

– Let’s get started with some screw removal! First up, take out these screws that are holding the midframe snugly to the back:
– Seven black 4 mm T5 screws – easy peasy!
– Two shiny silver 3 mm T5 screws – they’ll come out smooth!
Step 12

– The midframe is snugly secured by those clever little plastic clips that pop right into the back case’s edge. Isn’t that neat?
Step 13


– Locate the tiny notch in the bottom left corner of the frame and gently slide in an opening pick.
– Carefully glide the opening pick along the bottom edge of the phone towards the bottom right corner and let it rest there.
Step 14


This might be a bit tricky due to the snug fit, so be prepared to put in some elbow grease! If you’re finding it tough, a playing card can be your best buddy—just slide it in and give it a gentle nudge.
– Slide a trusty opening pick into the right edge of your phone, just a smidge above the bottom.
– Gently nudge the pick upwards along the seam until you hear that satisfying pop of the first clip coming free.
– Once that clip is happily released, keep the opening pick where it is to stop the midframe from playing hard to get again.
Step 15


Be careful not to push the pick in too far – about 2 mm is the max. If you go all the way, you might accidentally damage those delicate flex cables.
At this point, the right edge of the midframe should be free from the case. If it’s still stuck, try sliding an opening clip up and down along the right edge to loosen it. If you need help, you can always schedule a repair
– Grab an opening pick and sneak it into the right edge of your phone, sliding it up towards the top right clip.
– Gently glide the pick past the clip to unhook it from the frame.
Step 16


– Grab the right edge of the midframe by the corners and gently lift it up like you’re opening a secret door.
– Once the left edge starts to feel a bit wobbly, pause your lifting and elevate the midframe straight up.
– Now, go ahead and pull the midframe off with a triumphant flair.
– When it’s time to put the midframe back on, line it up with the case, and give it a good squeeze around the edges until every clip happily snaps back into place. If you’ve done it right, the midframe should sit nice and flat like a well-baked pancake.
Step 17


– Grab your trusty spudger and gently pry up to disconnect that battery connector. You’ve got this!
– Give the battery flex cable a little bend to keep it from accidentally making friends with the motherboard. Safety first!
Tools Used
Step 18

– Grab your trusty tweezers and gently lift the tape at the top of the interconnect cable. You’ve got this!
Step 19


– Grab your trusty spudger and gently use its pointy end to lift up and disconnect the interconnect cable from the motherboard. You’ve got this!
– When you’re ready to reconnect, just align that cable with the socket like a pro. Use your finger to press down on one side, then the other. If you nail it, the cable will be snugly held in place by the socket. Easy peasy!
Tools Used
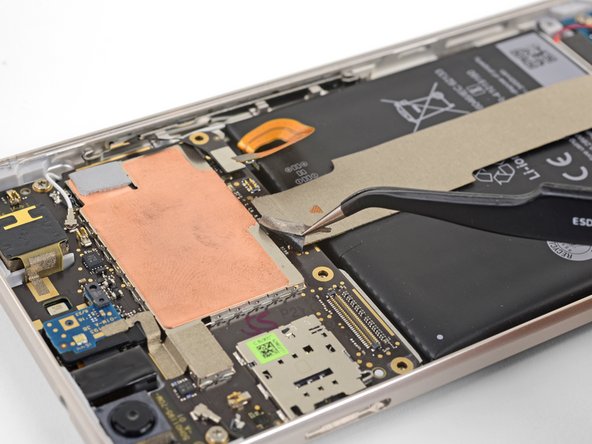
Step 20


– Grab your trusty spudger and gently lift up to disconnect the interconnect cable from the bottom daughterboard. You’ve got this!
– Keep going! Carefully peel away the interconnect cable from the bottom daughterboard.
– Now it’s time to remove the interconnect cable completely. You’re doing great!
Tools Used
Step 21


Avoid tugging on the connector by the wires. Trust us, it’s a surefire way to send that connector to the repair graveyard.
– Grab your trusty opening tool and gently nudge the vibration motor connector out of its cozy socket. Take it slow and steady!
– When it’s time to bring the connector back home, use that same opening tool along with the tip of a spudger to line things up just right. Then, with a gentle touch, push the connector back in while using the spudger to support it against the socket. You’ve got this!
Tools Used
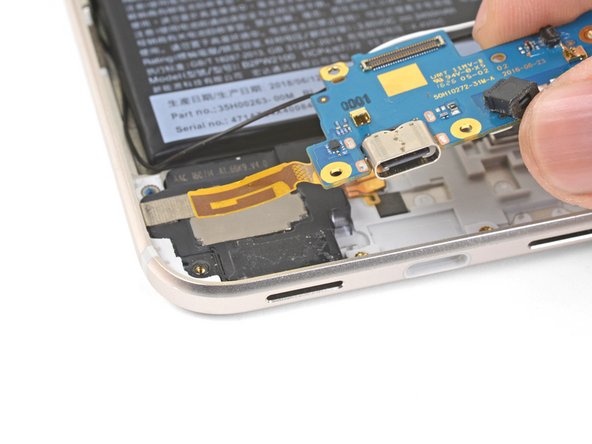
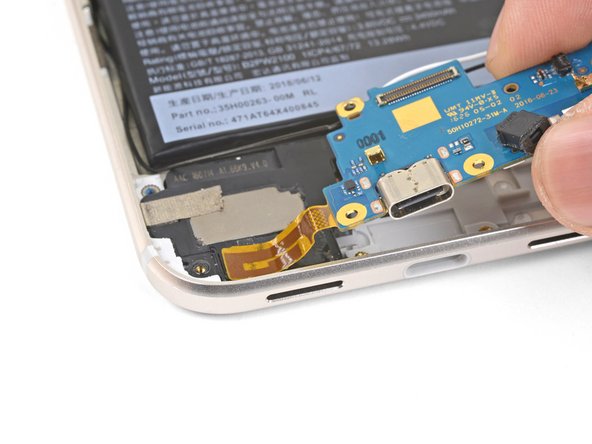
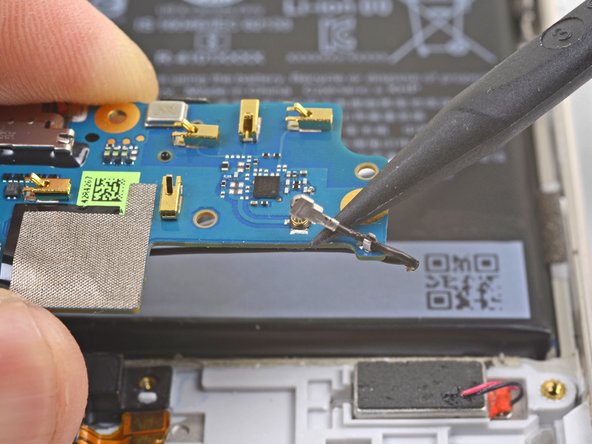
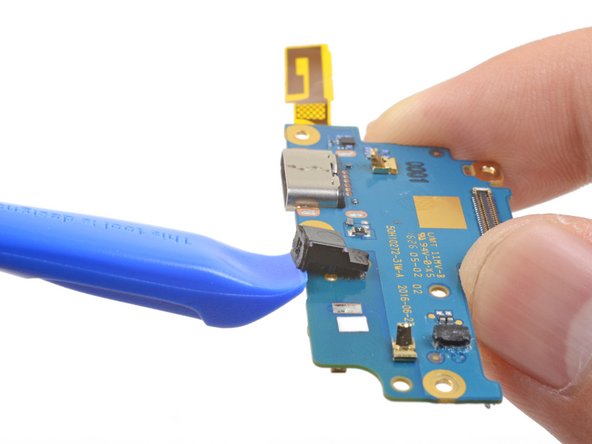
Step 22

– Time to get those tiny screws out! Carefully unscrew the two 3 mm T5 screws that are holding the daughterboard snugly to the frame. You’ve got this!
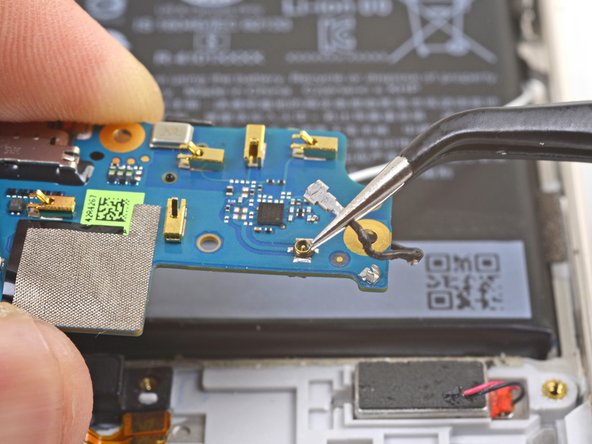
Step 23


Hold up! Don’t try to yank out that daughterboard just yet. It’s still hooked to the frame. If you need help, you can always schedule a repair.
– Grab the flat end of your trusty spudger and gently pry up the right edge of the daughterboard. We’re just loosening it up a bit!
– Once it’s loose, swing that daughterboard to the left to set it free from its snug little spot.
– When you’re putting everything back together, remember to guide the white antenna cable through the daughterboard notch and give the black antenna cable a cozy wrap around the screw post.
Tools Used
Step 24

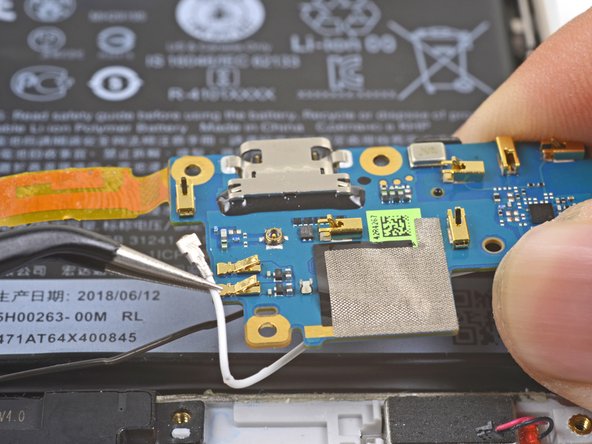
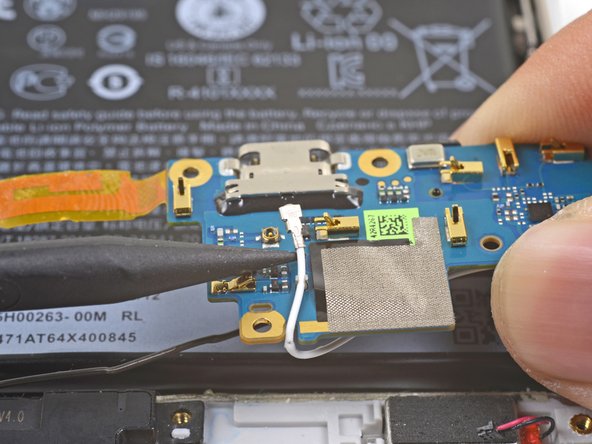
If the antenna patch starts tearing, put the brakes on! Warm up an iOpener, pop it on the corner for a minute, and use an opening pick to gently nudge it off the loudspeaker. If you need help, you can always schedule a repair.
– Gently lift the left side of the daughterboard, letting the antenna patch peel away from the loudspeaker.
– An opening pick can be slid under the antenna patch to help with separation from the loudspeaker.
Tools Used


Step 27
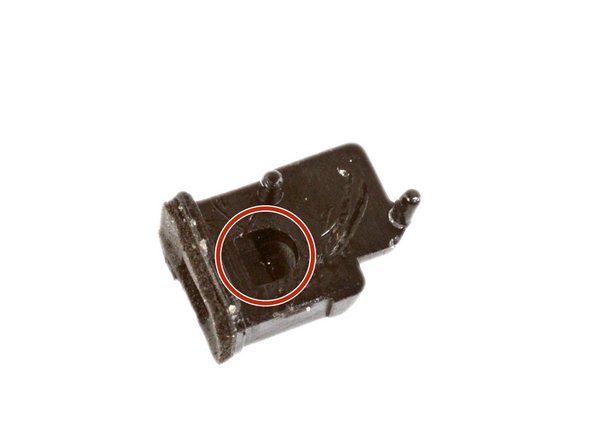

Remember to apply just the right amount of pressure; too much and those plastic alignment pins might take a little detour!
– If your shiny new replacement part is missing a plastic barometric vent, don’t fret! Just take the one from your old part and pop it onto the new one.
– Grab your trusty opening tool and use its edge to gently nudge up and loosen that barometric vent from the board. Easy does it!
– You might need a bit of adhesive or some double-sided tape to secure the vent to your new part. Just remember, keep that bottom vent hole clear as a whistle!


