DIY Google Pixel XL Loudspeaker Replacement Guide
Duration: 45 minutes
Steps: 28 Steps
Be careful with the Pixel XL’s display panel – it’s a bit delicate and can be prone to damage
Get ready to breathe new life into your Google Pixel XL by replacing the loudspeaker module. Keep in mind that the display panel is pretty fragile and stuck to the frame with some strong adhesive, so repairs can be a bit tricky. There’s a risk of damaging the display, especially if it already has some tiny cracks. To avoid any mishaps, make sure to apply plenty of heat and be super careful when prying things open. If you need help, you can always schedule a repair.
Step 1
You can use a hair dryer, heat gun, or hot plate to help with the repair, but remember to keep it cool! Overheating your phone can lead to some serious heat damage to the display and internal battery. So, let’s keep it chill while we fix things up! If you need help, you can always schedule a repair.
– Warm up that iOpener and give it a cozy spot on the top edge of the display for a solid two minutes.
– Before you dive into prying, keep an eye out for these important areas:
– A thin layer of adhesive hugging the display panel
– A thicker adhesive that’s a bit more stubborn
– The delicate OLED display panel, which needs some extra love
– The display cable, which is a bit fragile during the prying process
Tools Used
Step 2
Hey there, Just a heads up, be careful not to insert the pick more than 13mm (0.5 inches). Go easy, or you could damage the display assembly. If you need help, you can always schedule a repair.
If an opening pick isn’t doing the trick, don’t worry – you can also try using a playing card to help you make that initial entry. If you need help, you can always schedule a repair
– First up, warm up the edge until it’s cozy to the touch, then pop a suction cup right near that edge.
– Give that suction cup a gentle lift and slide an opening pick into the little gap you’ve created.
– If you find yourself struggling to make that gap, just reheat the edge and give it another go!
Step 3
Remember, don’t go deeper than 13 mm (0.5 inches) or you might just give your display a little too much love and end up damaging it.
There’s a nifty mesh covering the earpiece speaker at the top edge of the screen. If you don’t have a spare mesh handy, just be careful not to harm or misplace this little guy!
– Slide the opening clip across the top edge to slice through the adhesive. It’s like butter, right? Super easy!
– Leave an opening pick in the edge to keep the adhesive from sticking back together. We don’t want it to get cozy and snuggle up!
Step 4
Keep that pick under control! Don’t push it in more than 1 mm (1/32″) along the edge, or you might just end up giving the display assembly a little too much love – and not in a good way!
– Warm up that iOpener and place it on the right edge of your phone for a cozy two minutes.
– Gently slip an opening pick near the top edge of the phone, right where you’ve already cut the adhesive.
– Carefully maneuver the pick around the right corner.
– With a steady hand, slide the pick down the right edge of the phone to cut through the adhesive.
– Now, give the left edge the same treatment!
Tools Used
Step 5
Keep it cool and steady—don’t go deeper than 8.5 mm (about 1/3 of an inch) or you might mess with the display cable. If you’re feeling unsure, you can always schedule a repair.
– Heat things up by applying an iOpener to the bottom edge for two minutes – it’s time to loosen that adhesive.
– Next, insert a pick near the right edge where you’ve already weakened the adhesive, and get ready to make some progress.
– Now, carefully guide the pick around the corner – take your time, you’re doing great.
– Finally, slide the pick along the bottom edge to slice through the remaining adhesive. If you need help, you can always schedule a repair
Tools Used
Step 6
Be careful not to remove the display assembly just yet – it’s still connected by a flex cable, so let’s take it one step at a time. If you need help, you can always schedule a repair
– After you’ve cruised around the edge of your phone like a pro, gently lift up the display assembly from the right corners—just a smidge!
– Grab an opening pick for an adhesive showdown. Slice through any sticky bits still holding on.
Step 8
As you tackle this repair, keep an eye on each screw and make sure it finds its way back to its original home. You’ve got this!
– First things first, grab your trusty T5 screwdriver and unscrew those two 4 mm screws holding the display cable bracket tight. You’ve got this!
– Now, let’s gently take off the display cable bracket. You’re doing great!
Step 9
To get that connector back in place, line it up carefully and gently press one side down until you hear it click. Then, repeat the process on the other side. Remember, press down on the sides, not the middle – you don’t want those pins to bend and cause any permanent damage. If you need help, you can always schedule a repair
– Now it’s time to carefully disconnect the display cable – use the point of a spudger to gently pry it up from its connector. If you need help, you can always schedule a repair
Tools Used
Step 10
– Let’s get started by removing the display assembly – it’s the first step to a successful repair.
– Need help with reinstalling your Pixel XL display? Check out our guide for a step-by-step walkthrough.
– If your new display didn’t come with a speaker grille, don’t worry. Just use some tweezers to carefully remove the adhesive grille from your old display and transfer it to the new one.
– Before installing your new display, make sure to remove any leftover adhesive from the frame. A spudger or opening tool can help you scrape it off, and some high-concentration isopropyl alcohol will take care of any remaining residue.
– Reusing your old display assembly? Be sure to remove all the old adhesive residue from both the panel and the frame before applying new adhesive.
– Almost done! Turn on your phone and test your repair before sealing everything up with new adhesive.
– When you power on your phone after reassembling it, the screen will go through a calibration process. Just let it do its thing – don’t touch the screen until it’s finished, or you might end up with some touch calibration issues. And if you need help at any point, you can always schedule a repair with Salvation Repair.
Step 11
– Time to get those screws out and free the midframe from the back! Here’s what you need to remove:
– Seven stylish black 4 mm T5 screws
– Two shiny silver 3 mm T5 screws
Step 12
– The midframe is snugly secured by some clever plastic clips that grip the edge of the back case. Go ahead and release them with care!
Step 13
– First, locate the tiny notch at the bottom left of the frame – it’s your starting point. Gently insert an opening pick into this notch.
– Next, carefully slide the opening pick along the bottom edge of the phone, moving towards the bottom right corner. Leave it in place for now. If you need help, you can always schedule a repair
Step 14
Getting this part out can be a bit of a challenge due to the tight fit. Don’t worry if it takes some elbow grease – if you’re struggling, try using a playing card to help it slide out. If you need help, you can always schedule a repair
– Slip another opening pick into the right edge of the phone, down near the bottom.
– Carefully slide the pick up along the seam until you hear that satisfying *click* of the first clip popping free.
– Once that clip’s loose, keep the pick in place so the midframe doesn’t sneakily re-seal itself. We’re not done yet!
Step 15
Hey, keep it cool! No need to push that pick deeper than 2 mm into the edge, or else you might be giving those flex cables a little too much love. Easy does it!
Time for a quick check – the right edge of that midframe should be ready to roll out of the case. If it’s still playing hard to get, just slide an opening clip along the right edge to coax it out. And remember, if it gives you trouble, schedule a repair with us!
– Let’s get this party started! Grab your opening pick and slip it into the right edge of your phone. Slide that pick up towards the top right corner, like you’re trying to unlock a secret treasure chest!
– Keep sliding the pick past that clip to gently separate it from the phone’s frame. Easy peasy, right?
Step 16
– Grab the right edge of the midframe by the corners and gently lift it up like you’re raising a tiny flag.
– Once the left edge starts to feel like it’s ready to let go, pause your lifting and bring the midframe up.
– Say goodbye to the midframe as you carefully remove it.
– When it’s time to put the midframe back, line it up with the case and give a gentle squeeze around the edges until all those clips click back into place. And just like that, the midframe should settle in snugly!
Step 17
– Use the spudger tip to gently lift and disconnect the battery connector. A little nudge goes a long way!
– Give the battery flex cable a tiny bend, just enough so it won’t accidentally touch the motherboard. Better safe than sorry!
Tools Used
Step 19
– Grab your trusty spudger and gently nudge the interconnect cable away from the motherboard. You’ve got this!
– When you’re ready to reconnect, simply line up the cable with the socket. Use your finger to press down on one side first, then the other. If you nail it, the cable will stay snugly in place!
Tools Used
Step 20
– Let’s get started by using the point of a spudger to carefully pry up and disconnect the interconnect cable from the bottom daughterboard – take your time and work gently.
– Next, keep peeling the interconnect cable away from the bottom daughterboard, making sure not to damage any surrounding components.
– Finally, remove the interconnect cable completely. If you need help or feel unsure at any point, you can always schedule a repair with Salvation Repair.
Tools Used
Step 21
Hey there! Just a friendly reminder: avoid tugging on the connector by the wires. That’s a surefire way to send it packing! Keep it gentle and steady.
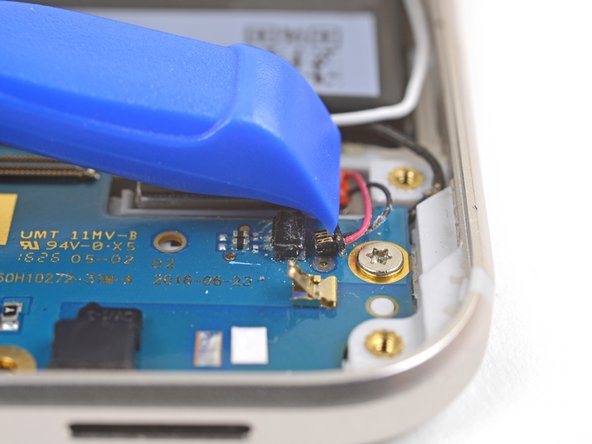
– Grab your trusty opening tool and gently nudge that vibration motor connector out of its cozy little socket.
– When it’s time to bring the connector back home, use the opening tool along with the spudger tip to help line it up just right. Then, with a gentle touch, press it back in using the opening tool while the spudger keeps everything steady against the socket.
Tools Used
Step 22
– Time to unscrew! Grab your trusty T5 screwdriver and gently remove those two 3 mm screws holding the daughterboard snugly to the frame.
Step 23
Be careful not to remove the daughterboard – it’s still connected to the frame, so let’s leave it right where it is for now. If you need help, you can always schedule a repair
– Grab your trusty spudger and gently pry up the right edge of the daughterboard.
– Swing the daughterboard to the left, setting it free from its little nook.
– When putting everything back together, mind that the white antenna cable goes through the daughterboard notch and wrap the black antenna cable around the screw post. If you need help, you can always schedule a repair.
Tools Used
Step 24
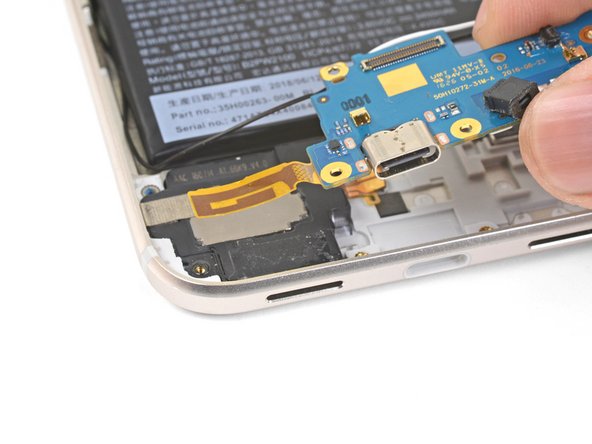
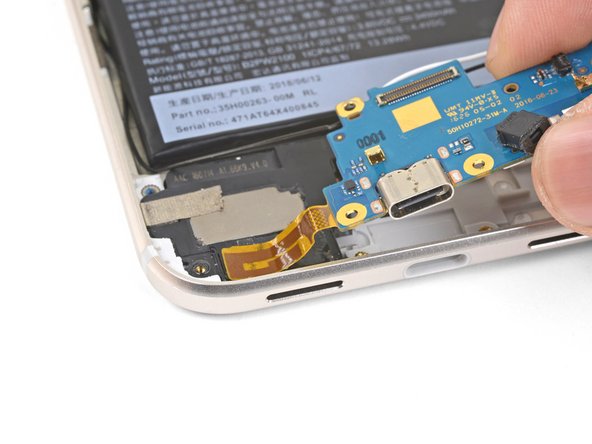
If the antenna patch starts to tear, pause and let’s regroup. Grab an iOpener, heat it up, and apply it to the corner for about a minute. Then, use an opening pick to gently coax it away from the loudspeaker. If you need help, you can always schedule a repair
Slide an opening pick beneath the antenna patch to gently pry it away from the loudspeaker. If you need help, you can always schedule a repair.
– Gently pry up the left edge of the daughterboard, taking care to detach the antenna patch from the loudspeaker. If you need help, you can always schedule a repair
Tools Used
Step 25
– Gently flip the daughterboard onto the battery and keep it secure with a bit of tape to keep things tidy.
Step 27
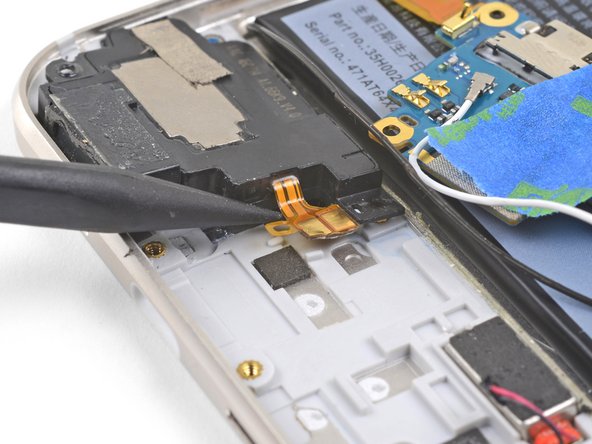
– Carefully slip the tip of your spudger under the loudspeaker flex cable and give it a gentle nudge to release it from the frame. Easy peasy!
– When you’re putting things back together, double-check that the loudspeaker flex cable is snugly in place using the alignment notches. If it’s a bit off, your loudspeaker might just sit there silently!
Tools Used
Step 28
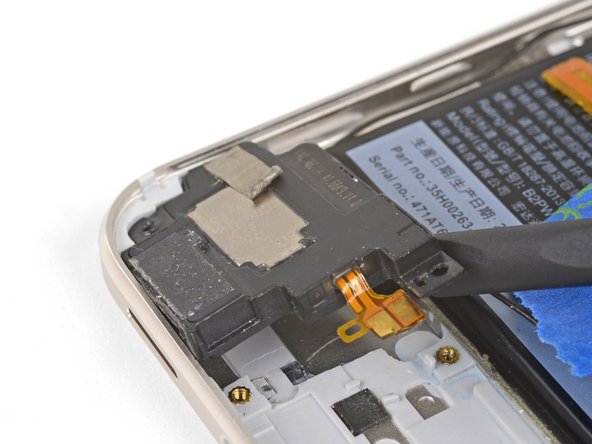
– Time to get this loudspeaker out – use your trusty spudger to carefully pry it up.
– Now that it’s loose, go ahead and remove the loudspeaker. If you need help, you can always schedule a repair
Tools Used


