DIY Guide: Google Pixel 2 XL Charging Assembly Replacement
Duration: 45 minutes
Steps: 32 Steps
Hey there, techie! This step-by-step repair guide is brought to you by the awesome folks at Salvation Repair. We’re not affiliated with Google, but we’re here to help you fix your stuff! If you need a hand, you can always schedule a repair.
Hey there! Ready to dive into some DIY magic? This repair guide, crafted by the awesome folks at Salvation Repair, is here to help you tackle the replacement of the charging assembly in your Pixel 2 XL. Inside that assembly, you’ll find the USB-C port, microphone, and a bunch of other nifty hardware. If you ever feel stuck, remember you can always schedule a repair to get back on track!
Step 1


– Time to get started. Insert a SIM card eject tool or a paperclip into the small hole in the SIM card tray, which you’ll find on the left edge of your phone – just opposite the power and volume buttons.
– Give it a firm press to eject the tray. If you need help, you can always schedule a repair
Tools Used

Step 2

Don’t worry, the SIM card will pop right out of the tray – it’s a piece of cake!
– Time to pop out that SIM card tray from your phone! Just give it a gentle tug.
– When you’re putting the SIM card back in, make sure it’s lined up just right with the tray. It’s a snug fit, but you’ve got this!
Step 3


Hey, cracked screen? No problem! Tape over the glass to keep things safe and steady for the next step. It’ll also make things smooth for your suction cup to get a good grip.
Heads up, your suction cup might not stick so well on those curved edges. Just be mindful of that!
– Stick a suction cup right next to the SIM slot on your phone’s edge. Make sure to stay away from the curvy part of the phone.
– If you need help, you can always schedule a repair
Step 4


Don’t worry, we’ve got you covered. Removing this part can be a bit tough and requires some patience. If it’s not budging, try gently rocking the suction cup and screen back and forth to loosen the adhesive. You can also apply some heat using an iOpener, heat gun, or hair dryer to help it along. If you need help, you can always schedule a repair
– Let’s get this party started! Grab your suction cup and pull up gently but firmly, creating a little space between the front panel and the rear case. Now slide in your opening pick like a pro – you’ve got this!
Tools Used

Step 5


Heads up! Some of the steps coming up need a little extra care to keep your phone happy. Just remember to be super gentle and you’ll be all set! If you need help with anything, you can always schedule a repair.
– Hey there, brave fixer! Don’t get too caught up in that skinny corner – only dip your tool 0.25 inches deep, or take a gander at some chewed-up display. And remember, we’ve only got front-facing camera to worry about, so keep it chill and make those shallow cuts! If you run into troubles, head over to schedule a repair and we’ll help you out!
Step 6


– Slide the opening pick down the right side of the phone to separate the display adhesive. It’s like a little dance, and you’re the lead! Don’t worry, this is a super common step, so you got this. If you need help, you can always schedule a repair
Step 7


When working through these steps, use the flat edge of your opening pick to cut – it’s easier to control and helps you avoid inserting the pick too far. If you need help, you can always schedule a repair
– Gently glide the opening pick around the lower-right corner and along the bottom edge of your phone. You’ve got this!
Step 8


– Pop the flat edge of the pick back into the top-right corner of your phone, and glide it smoothly around the corner and along the top edge of your device.
Step 9


Hold your horses there, partner! Don’t go ripping that display off just yet. There are some delicate little ribbon cables still holding it to the motherboard. We wouldn’t want to cause any damage, now would we? If you need help, you can always schedule a repair.
– Time to give that display a little lift! Gently pry it up from the right side of the phone, just like you’re opening a book.
– Now, lay the display down nice and flat on the table, keeping it close to the phone. We want to make sure we don’t strain those delicate display and digitizer cables. If you need help, you can always schedule a repair
Step 10


Be gentle when prying to avoid damaging the cable underneath or misplacing the cover. If you’re not feeling confident, don’t worry – you can always schedule a repair and let the pros handle it.
Hang onto this component – you’ll need it for reassembly later.
The clip that secures this cover is located along the bottom edge, so keep an eye out for it. If you need help, you can always schedule a repair
– Grab your trusty opening tool and gently nudge the corner to pop up and unclip the lower edge of that digitizer cable connector cover. You’ve got this!
– Now, go ahead and lift that connector cover away like a pro.
Step 11


– Grab your trusty spudger and gently lift that digitizer cable connector up and out of its cozy home on the motherboard.
– When it’s time to reconnect, align those connectors just right and give one side a gentle press until you hear that satisfying click. Repeat the same for the other side, but steer clear of pushing down in the middle. Misalignment can lead to bent pins, and nobody wants that kind of drama!
– If your screen seems a bit moody and refuses to respond to your touch after the repair, don’t fret! Just re-seat that connector, making sure it clicks snugly back in place. Oh, and check for any sneaky dust or obstructions in the socket—everything should be nice and clear!
Tools Used

Step 12

– Let’s get started by carefully using tweezers to gently remove any tape covering the display connector. If you need help, you can always schedule a repair
Tools Used

Step 13


Don’t forget to hang on to this part! You’ll need it when it’s time to put everything back together.
– Let’s pop open that display connector cover! Use the tip of your spudger to gently wiggle it out of its little home in the edge of the display.
– Now, give it a little pry and pop it out! You’re doing great.
– And just like that, you’ve got that connector cover free. Woohoo! If you need help, you can always schedule a repair.
Tools Used
Step 14


– Grab your trusty spudger and gently pry up the display cable connector from its socket. It’s like giving it a little high five!
– Now, it’s time to remove the display. Easy peasy, lemon squeezy!
– When you’re putting things back together, you can take a minute to replace the adhesive around the edges of the display. It’s like giving your device a fresh new look! If you need any help along the way, you can always schedule a repair
Tools Used
Step 15

– Let’s get started by removing eleven 3.8 mm Phillips screws that hold the midframe in place. Take your time and make sure you’re ready to keep track of each screw.
– As you work through this repair, remember to keep each screw organized so it ends up back where it belongs. If you need help, you can always schedule a repair
Step 16


– Time to get started. Insert an opening tool into the notch in the midframe, right by the volume buttons, and gently pry the midframe up and away from the rest of the phone – you got this.
– Now that the midframe is loose, go ahead and remove it. If you need help, you can always schedule a repair


Step 18

– Use the pointy end of a spudger to gently unplug the front-facing camera. It’s like giving it a little high five, but with a tool!
– When you’re putting everything back together, it’s easier to connect the front camera to the motherboard first, then pop the motherboard back in place. Think of it like a puzzle, but a fun one!
Tools Used
Step 19

– Let’s get those connectors unplugged! Use the flat end of a spudger to carefully disconnect the right Active Edge sensor connector.
– Time to give that antenna cable a little break. Disconnect it gently!
Tools Used
Step 20

– Grab your trusty spudger and gently use its pointy end to disconnect the fingerprint sensor connector. You’ve got this!
Tools Used


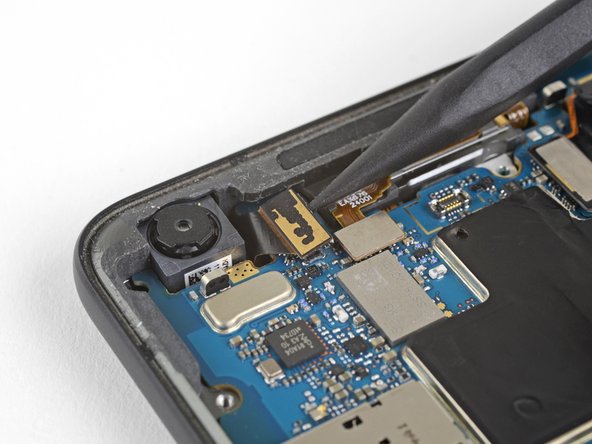
Step 23


– Now it’s time to disconnect the front-facing sensor assembly connector – simply use the point of a spudger to gently release it. If you need help, you can always schedule a repair
Tools Used
Step 24


Whoa there, partner! The motherboard’s narrow part is a delicate fella. If you feel it bendin’ when you lift, hit the brakes and check for obstacles! The board should go up smooth as butter.
– First, let’s get those cables and connectors out of the way – use the flat edge of a spudger to gently lift the bottom of the motherboard, making sure everything is clear of the board.
– Now, carefully hold the wide part of the motherboard near the SIM card slot and slide it toward the bottom of the phone while lifting it out – easy does it!
– Time to remove the motherboard – take your time and be gentle.
– After you’ve removed the motherboard, keep your phone flat with the battery facing up to prevent the front-facing camera from falling out of the phone case – it’s an easy mistake to make, but an easy one to avoid too!
– When you’re ready to put everything back together, make sure all the cables and connectors are out of the way and aligned with their respective sockets – take a deep breath, you’re doing great! If you need help, you can always schedule a repair
Tools Used
Step 25


If you’re having trouble getting started, try using a spudger to gently pry up the back cover. You got this!
– Gently slide the tip of a spudger under the lower left corner of the loudspeaker and carefully lift the speaker assembly out of the phone. Remember, take your time and be gentle—your device will appreciate it!
Tools Used
Step 26

– Let’s get started by removing the loudspeaker from your phone. This is a crucial step, and we’re here to guide you through it. If you need help, you can always schedule a repair
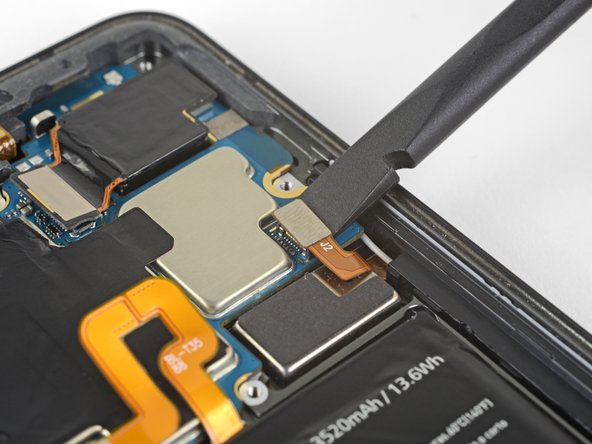
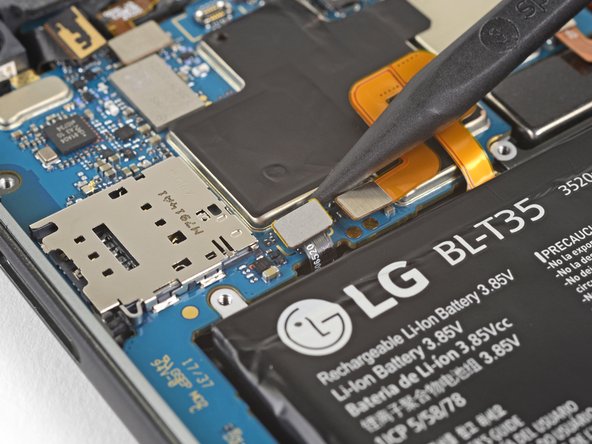
Step 27

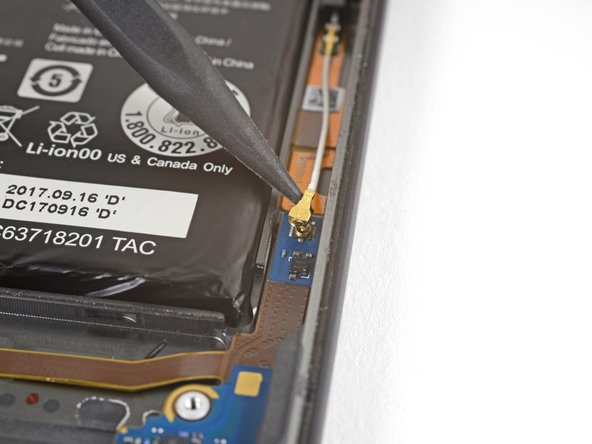
– Alright, let’s get that white antenna cable outta there! Use the tip of your spudger to gently disconnect it from its spot to the right of the battery. No worries if you need a hand, you can always schedule a repair.
Tools Used
Step 28

– Give that adhesive holding the charging assembly a little love! Warm it up with a hairdryer or heat gun, or get cozy with an iOpener for about a minute. This will loosen things up and make removing the assembly a breeze. If you’re feeling a bit lost, you can always schedule a repair.
Tools Used
Step 29
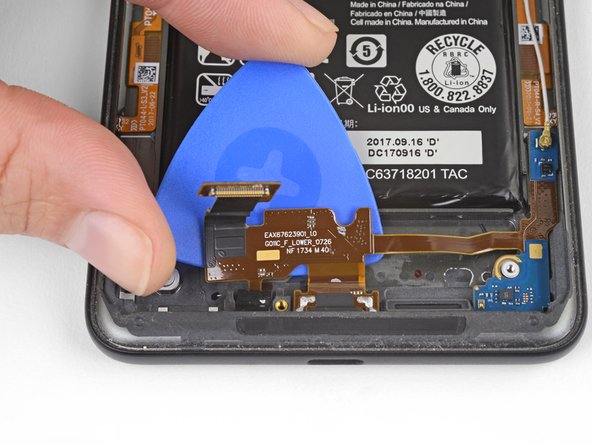


– Let’s get started by sliding an opening pick under the charging assembly flex cable on the left side of your phone. Gently pry it away from the case to begin the separation process. If you need help, you can always schedule a repair
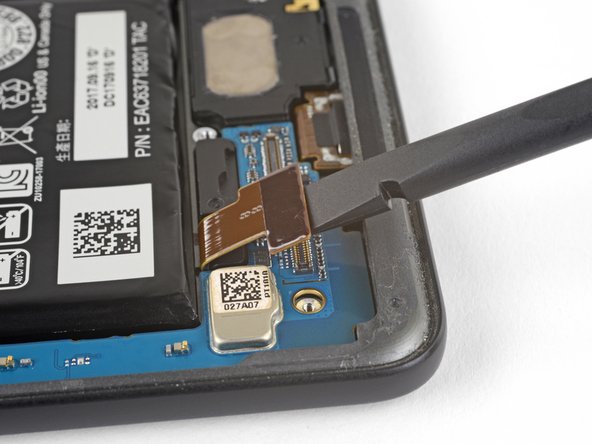
Step 30


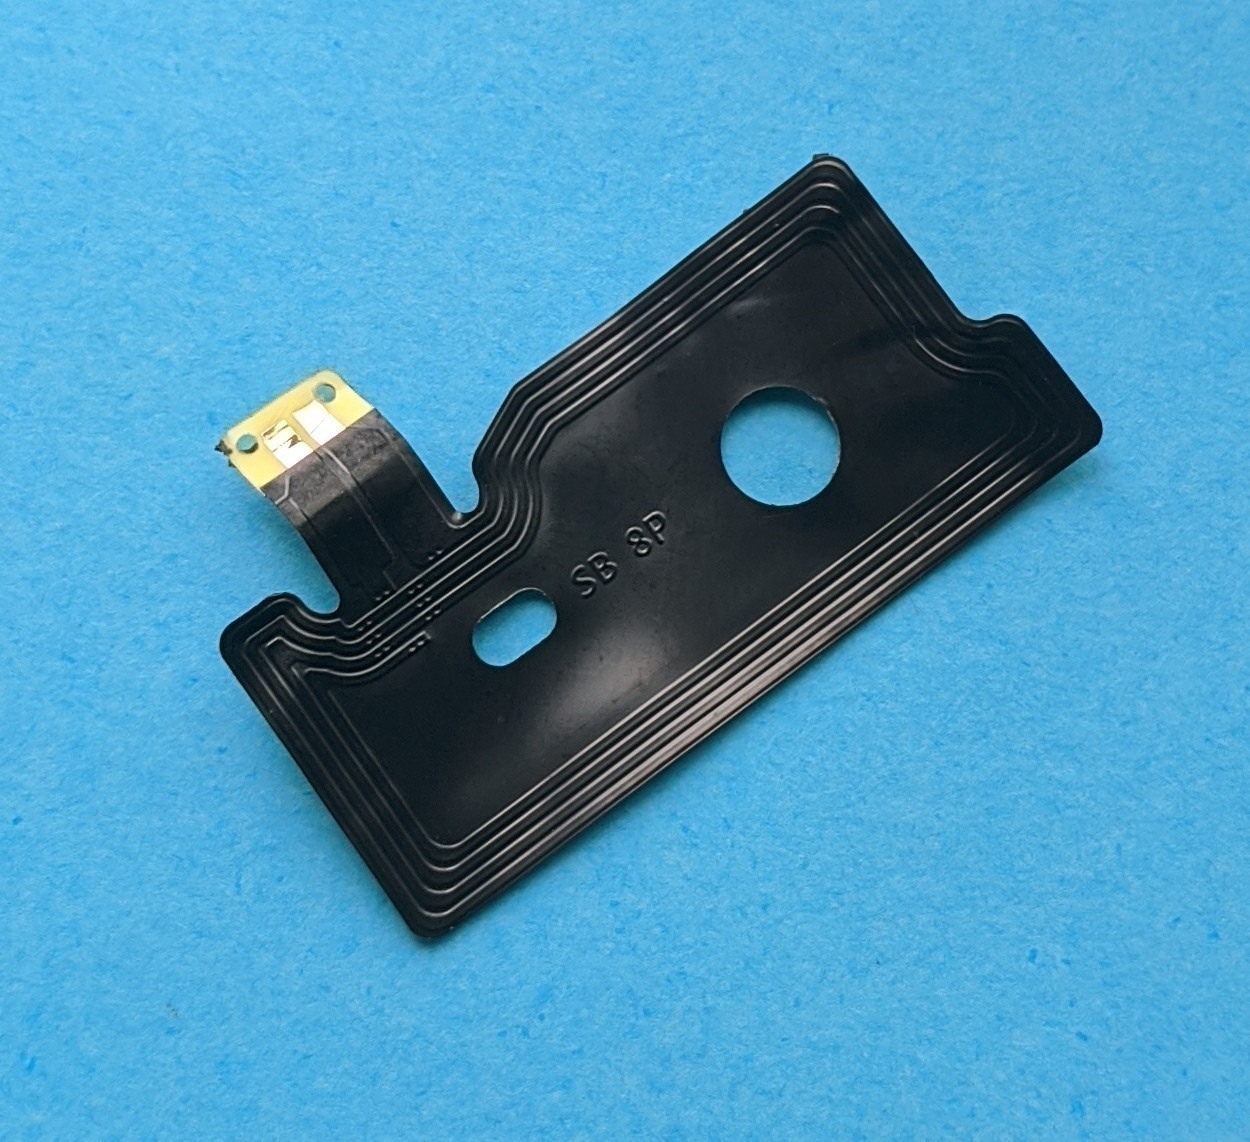
– Carefully pull out the USB-C port from its cozy spot in the phone case. If you need help, you can always schedule a repair
Whoa there, champ! Make sure the antenna board’s still huggin’ its phone case. Keep that charging assembly put and avoid any stress to the flex cable connecting the antenna board and the USB-C port. It’s all about keepin’ things connected and flowin’. Need a hand? You can always schedule a repair!
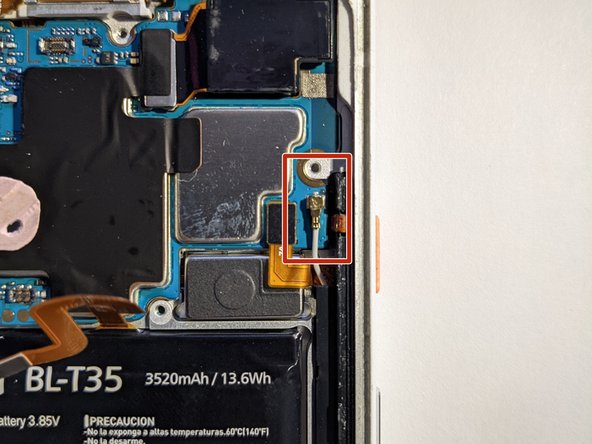
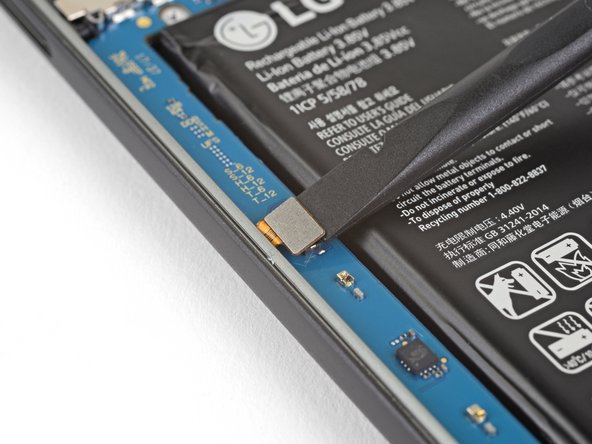
Step 31

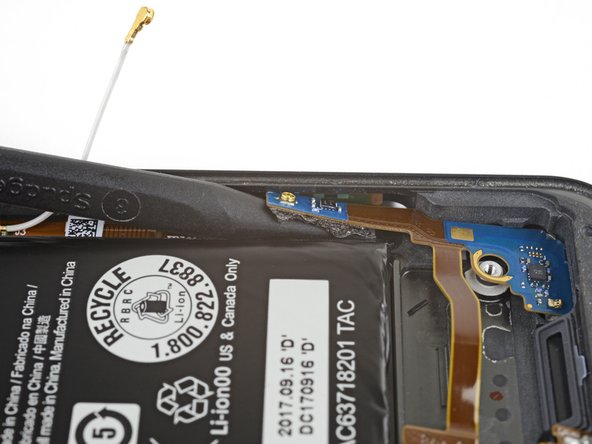
Be gentle and patient when prying – you don’t want to put too much stress on that delicate board. If you need help, you can always schedule a repair
– Gently wiggle the tip of your spudger under the antenna board to ease apart that sneaky adhesive tape lurking underneath it.
Tools Used
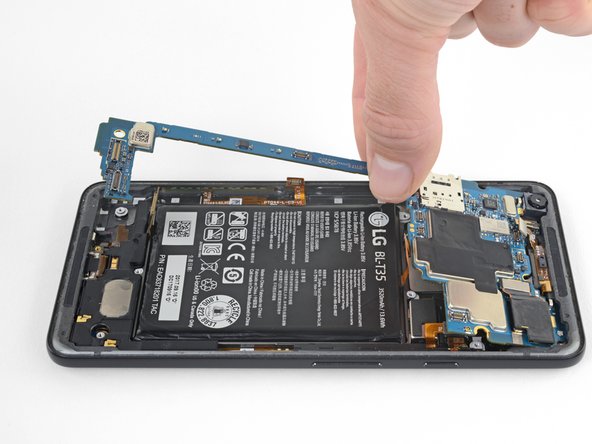
Step 32

– Time to get this charging assembly out of the phone case. Gently lift it up, like you’re giving it a little hug goodbye.