DIY Guide: Google Pixel 4 XL Charging Assembly Replacement
Duration: 45 minutes
Steps: 35 Steps
This repair guide was written by the awesome folks at Salvation Repair, and isn’t affiliated with Google.
Heads up!
Hey, just a heads up:
Get ready to breathe new life into your Google Pixel 4 XL by replacing its charging assembly. This step-by-step guide from Salvation Repair will walk you through the process, which involves removing the loudspeaker and accessing the assembly that houses the USB-C port and antenna connectors. Before you start, please note that Google has issued a warning about the potential risks of disassembling the front laser assembly, which could expose you to invisible infrared laser emissions – you can read more about their safety warnings here. Additionally, if your battery has been damaged or deformed, it’s crucial to replace it with a new one to avoid any potential safety hazards. If you need help or feel unsure about any part of the process, you can always schedule a repair.
Step 1
– Grab a SIM eject tool, small bit, or even a straightened paper clip and poke it into the tiny hole on the SIM card tray at the left edge of your phone.
– Give it a nice firm press to pop the tray out.
– Now, slide out the SIM card tray.
Step 2
You can also use a hair dryer, heat gun, or hot plate for this step. Just be cautious not to overheat your device—the display and battery are sensitive to heat. If you need help, you can always schedule a repair.
– Grab your trusty iOpener and give it a warm hug against the bottom edge of the back panel for a solid minute. You’ve got this!
Tools Used
Step 3
– Time to get sticky! Attach a suction cup to the warmed-up edge of the back panel, pressing down firmly for a good grip. Aim for as close to the edge as you can get. You’ve got this!
If your back glass is sporting some serious cracks, don’t sweat it! A bit of clear packing tape can help the suction cup stick like it just found a best friend. Got some super strong tape on hand? Feel free to swap that in instead! And hey, if those options aren’t doing the trick, a little dab of superglue can work wonders to attach that suction cup right to the broken panel. Let’s get that fixed up!
Step 4
Depending on how old your phone is, this might be a bit tricky. If you’re running into some hiccups, just warm up the edge a little more and give it another go!
– Alright, grab that suction cup and give it a good pull! We want to create a little space between the back panel and the frame. Think of it like opening a door – just a little gap to start with.
– Now, take your opening pick and gently slip it into that gap you just made. We’re just trying to get a little leverage here, nothing too crazy.
Step 5
– Let’s get this show on the road! Slide the opening pick across the bottom of your device towards the left corner, like you’re slicing through butter. Easy peasy!
– Now, with the pick still in place, slide it from the bottom left corner over to the bottom right corner. You’re basically giving the adhesive a little massage to loosen it up.
– Keep that pick in the bottom right corner, holding the line. You don’t want the adhesive getting all clingy again, do you?
Step 6
– Grab your trusty iOpener and give it a warm hug on the left edge of the phone for a solid minute. It’s like a cozy spa day for your device!
Tools Used
Step 7
– Let’s get that back panel off! Slide a second opening pick under the back panel, right above the charging port.
– Now, gently glide that pick to the bottom left corner of the phone. You’re doing great!
Step 8
This adhesive can get super sticky. Don’t worry, just wiggle your pick back and forth like you’re sawing a log to cut through it.
– Gently glide the opening pick around the bottom left corner and along the left edge of your phone to cut through that pesky adhesive.
– Pause when you get to the top left corner, right by the camera, and keep that pick in place.
Step 9
– Grab your trusty iOpener and give it a warm hug on the right edge of the phone for a solid minute. It’s like a cozy spa day for your device!
Tools Used
Step 10
– Now that you’ve got two opening picks in place, it’s time to bring in the third pick to help with the lower part of the righthand side.
– Gently slide the opening pick upwards towards the top of the phone, carefully cutting through the adhesive on the right side.
– Stop when you reach the top right corner and leave the pick inserted – you’re making great progress! If you need help, you can always schedule a repair.
Step 11
– Now, let’s gently slide that third opening pick around the top right corner and across the top side of the phone. This will slice through the last bit of adhesive, like a hot knife through butter!
Step 12
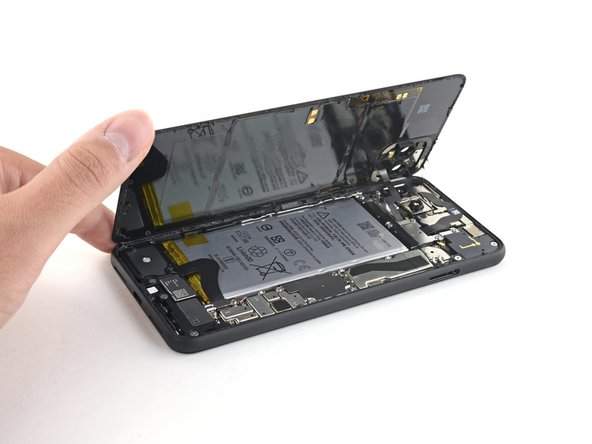
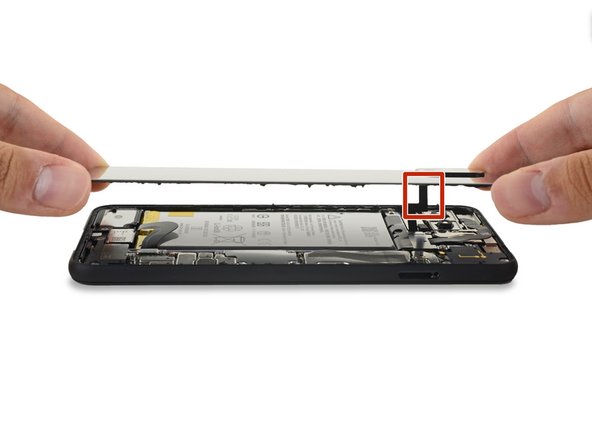
– Once you’ve carefully sliced around the perimeter of the phone, it’s time to gently lift the right edge of the back cover. Think of it like opening a book!
– Hold on a sec though – don’t pull the panel all the way off yet. It’s still holding onto the phone, so we need to be careful. You got this! If you need help, you can always schedule a repair
Step 13
– Keep swinging that back panel open until it’s resting on the left edge, just like a little phone hammock. Be careful not to pull on that ribbon cable, it’s like a delicate spiderweb!
– This is a good time to turn your phone on and make sure everything’s working like a champ before you close things up. Remember to power it down completely before you move on. If you need help, you can always schedule a repair
Step 14
As you tackle this repair, remember to keep an eye on each screw and return it to its original home. You’ve got this!
– Let’s get started by taking off the four T3 Torx screws that are holding down the battery connector shield:
– One 1.8 mm screw
– One 4.1 mm screw
– One 4.4 mm shouldered screw
– One 4.0 mm shouldered screw
Step 15
– Grab your trusty tweezers and pop off the battery connector shield. If you need help, you can always schedule a repair
Tools Used
Step 16
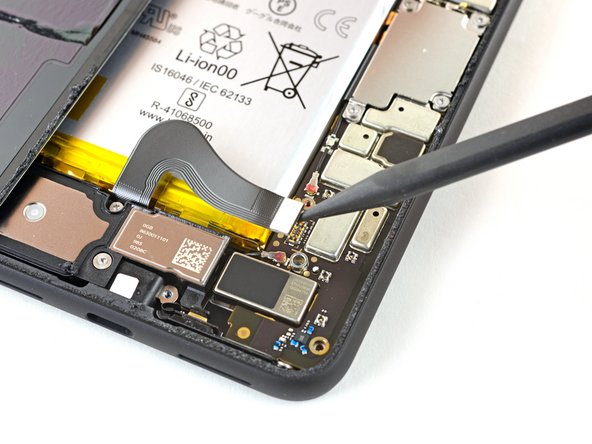
Hey there! Be extra careful when using the spudger near the battery. You don’t want to poke a hole in it, right? If you need help, you can always schedule a repair.
– Grab your trusty spudger and gently lift the battery connector straight up from the motherboard to disconnect it. Easy peasy!
– When it’s time to reconnect, align those connectors just right and press down on one side until you hear that satisfying click. Then do the same on the other side—just avoid pressing down in the middle. If things get misaligned, those little pins can bend, and we definitely don’t want that! If you need help, you can always schedule a repair.
Tools Used
Step 18
– Grab your trusty T3 Torx driver and let’s tackle those two 4.1 mm screws holding down the back panel connector cover. You’ve got this!
Step 19
– Time to get started! Use a pair of tweezers to carefully remove the cover from the back panel connector. If you need help, you can always schedule a repair
Tools Used
Step 21
– Let’s get started by removing the back panel – it’s the first step to fixing your device.
– When you’re putting everything back together, be sure to check out our guide on how to install custom-cut adhesives for your device.
– If you’re using a pre-cut adhesive card, follow along with this guide for a smooth repair process. And remember, if you need help, you can always schedule a repair
Step 22
Whoa there, buddy! Looks like these battery strips are like little sticky friends. Don’t sweat it though, just get those handy tabs, or maybe even chop ’em if you’re feeling extra adventurous. And if you get stuck, remember, your repair squad at Salvation Repair is always here to help. Just click this link to get things moving in the right direction!
Tools Used
Step 23
If those adhesive pull tabs are being stubborn and not stretching, grab a plastic dropper or syringe and fill it with some high concentration isopropyl alcohol. Just a few drops under the left edge of the battery should do the trick! Give it a minute to work its magic on that adhesive.
Be prepared to put in some muscle here!
Watch out! Those adhesive pull tabs can be a bit temperamental and might snap during this process. Take it slow and steady for the best results.
– Gently tug on the black pull tab at a low angle, keeping a steady hand. When the adhesive gets lengthy, wrap it around a spudger and keep pulling.
– Keep a firm grip on the adhesive strip, applying consistent force, and roll the spudger every now and then to maintain a short length of the pull tab.
– Repeat this process for each of the three pull tabs, until they’re either removed or break in half.
Tools Used
Step 24
Steer clear of shoving that opening pick near or below the grip sensor cable—it’s a no-go zone! That sneaky pick could end up messing with the charge port flex cable hiding under the battery. Keep it safe and sound!
Even if you’ve managed to pull off all three adhesive tabs, you might still need to use an opening pick to give that battery a little nudge. Don’t worry, it’s perfectly normal! If you need help, you can always schedule a repair.
– If those battery tabs snapped during removal, don’t worry! Just slip an opening pick along the upper right edge of the battery, gently slicing through the adhesive underneath. You’ll be back in business in no time!
Step 25
– Time to set that battery free! Lift it up and away from the phone to remove it.
– Ready for a new battery? Let’s get started:
– Clean up any leftover adhesive from the battery well – we want a fresh start.
– If you’re using stretch release adhesive, apply it to the battery. Otherwise, add some double-sided tape or pre-cut


