DIY Guide: Google Pixel 7 Pro mmWave Antenna Replacement
Duration: 45 minutes
Steps: 32 Steps
A heads up from the team at Salvation Repair: we created this guide to help you fix your device, but it’s not officially endorsed by Google. Want to know more about our repair guides? Click here to learn more.
Safety first! Before you start taking your phone apart, make sure the battery is at 25% or less. If you need help or have questions, you can always schedule a repair.
Hey there! This repair guide is brought to you by the awesome team at Salvation Repair. Just a heads up, it hasn’t been given the thumbs up by Google, but we’re here to help! In this guide, we’ll walk you through replacing the 5G mmWave antenna in your Google Pixel 7 Pro. Before diving in, make sure to juice down your battery to below 25% to keep things safe and sound. This way, we can avoid any fiery surprises if the battery gets a little too cozy during the repair. If your battery looks like it’s been working out and is swollen, be sure to take the right precautions! Also, a quick note: your Pixel 7 Pro has class 1 lasers in there. So, disassembling it might expose you to some invisible infrared laser fun (not the good kind). Keeping that water resistance intact after the fix depends on how well you reapply the adhesive, but remember, your device will lose its IP (Ingress Protection) rating. Don’t forget to grab some replacement adhesive to wrap things up nicely!
Step 1
– First, let’s get your phone ready for repair – start by completely powering it off and unplugging any cables.
Step 2
Keep your pick-insertion game strong! Only slide that little tool in about ~3.5 mm during the removal process. This way, you’ll dodge any mishaps with the internals and keep those plastic clips happy and intact.
– As you dive into the removal process, be sure to slide your opening picks in just the right spots to keep the screen cozy with its safety frame.
– Screen seam: This is the line that keeps the screen snug with the rest of the phone. Remember, prying here is a no-go!
– Bezel seam: This is where the stylish plastic bezel meets the frame, ready to protect your screen. It’s held in place by some trusty plastic clips. This is your go-to spot for prying.
– You’ll notice several plastic clips hugging the screen all around. If your opening pick feels stuck during the removal, it might be a little too deep under the screen. Just adjust and keep going!
Step 3
Get ready for some cool tips! In the next few steps, we’ll introduce you to the Anti-Clamp, a nifty tool we whipped up to make opening your device a breeze. If you’re not using the Anti-Clamp, don’t fret—just jump ahead three steps for an alternative method.
Is your screen looking a bit worse for wear? No worries! Slap on a layer of clear packing tape to give that suction cup a fighting chance to stick.
Want to master the Anti-Clamp? Check out our handy guide for all the deets.
If your phone’s surface is feeling slicker than a banana peel, grab some tape to create a surface that’s a little easier for the Anti-Clamp to grip.
– Give the blue handle a gentle tug backwards to unhook the Anti-Clamp’s arms.
– Slide those arms right over the edge of your phone, either on the left or the right—your choice!
– Now, let’s get those suction cups working! Place them near the bottom edge of your phone—one on the front and one on the back.
– Press those cups together to create a solid suction. You’ve got this!
Step 4
– Alright, let’s get this party started! Pull the blue handle forward to lock those arms in place. You got this!
– Now give that handle a spin, clockwise, all the way around. Keep going until those cups get a little stretchy. You’re doing great!
– Make sure those suction cups stay buddies. If they start to drift apart, just loosen them up a bit and get them back in line. We’re almost there!
Step 5
Take it easy and turn slowly – no more than half a turn at a time. Give it a minute between turns and let the Anti-Clamp do its thing. If you need help, you can always schedule a repair
Feel free to grab a hair dryer or heat gun, but watch out! Too much heat can wreak havoc on your display and internal battery, so handle with care.
If the Anti-Clamp isn’t quite doing the trick, don’t hesitate to warm things up a bit more and give that handle a half turn clockwise.
– Let’s get started! Heat up your iOpener and carefully thread it through the arms of the Anti-Clamp.
– Now, fold the iOpener so it’s snug against the bottom edge of your phone – this will help loosen things up.
– Be patient for just a minute – this will give the adhesive a chance to release, making it easier to create an opening gap.
– When the Anti-Clamp creates a big enough gap, it’s time to insert an opening pick under the screen frame.
– You can skip the next two steps – you’re making great progress!
Step 6
Feeling a little warm? Get your device up to temp with a hairdryer, heat gun, or hot plate. Just don’t let it get too toasty! You want the edge to feel a little warm, like a warm hug from a friend. You know, not too hot, just right. If you need help, you can always schedule a repair.
– Get your trusty iOpener warmed up and ready to go! Give that screen a nice, warm hug for at least 3 minutes to loosen up the glue underneath. It’s like a spa day for your phone! (But don’t worry, it’s not actually a spa. 😉 If you’re feeling overwhelmed, you can always schedule a repair).
Step 7
If your display is looking rough, a layer of clear packing tape might help the suction cup stick. Or, you could try using a really strong tape instead of the suction cup. If you’re still having trouble, you can superglue the suction cup to the screen. We’ve all been there! 😉
Depending on the age of your phone, this might be a bit tricky. If you’re struggling, try applying some heat to the bottom edge and give it another go. If you need help, you can always schedule a repair
– Alright, let’s warm up that screen! Once it feels toasty, grab your trusty suction handle and attach it to the bottom edge of the screen.
– Now, give that screen a gentle lift using the suction handle. We’re just creating a little space between the screen and the phone’s body, no big deal.
– Time to slip in our opening pick. Carefully insert it into the gap you just made. We’re almost there!
Tools Used
Step 8
– That screen cable is a little shy, hanging out halfway up the left side of your phone. Take it easy and be gentle with that little guy. You don’t want to give it a fright, and it’s really sensitive!
– There’s a whole party of spring contacts around the edge of the phone. Try not to bend them, those guys are delicate and a little grumpy! Be cool and keep it classy.
Step 9
– Now it’s time to get that screen loose – gently slide the opening pick down to the bottom right corner to break the adhesive seal.
– Leave that pick right where it is, so the adhesive doesn’t try to sneak back into place. If you need help, you can always schedule a repair
Step 10
There’s a little plastic clip hanging out in the bottom left corner, and it might just try to throw a wrench in your opening pick plans. Just use the very tip of your opening pick (about 1 mm) to navigate around it like a pro!
– Now it’s time to bring in some extra help – insert a second opening pick at the bottom edge of your device and gently slide it to the bottom left corner to cut through the adhesive.
– Don’t remove the opening pick just yet, leave it in place to keep the adhesive from sealing back up. If you need help, you can always schedule a repair
Step 11
– Let’s get started by inserting a third opening pick under the bottom left corner of the screen – this will help you make some progress.
– Now, slide that opening pick along the left edge of the screen to cut through the adhesive and release those plastic clips. You’re making great progress!
– Leave the opening pick in the top left corner to keep the adhesive from resealing – you’re almost there! If you need help, you can always schedule a repair
Step 12
When you’re cutting close to the front-facing camera, just slide in the tip of the opening pick (about 2.5 mm) to keep that camera safe and sound. No smudges, no worries!
– Slide in a fourth opening pick at the top left corner of the screen with confidence!
– Gently glide that pick along the top edge of your phone to neatly slice through the sticky stuff holding it all together.
– Keep that opening pick lodged in the top right corner, just to make sure the adhesive doesn’t decide to rejoin the party!
Step 13
Hold your horses! Don’t yank that display off just yet; it’s still hanging on to the phone assembly with a flex cable.
– Slide a fifth opening pick along the right edge of your phone to cut through the remaining adhesive and pop those right plastic clips free!
Step 14
Be gentle with that screen – avoid twisting or pulling it too far from the frame, or you might end up damaging the flex cable. If you need help, you can always schedule a repair
Step 15
That display cable bracket is holding on tight! Give it a little love (and some gentle force) to release it.
– Let’s free that display cable bracket! Grab your trusty tweezers and gently slide one arm into the opening at the top.
– Now, give that bracket a little push inwards and carefully pry it up to release it. You’ve got this!
Tools Used
Step 17
– Hey there! So, you’re looking to reconnect the display flex cable, right? Just use your trusty spudger to pop that connector straight up from its cozy little socket. Easy peasy! And when you’re ready to put it back together, don’t stress – carefully line it up and give it a good press on both sides. Remember, no middle pressing, unless you want to bend some pins and cause some serious damage. If you’re feeling a bit puzzled, you can always schedule a repair with our awesome team at schedule a repair!
Tools Used
Step 18
– Let’s get that screen separated from the phone assembly!
– Now, while you’re putting everything back together:
– When you power up your device after reassembly, the screen will undergo a calibration dance. Keep those fingers away until it’s done, or you might end up with a touch screen that has a mind of its own!
– Double-check that all screws are snug and there are no pesky loose parts hanging around.
– Reconnect the screen and give your phone a test run to make sure everything’s working. Once confirmed, power it down and continue the reassembly.
– If needed, apply fresh adhesive after giving the relevant areas a good clean with isopropyl alcohol (90% or higher).
– Using custom-cut adhesives for your device? Make sure to follow this guide for the best results.
– If you’re working with a pre-cut adhesive card, this guide is your go-to.
Step 19
Be super careful not to poke or twist the battery with your tool—doing so could lead to a leak of nasty chemicals or even a fire. Let’s keep it safe and sound!
Struggling to get that foil off? No worries! Just grab a heated iOpener and give the back of your device a warm hug for two minutes. That adhesive will be loosened up in no time!
Step 20
– Alright, let’s get those charging port screws out! Use a Torx T3 screwdriver to give those two 5.1 mm long screws holding the charging port bracket in place a little twist and they’ll come right off. If you need help, you can always schedule a repair.
Step 21
– Grab some tweezers and gently lift off the charging port bracket. You’ve got this!
Tools Used
Step 22
– Hey there! Time to take out these little fellas using your trusty Torx T3 screwdriver. Locate the six 5.1 mm-long screws holding the midframe in place and get ready to remove them. Feeling like a pro already? If not, take a deep breath and remember, you can always schedule a repair if you need a hand!
Step 23
– Grab your trusty tweezers and carefully remove the midframe – you’re making great progress!
– When you’re putting everything back together, take a moment to check the thermal pad. If it’s looking a bit worse for wear, don’t worry! Just remove the old pad, give the area a good clean with some high-concentration isopropyl alcohol (we’re talking 90% or higher) and a microfiber cloth, and then apply a brand new thermal pad. If you need help, you can always schedule a repair with the experts at Salvation Repair.
Tools Used
Step 25
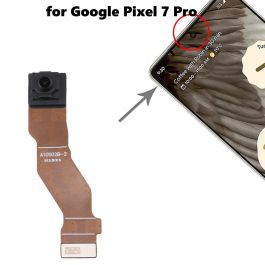
Get ready for a little adventure! The next seven steps will guide you through the process of removing the mmWave antenna with ease.
– Grab your trusty Torx T3 screwdriver and carefully unscrew the 5.1 mm-long screw that’s keeping the mmWave antenna bracket in place. You’re doing great!
Step 28
The mmWave antenna cable is snugly secured with a bit of mild adhesive magic.
– Wiggle an opening pick under the mmWave antenna cable from its bottom end.
– Gently use the pick to pry the mmWave antenna cable away from the motherboard.
Step 29
– Now it’s time to repeat the previous step – use that handy opening pick to gently pry the horizontal part of the mmWave antenna cable away from the motherboard. If you need help, you can always schedule a repair
Step 30
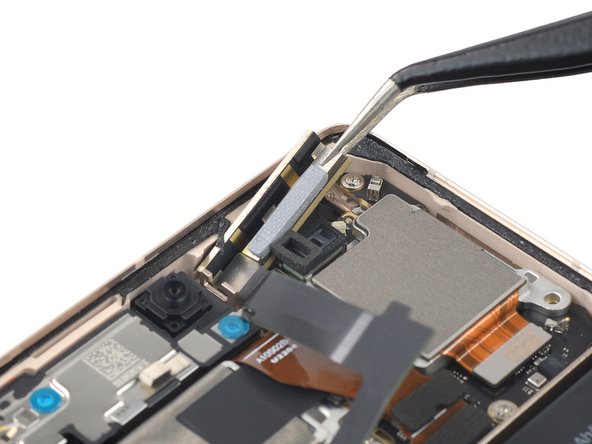
– Time to get a little delicate – use a pair of tweezers to carefully lift the mmWave antenna and its cable out of its recess.
– Next, remove the entire mmWave antenna assembly – it’s time to say goodbye!
– When you’re putting everything back together, don’t forget to check the thermal pad. If it’s looking a bit worse for wear, gently remove it, clean the area with some high-concentration (greater than 90%) isopropyl alcohol and a microfiber or lint-free cloth, and then apply a brand new thermal pad. If you need help, you can always schedule a repair with the experts at Salvation Repair.
Tools Used
Step 31
– Time to get started! Use a spudger to carefully disconnect the mmWave antenna cable by gently prying the connector straight up from its socket. Take your time and be patient.
– Now, let’s separate the mmWave antenna cable from the mmWave antenna. If you need help, you can always schedule a repair with Salvation Repair.
Tools Used
Step 32
– Congratulations! You’ve successfully uncovered the mmWave antenna. Keep up the great work!


