DIY Guide: How to Replace Google Pixel 9 Pro XL Screen
Duration: 45 minutes
Steps: 26 Steps
This repair guide was crafted with care and a dash of fun! While it isn’t officially recognized by any tech giants, it’s packed with helpful insights. If you want to dive deeper into our repair guides, check them out here. Remember, if you ever hit a snag, don’t hesitate to schedule a repair!
Hey there, techie! Let’s get your Pixel 9 Pro XL screen looking fresh again. This guide will walk you through replacing that cracked or unresponsive screen with a brand new one. If you’re not getting a screen with adhesive pre-installed, you’ll want to grab some replacement screen adhesive to complete this repair. Remember, any repair can affect your phone’s water resistance. How well you reapply the adhesive will determine if your phone stays water-resistant. If you need help, you can always schedule a repair. Let’s dive in!
Step 1
– First things first, let’s get your phone to chill out! Unplug all those cables and power it down completely. It’s time for a little break!
Step 2
Watch out for those pesky glass shards! They can make taking things apart a bit tricky—and they definitely don’t play nice when it comes to your safety. If your phone’s screen looks like a jigsaw puzzle, let’s tackle it together with these steps:
When you’re taping things up, just stick to the glass—leave the frame out of it!
– Let’s cover that cracked screen with some packing tape! Just stick overlapping strips until the whole thing is covered. This’ll give our suction cup a good grip.
– Safety first, right? Grab a pair of safety glasses and protect those peepers from any flying glass shards. You’re a rockstar, so let’s keep it that way!
Tools Used
Step 3
Keep an eye on the heat—your phone’s battery and plastic parts don’t enjoy the sauna experience! If things start feeling too warm for your touch, take a break from the heat.
– Grab a hair dryer, heat gun, or hot plate, and warm up that screen until it’s almost too toasty to handle!
Tools Used
Step 4
– Place a suction cup right in the middle of the top edge of the screen and give it a gentle tug.
Tools Used
Step 5
Hey there! Just a heads up—there are some gentle metal spring contacts all around your device. When you’re prying the screen apart, make sure to keep your pick under 3 mm deep to avoid any surprises. You’ve got this!
Or, get creative and tape a coin to a pick, leaving about 3 mm from the tip. Easy peasy!
– Grab your trusty opening pick and measure about 3 mm from the tip. Give it a mark with a permanent marker to keep things on point!
Step 6
Getting that opening pick in place can be a bit tricky. Just hang in there! If it feels like it’s playing hard to get, don’t hesitate to give the screen a little reheat to loosen things up.
– Give the suction handle a good, strong tug to create a gap between the screen and frame.
– Slide the tip of an opening pick under the screen.
Tools Used
Step 7
– Let’s get this party started! Slide the opening pick along the top edge to separate the adhesive holding things together.
Step 8
– Keep sliding your opening pick around the edges of the screen to get that sticky stuff off. You got this! 💪
Step 9
Watch out for the display cable—it’s chilling near the bottom right corner. Handle with care!
If the screen seems a bit clingy, take your trusty opening pick and glide it around the edge to break free any stubborn adhesive still hanging on.
– Hey there! Get ready to rock and roll with your phone’s screen! Just flip it over the right edge and use our slick suction handle. You got this, repair guru! 💪😉
Tools Used
Step 11
Those tiny components around the screen’s press connector are delicate, so be super careful not to bump into them. You’ve got this!
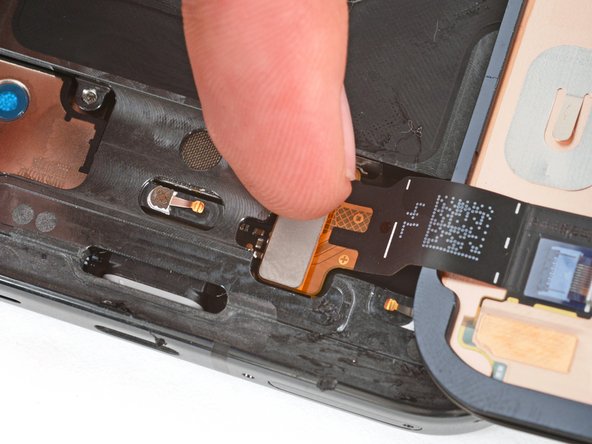
– Gently slide the spudger under the left edge of the screen cable connector and give it a little lift to disconnect it.
– Now, carefully remove the screen. You’re doing great!
Tools Used
Step 12
As you peel away the screen adhesive in this step, take it easy! We want to ensure that none of the delicate components around the frame get harmed. You’ve got this!
– Grab your trusty spudger and gently scrape away the old screen adhesive from the frame’s edges.
– Once the adhesive is gone, give the frame a quick wipe with isopropyl alcohol and a microfiber cloth to clean up any leftover gunk.
– Let the frame dry completely before moving on to the next step. Patience is key!
Tools Used
Step 13
Got a replacement screen with adhesive already attached? Awesome! Just hop down seven steps. If not, no worries—stick with us for the next seven steps to apply that new screen adhesive like a pro!
Make sure the blue liner is facing up, and the larger clear liner is on the bottom. You’re doing great!
– Before you go gluing things together, double-check the adhesive’s orientation on the frame. Hold it up to your phone like a puzzle piece to find the perfect fit.
– The adhesive has a groove that matches up with the frame’s edge—like a key in a lock.
– Those cutouts in the blue liner? They’re there to line up with the spring contacts on the frame. Match them up, and you’re golden!
Step 14
– Gently peel back the top half of the larger, clear liner to reveal the adhesive—keep the rest of the liner intact for now.
Step 21
Hey there! Just a quick heads-up: be super gentle with that screen cable during this part. You might want to tilt the screen a bit to get the cable in just the right spot. You’ve got this!
Avoid pressing down in the center. If the connector gets out of whack, the pins might bend and lead to some serious trouble.
– Line up the screen connector with its socket, then give one side a gentle push until it clicks. Repeat on the other side—easy peasy!
– Before sealing things up, let’s make sure everything’s working. Power on your phone, check it out, and then power it back down before moving on.
– Slide the bottom edge of the screen cable bracket into its spot, then press the top edge firmly until it clicks into place. You’re nailing this! If you need help, you can always schedule a repair.
Step 22
Step 24
Handle that screen with care while you peel off those liners! We wouldn’t want any cracks to spoil the fun.
Step 26
When you power on your revamped Pixel for the very first time, make sure it’s got a perfect flat landing and your hands are off the screen! No smudges, no cases, nothin’ distractin’ from your masterpiece.
– Way to go! You’ve successfully tackled your screen repair!
– Feeling techy? Give the built-in Pixel Diagnostic tool a whirl by clicking here.
– Got some e-waste? Make sure to drop it off at an R2 or e-Stewards certified recycler.
– If things didn’t go quite as planned, no worries! Try some basic troubleshooting or reach out to our awesome community for support.
– Oops! I didn’t finish this guide.
–
Success!


