DIY Guide: How to Replace the Fan in PlayStation 2 Slimline SCPH-750xx
Duration: 45 minutes
Steps: 10 Steps
Dive into this guide to effortlessly navigate the steps for swapping out a faulty fan in your PlayStation 2 Slimline SCPH-7500x. The fan is your trusty sidekick, keeping the other components cool and collected. You should catch the fan humming along while your PlayStation is powered up. If it’s silent or your system is feeling the heat, follow this guide to give that fan a fresh start. And remember, if you need help, you can always schedule a repair.
Step 1
– Power down the PlayStation 2 and unplug it like a pro. Don’t forget to eject the CD before flipping the console over. Safety first!
Step 2

Five of these little feet are easy to spot, but the sneaky last one is hiding under the black void sticker on the back of the device.
Some versions of the console, like the PAL Version, might skip the sticker altogether. If that’s the case, the foot or screw will be out in the open for you.
– Find the six little feet hanging out on the bottom of your PS2.


Step 4


– Peel off the sticker, and then take out the 6th foot. You’re almost there!
Step 5


– Once all the feet are off, grab your trusty Phillips #1 screwdriver and unscrew the six 4.0mm screws from the base of the PS2.
Tools Used

Step 6


Be gentle when removing the covers, as you don’t want to damage those tiny plastic screw pins. A little patience and care will go a long way in this step!
– After unscrewing all the screws, it’s time to pry those plastic covers apart. Start by lifting the side with the power cable and Ethernet port. Then, lift the other side to completely separate the two halves.
Step 7

– Alright, if you did everything right, you’ve got the plastic backing completely off, and now you’re staring at the electronic guts of your PlayStation 2. Nice job!
Step 8


– First, let’s get started by locating the fan component on the motherboard of your PS2 – it’s time to get up close and personal with the internals!
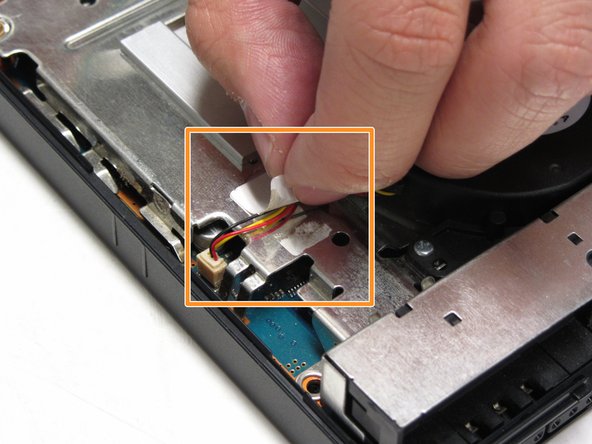
– Next, carefully peel off the sticker that’s holding down the fan’s wiring. You can use your fingers or tweezers to gently pry it off – easy does it!
Tools Used

Step 9


– Gently remove the terminal (white cover) connecting the red and yellow wires from the motherboard to the fan using tweezers. You’ve got this!
Tools Used
Step 10


You’ll find them just off the curved edge of the fan.
– To put everything back together, just follow these steps in reverse – easy peasy!
– If you need help or got stuck, don’t worry, you can always schedule a repair.
– You’re all done! Great job following this step-by-step repair guide from Salvation Repair.
Success!