DIY Guide: Replace Google Pixel Fold Screen Step-by-Step
Duration: 45 minutes
Steps: 126 Steps
This step-by-step guide is brought to you by the awesome folks at Salvation Repair. While we appreciate your interest, this guide hasn’t received any official nods from the big names out there. If you need help, you can always schedule a repair.
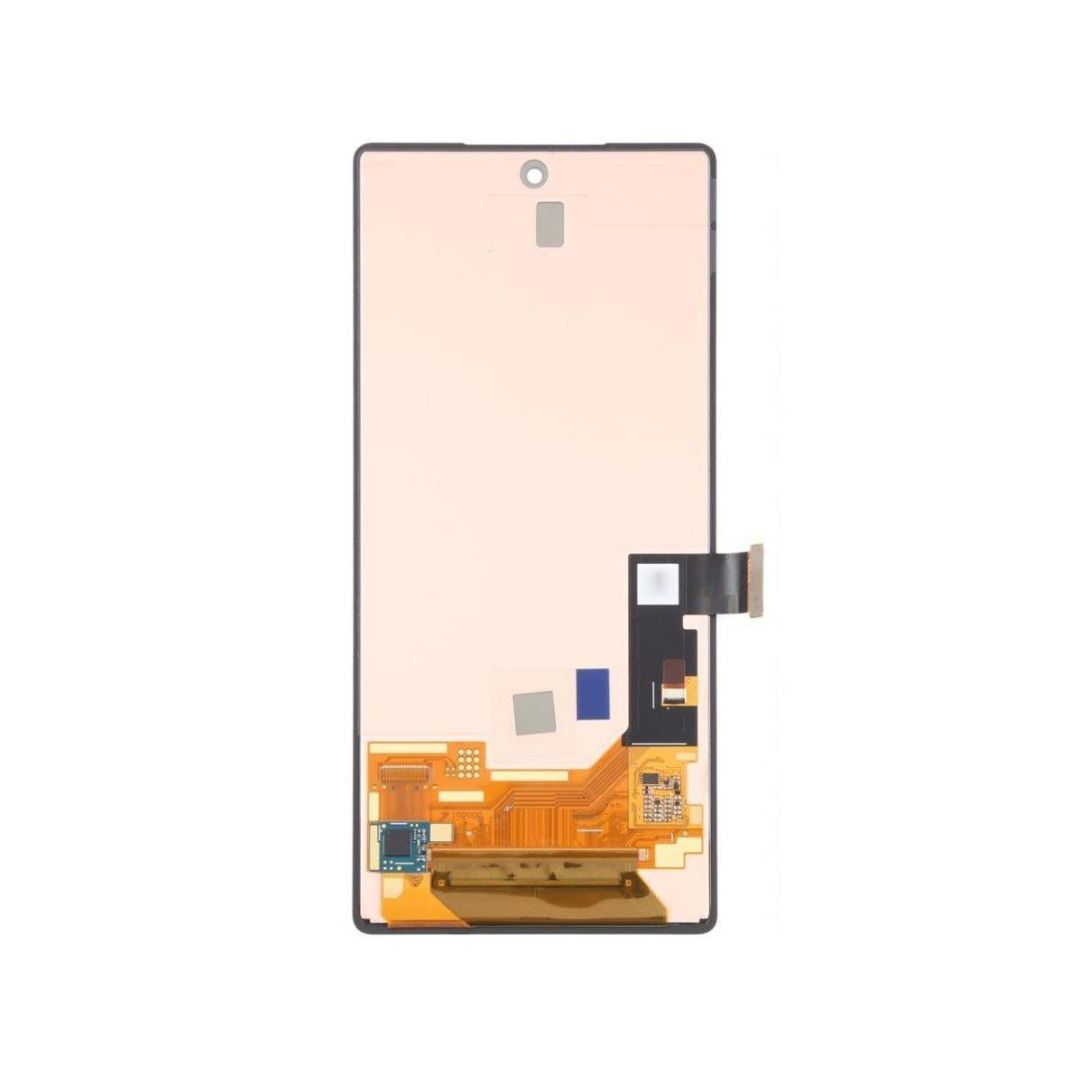
Welcome to your repair adventure! This guide will help you swap out the inner screen assembly in your Pixel Fold. The inner screen assembly includes the inner screen, fingerprint sensor, and volume button, all snugly fitted into a new frame. You’ll need to transfer all the internal components into this new setup. Just a heads up: some of the photos you’ll see here were snapped at different stages of disassembly, but don’t worry—any visual differences won’t mess with the steps you need to follow. If you find yourself in a pickle, you can always schedule a repair!
Step 2


– Grab your trusty SIM eject tool, a mini screwdriver, or a straightened paper clip and gently slide it into the SIM card tray hole.
– Give it a firm push to pop that SIM card tray out like a pro!
Step 3

Feeling a bit warm? A hair dryer, heat gun, or hot plate can help! Just be cautious—too much heat could send your display or battery into a meltdown. So, let’s heat things up gently and keep those gadgets safe!
– Gently place your phone on a spotless, smooth surface with the back glass facing up. Treat it like the precious gem it is!
– Warm up your trusty iOpener and lay it on the bottom edge of the back glass for about two minutes. It’s like giving your phone a cozy little spa treatment!
Tools Used

Step 4


The next three steps show off the Anti-Clamp, a cool tool to make opening your device a breeze. If you don’t have one, just hop down three steps for another method.
Need detailed instructions on using the Anti-Clamp? Check out this guide.
Ensure the suction cup isn’t touching the bezel on the inner screen, or it won’t stick properly.
If your phone’s surface is too slippery for the Anti-Clamp, use tape to get a better grip. If the glass is cracked, packing tape can help the suction cups adhere.
– Give the blue handle a little tug back to free the Anti-Clamp’s arms!
– Fully open your phone and gently slide the Anti-Clamp arms over the left side of the back glass, just below the shiny logo.
– Place the suction cups close to the bottom edge of your phone—one on the front and the other on the back.
– Press the cups together to create a snug suction grip on your phone.
Step 5


– Set something sturdy under your phone, like a box or a few books, to keep it nice and level while it hangs out between the Anti-Clamp’s arms.
– Give that blue handle a good pull forward to secure those arms in place.
– Now, twist the handle clockwise a full 360 degrees, or until those little suction cups start to stretch out.
– Keep an eye on those suction cups! They should stay in line with each other. If they start to go rogue, just detach them and realign the arms like a pro.
Step 6

Take your time and only twist a quarter turn at once. Then, hang tight for a minute before the next turn. Remember, the Anti-Clamp and a little patience are your best buddies in this process!
If the Anti-Clamp isn’t creating enough space, just add some more heat to the area and give that handle a friendly quarter-turn spin!
– Slide an opening pick into the gap under the back glass, like a champ.
– No need to worry about the next step, just move on!
Step 7


If your back glass is cracked to the point where it’s looking rough, don’t worry! You can try using a layer of clear packing tape to give the suction cup something to grab onto. Alternatively, you can use some really strong tape instead of the suction cup altogether. If that’s not working, you can try attaching the suction cup to the broken back glass with superglue. It’s a bit of a trick, but we’re sure you’ll get it!
Now, depending on the age of your phone, this might be a bit tricky. If you’re struggling, try heating up the edge a bit more and give it another go. Don’t sweat it if it takes a few tries – patience is key!
– Grab that suction cup and stick it on the back glass, aiming for the center of the bottom edge like a pro.
– Now, give it a strong and steady pull! This will help create a little gap between the back glass and the frame. You’ve got this!
– Time to slide in an opening pick into that gap you just created. Let’s get in there!
Step 8


Hey there! Just a friendly reminder: when you’re using that opening pick, keep it shallow—no deeper than 3.5 mm! We want to avoid any accidental damage to those precious internal components. Stay safe and happy repairing!
– Gently glide that opening pick back and forth along the bottom edge to loosen up the adhesive. You’ve got this!
– Once you’ve made some progress, just leave the pick chilling in the bottom left corner before you move on.
Step 9

– Let’s warm up that back glass with our heated iOpener pal for about two minutes on the left edge. Hang loose and let the magic happen!
Tools Used
Step 10


– Swing that opening pick around the bottom left corner like a pro to break loose that pesky adhesive!
Step 11


– Let’s get this party started! We’re gonna slip a second opening pick into the bottom left corner.
– Now, slide that pick up towards the top left corner to get that adhesive feeling the separation.
– Hold on tight to that pick at the top left corner. We’re not done yet!
Step 12

– Get that iOpener nice and toasty and press it against the top edge of the back glass for two minutes. It’s like a warm hug for your phone!
Tools Used
Step 13


– Gently slide the opening pick around the top left corner to break that adhesive seal. You’re doing great!
Step 14


– Pop in a third opening pick at the top-left corner like you’re tucking in a cozy blanket.
– Gently glide that pick towards the top right corner, creating a nice little split in the adhesive as you go. You’re doing great!
Step 15

– Warm up that iOpener and press it against the right edge of the back glass for a solid two minutes.
Tools Used
Step 16


This corner is a little delicate, so treat it like a fragile flower! Use lots of heat and be super gentle as you work around it during this step.
– Position your pick so it hugs the back glass as closely as possible.
– Gently pivot the opening pick around the top right corner to break the adhesive free.
Step 17


– Pop in a fourth opening pick in the top right corner like a pro!
– Gently slide that pick down towards the bottom right corner to break the adhesive loose. You’re doing great!
Step 18


Whoa there, glossy friend! This snazzy corner is super susceptible to shattering. So when you’re heating things up, go slow and gentle – think of it as slow dancing with a crush. And if you ever need a hand, we’ve got your back, just a mere click away! Schedule a repair
– Position your pick so it’s lying as flat as a pancake against that back glass.
– Twist the opening pick around the bottom right corner to effortlessly break through the adhesive.
Step 19


Hold up there! Don’t go yanking that back glass off just yet; it’s still hanging out with the phone via a little cable connection.
Now that you’re here, it’s time to pop that back glass off the frame! If you feel a little tugging around the edges, grab an opening pick and gently ease away any stubborn adhesive that’s hanging on. You’ve got this!
– Let’s get that back glass moving! Gently lift the left edge of the back glass up and over the right edge of the phone.
– Now, carefully lay the back glass to the right side of the phone. We’re almost there!
Step 20

As you dive into this repair adventure, keep a close eye on those little screws! They love to play hide-and-seek, so make sure each one returns to its original spot.
The Pixel Fold has a thing for Torx Plus screws, but don’t worry—standard Torx bits are welcome too! Just grab the same size or one size up (T3 or T4 Torx bits for those 3IP Torx Plus screws) and remember to apply steady downward pressure to keep everything intact and avoid stripping.
– Grab your trusty Torx Plus 3IP driver and remove those two little 2.8 mm screws holding down the middle bracket. You’ve got this!
Step 21


– Grab some tweezers or use your fingers to gently nudge that middle bracket over to the left side of the phone and pop it free from its clip.
– Go ahead and remove the middle bracket—it’s time for it to take a break!
– When you’re putting things back together, make sure to tuck that middle bracket clip back into its cozy little slot in the frame before you line up the screw holes.
Tools Used

Step 22


To get those connectors back in action, start by lining them up just right. Gently push down on one side until you hear that satisfying click, then do the same for the other side. Avoid pressing down in the center, though! If things get out of alignment, you could bend those pins and that’s a big no-no. Remember, if you hit a snag, you can always schedule a repair.
– Now, grab your spudger and give that back glass cable a little nudge! Gently pry it up and disconnect it from the motherboard. It’s like a tiny little dance, see? Just make sure it’s disconnected before moving on to the next step.
Tools Used