DIY Guide: Step-by-Step Nintendo Switch Dock Replacement
Duration: 45 minutes
Steps: 18 Steps
Ready to swap out that busted circuit board in your Nintendo Switch dock? This guide will walk you through the process step-by-step. Grab your Tri-head 360×50 driver, mini-tweezers, and needle-nose pliers, and let’s get your dock back to working like a champ!
Step 1

– Gently unclip the back plate and let it fold back. This will give you access to the power wire and the HDMI cable, all set and ready for the next steps!
Step 2

– Slide that Switch out of its dock like a pro!
– Flip the dock around so the adapter block is staring right back at you, just like in the picture.
Step 3

– Grab your trusty Tri-head 360×50 driver and unscrew those four screws (1, 2, 3, 4) like a pro! Use your mini-tweezers to gently pluck them out – they’re going to need a cozy spot to chill.
– Make sure to stash those screws in a safe place where you won’t forget about them. Trust me, future you will thank you!
Tools Used

Step 4

– Let’s get started! Using your trusty Tri-head 360×50 driver, carefully remove the next four screws marked A, B, C, and D. Then, use those handy mini-tweezers to gently pull them out.
– Great job so far! Now, take those screws and store them in a safe place where they won’t get lost. You’re doing fantastic!
Tools Used
Step 5


– Gently peel back the backing from the switch dock to reveal the circuit board underneath. Take it slow and steady—you’re doing great!
Step 6

– Gently unplug the snazzy red and black cable linking the circuit board to the dock housing. Do it with care—no yanking allowed!
– Grab a pair of needle-nosed pliers for a smoother move. Clamp onto that plastic casing like a pro and give it a nice, controlled pull to pop the cable out cleanly.
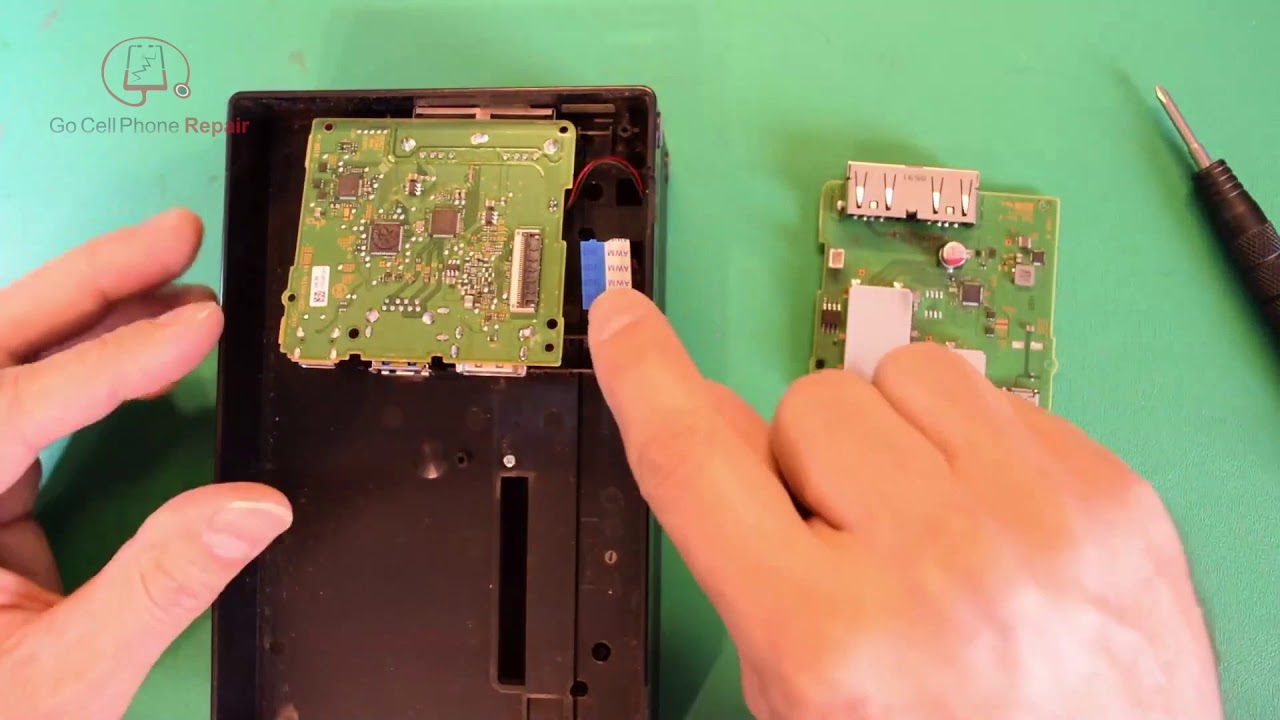
Step 7

– Carefully wiggle the film cable out of the circuit board. It should pop free with just a gentle pull—like magic!
Step 8
– Time to unpack that replacement circuit board! Give it a good once-over to make sure there’s no damage or weirdness lurking around. You want it to be in perfect shape for the job ahead.
Step 9


– Gently slide the film cable back into the replacement circuit board. A little push should do the trick, so don’t be shy!
– Make sure you’re inserting the cable the right way to keep it safe and sound. We want to avoid any mishaps!
Step 10


– Double-check the cable to make sure it’s lined up properly—take a peek at the port and make sure those holes are ready to match up perfectly.
– Slide that plug into the port like a pro! Hold steady, apply gentle pressure, and let the cable glide smoothly into place.
– Make sure the circuit board settles in without any hiccups or blockages—nice and snug is the goal!
Step 11

– Give the circuit board a gentle nudge to snugly fit it into the housing.
Step 12

– Pop that backing onto the dock like a pro—make sure all the screw holes are lined up perfectly.
– Press down gently, and you’ll feel a little ‘click’ or ‘give’ when it settles into place. Nice and easy!
Step 13

– Grab your Tri-Head driver and pop those screws (A, B, C, D) back in place!
Step 14

– Grab your trusty Tri-head driver and get ready to work some magic! It’s time to put those screws (1, 2, 3, 4) back where they belong. You’ve got this!
Step 15

– Connect the HDMI and power cables to the switch dock, and you’re on your way to a seamless experience!
Step 16

– Hook up that HDMI cable to any device flaunting an HDMI port—be it a TV, monitor, or your computer. (Heads-up: PCs might need an adapter to sync video and audio!)
Step 17

– Place your Nintendo Switch into the dock and power it on.
– The dock should start charging your Switch. If it doesn’t, double-check the power supply and the cable.
– Once the Switch is properly docked, the screen will stay black – that’s a good sign!
Step 18
– Fire up your Switch and give it a whirl to see if the audio and video are playing nice.
– If your Switch is all good but the dock is throwing a tantrum, let’s double-check a few things:
– Make sure both cables are snugly plugged in where they belong.
– Inspect the cables to ensure they’re not blocked or looking like they’ve had a rough day.
– Give the circuit board a glance—no cracks, burns, or other battle scars, right?
– Finally, confirm the circuit board is sitting pretty and properly in its housing.
Success!


