DIY Guide to Disassembling Power Tool Soldering Iron
Duration: 45 minutes
Steps: 9 Steps
Hey there, repair hero! Before you dive into the world of fixes, just a friendly reminder to make sure you’re working in a well-lit space. You wouldn’t want to miss a sneaky screw or two! And remember, if things get tricky, no worries at all—you can always schedule a repair for some expert help.
Hey there, before you dive into taking apart the TS101, let’s pump the brakes for a sec! The circuit board in this little guy is soldered right onto the display’s ribbon cable, and guess what? The display is glued in tight. So, getting it apart without some serious finesse can lead to a bit of a disaster. We recommend giving these instructions a good read-through before you get started. And remember, if you need help, you can always schedule a repair.
Step 1


– Start by popping off the soldering tip and the anti-slip cap. Easy peasy!
– Keep the tip retention screw and the grounding screw right where they are. No need to worry about them for this part of the disassembly.
Step 2


– Gently lift the edge of the case panel just enough to unhook that pesky clip near the power inputs.
– Carefully pry both sides of the case panel upwards, tilting it from the other end.
– Now, slide the case panel away from the device, pulling the tab at the end out of the case.
– (Your fingernail works like a charm for this job!)
Step 3

– Slide out the separation panel with ease! It simply glides into the case slots, making it a breeze to remove.
Step 4

– Stick some tape on those buttons or find a way to keep them snug so they don’t go wandering around inside the case.
Step 5

– You’ll find a single mounting screw hanging out near the soldering tip power clamps. I found that a Phillips 000 was my best buddy for this job, but a Phillips 00 can do the trick just fine too!
Step 6

– Gently nudge the entire circuit board towards the tip side. There’s a little leaf spring making contact with the tip mounting ring, so you’ll be pushing against a bit of light spring pressure—no biggie!
– Now, lift the power input side of the circuit board all the way out of the case. You’ll need to give it a good push towards the tip side with some solid force. A tiny bit of bending of the circuit board might be necessary to wiggle the USB-C socket past the case flanges.
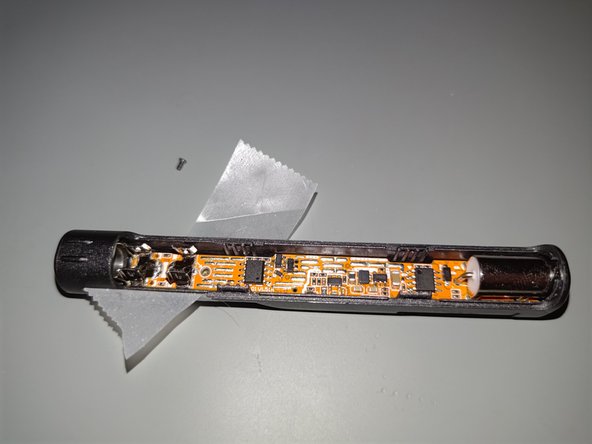
Step 7

– Well, here we are—this is the point where I hit a bit of a wall without causing any harm.
– Right now, the power input side of the circuit board is free from the case, but the tip side is still hanging on, thanks to a few millimeters of case overhang.
– It’s a little tricky to spot, but the circuit board is also being held in place by the display’s ribbon cable, which is soldered right onto the bottom of the circuit board.
– If you’re feeling adventurous and want to keep going, you might need to remove the display’s glass panel from the case, which is likely glued in pretty well.
– Once you manage to get that glass out, it seems like the actual display is just wedged between the glass and the case, and you should be able to pivot it up and slide it through a slot in the case.
– I decided to call it a day at this stage, but while trying to get the ground screw sleeve and one of the buttons back into position, I accidentally snapped the ribbon cable off the display.
Step 8

– Just to the right of the ground screw sleeve, you’ll spot the far edge of the display panel. And over to the left of the buttons, you can see the other edge of the panel, complete with some remnants of the ribbon cable, all while a sturdy piece of the case is hanging out in the middle of the panel. Fun times, right?
– The panel itself is a bit of a free spirit and will shift slightly in that space, which suggests that the display isn’t glued down tight. If you’ve managed to remove the glass panel that was sticking to the display, lifting the far end should be a breeze, allowing the display to slide right through the slot where the ribbon cable used to be. Easy peasy!
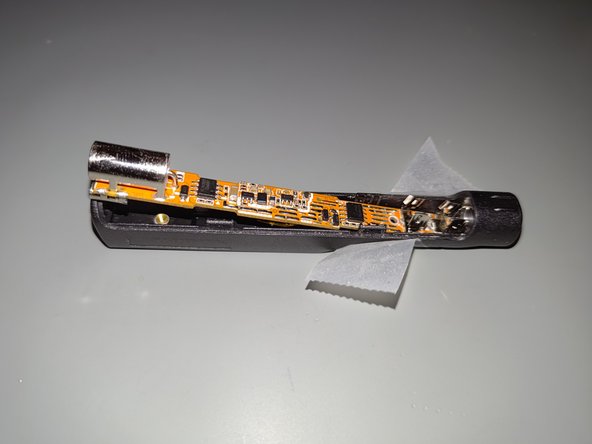
Step 9


– Check out the top side of the circuit board! You’ll see the ribbon cable is cleverly folded in both directions, giving you a clear peek at what’s hiding underneath on both sides.
– (Just a heads-up, the case panel is merely playing the role of a supportive prop for the circuit board here.)