DIY Guide to Replace PlayStation 4 Slim Fan System
Duration: 45 minutes
Steps: 25 Steps
Just a heads-up: Some of these steps might be a bit tricky. But don’t worry, you’ve got this! If you need help, you can always schedule a repair.
Hey there! Ready to give your PS4 Slim a little TLC? Follow this guide to swap out the fan system and keep your gaming sessions cool and smooth. If you need help, you can always schedule a repair.
Step 1


No worries! Removing the warranty sticker won’t void your warranty. If you need help, you can always schedule a repair.
– First things first, find the plastic warranty sticker hanging out next to the three ports on the side of your console. It’s playing hide and seek, but you’re up for the challenge!
– Now, gently peel that warranty sticker off using a trusty spudger. Just lift it up and away—like removing a band-aid, but way less painful!
Step 2


– Grab your trusty TR8 security Torx screwdriver and unscrew that exposed 5.0mm screw by turning it counter-clockwise. You’ve got this!
Step 3


Opening this up might require a little elbow grease, and you’ll know you’ve done it right when you hear a satisfying click as the bottom cover pops off.
– Flip your Playstation 4 Slim upside down with the screw side facing you.
– Use your fingers to gently pry up on the two corners in front of you.
– Slide the bottom cover towards the back corners and lift it off.
Step 4


Opening this up might require a bit of elbow grease, but don’t worry! You’ll know you’ve succeeded when you hear a satisfying click as the top cover pops off.
– Set your Playstation 4 Slim down on a flat surface, making sure it’s right side up with the PS logo proudly displayed on top and the ‘SONY’ and ‘PS4’ labels facing you.
– Gently press up on the two corners that are looking right at you with your fingers—give them a little nudge!
– Slide the top cover back towards the rear corners and lift it off to reveal the inner workings of your console.
Step 5


– Grab your trusty T8 screwdriver and carefully unscrew and remove the two screws (left one is 31.0mm and the right one is 24.0mm) by turning it counter-clockwise. Nice and easy!
– Take your Phillips #1 screwdriver and unscrew the 3.0mm screw with a smooth counter-clockwise motion. If you need help, you can always schedule a repair.
Tools Used

Step 6

– Unscrew those four 16mm Philips screws that are keeping the power supply snug as a bug in a rug!
Step 7


– Gently lift the metal sheet off the top of the power supply using your hands. You’ve got this!
Step 8


– Pop off the antenna from the top of the power supply by smoothly sliding the wire with your fingers through the grooves under the metal panel.
Step 9


– Let’s gently flip the Playstation 4 Slim onto its back, shall we?
– Now, grab your trusty Phillips #1 screwdriver and carefully unscrew that 4.0mm screw by turning it counter-clockwise. You’re doing great!
Tools Used
Step 10


– Grab a plastic opening tool and get in there, making space between the power supply and console by wedging and wiggling it like a pro.
– Using your hands, lift the power supply up and flip it onto its back on the metal sheet. You got this!


Step 12


– Using a T8 screwdriver, twist counter-clockwise to unscrew and take out that 31.0mm safety screw. You’ve got this!
Step 13


– Find the two wires chillin’ at the bottom of the motherboard.
– Carefully grab the metal connectors with your fingers or tweezers, and give them a gentle pull upward until they pop off. Need help? You can always schedule a repair.
Tools Used
Step 14


– Turn your device upside down.
– Remove 14x (19x for CUH-21xx) 4.0mm black screws using a Phillips #1 screwdriver, turning counter-clockwise.
– Remove 8x (7x for CUH-21xx) 6.0mm silver screws using a Phillips #1 screwdriver, turning counter-clockwise.
– Remove 4x 3.0mm silver screws using a Phillips #1 screwdriver, turning counter-clockwise.
Tools Used
Step 15


If you’re working on the CUH-21xx, feel free to skip this step – those screws have already been taken care of in the last step!
– Carefully take your trusty Phillips #1 screwdriver and twist those two 5.0mm screws on the side of the console counter-clockwise to set them free. You’re doing great!
Tools Used
Step 16


– Spot the white wire connected at the corner on top of the motherboard.
– Unplug it by gently grasping the metal connector with your fingers or tweezers and pulling up until it pops off.
– Carefully unthread the wire from the tape and set it aside using tweezers or your fingers.
Tools Used
Step 17

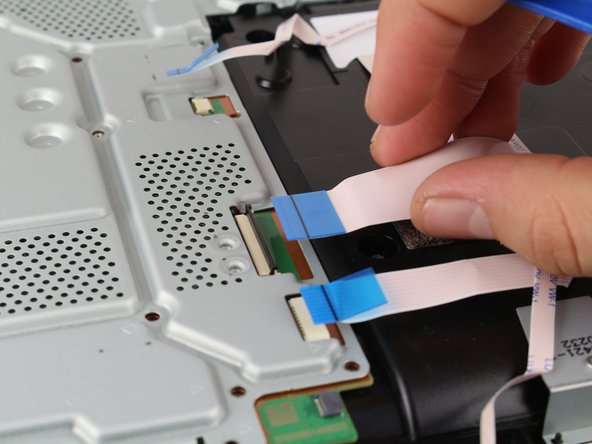

– Gently tug on those blue tabs with your fingers to disconnect the connections. You’ve got this!
– Give a little lift to the black clip on the biggest tab with your finger before you pull it off. Easy peasy!
– Grab that wire connection firmly and give it a good pull to remove it. You’re doing great!
Step 18


Keep an eye on those black pads stuck to the motherboard—don’t let them wander off while you’re getting things done!
Give that plate a little wiggle before lifting it out; it might just need a gentle nudge to break free!
– Lift the metal plate by gripping both sides and gently pulling it up and away from yourself.
Step 19


– Grab your trusty Phillips #1 screwdriver and get ready to unscrew those two 10.0mm screws – one’s silver and the other’s black. Just give them a counter-clockwise twist and they’ll be off in no time!
– Now, it’s time to gently lift off the small metal plate. Just use your fingers to grab it and give it a little nudge upward. Easy peasy!
Tools Used


Step 21


Give that board a little shimmy to help it break free before you pull it out!
– Gently lift the motherboard by the edges with one or both hands and pull it up and away. If you need help, you can always schedule a repair.
Step 22


– Carefully twist the six 4.0mm screws loose with a PH00 screwdriver, turning them left, and watch them pop out like confetti!
Step 23


– Gently grasp the edges of the metal plate and lift it up with your hands. You’ve got this!
Step 24


– Using a PH00 screwdriver, twist those two 40 mm screws counter-clockwise to set them free. You’ve got this!
Step 25


– Remove the fan system by grabbing the edge of the top metal plate and lifting up with your hands like a pro. If you need help, you can always schedule a repair.