DIY Microsoft Lumia 640 LTE Motherboard Replacement Guide
Duration: 45 minutes
Steps: 15 Steps
Get ready to swap out that motherboard! This upgrade will have your device zooming along at lightning speeds.
Step 1
– Use your thumb or fingernail to carefully pry the back cover off the phone. It’s like opening a treasure chest, but with less gold and more awesome technology!
Step 3
– Grab your trusty T4 Torx driver and get ready to work some magic! Remove the screws from the four corners and don’t forget the two on the middle left side—six screws in total to set your device free.
Step 4
– Grab your T4 Torx driver and let’s get those two screws out of there!
– Make sure to keep these screws separate from the ones at the back of the phone. We want to make sure each screw finds its perfect home!
Step 5
– Grab your trusty plastic opening tool and gently work it around the edges to pop the screen away from the back casing. You’ve got this!
– Next up, take your tweezers and delicately unclip the little side clip of your device. With a gentle touch, remove the back of your phone and reveal its inner beauty!
Tools Used
Step 6
If you’re diving into a motherboard replacement, just breeze on over to Step 11 once you’ve wrapped up this task.
Step 7
It’s stuck on there pretty firmly with some adhesive magic.
– Grab your trusty plastic opening tool and gently slide it under that shiny gold strip. Careful now!
– Next, take a pair of tweezers and delicately lift the camera up. You’ve got this!
– Finally, use those tweezers again to gently pull up on the depth sensor. Easy peasy!
Tools Used
Step 8
It’s stuck on there pretty good with some serious adhesive.
– Gently lift the ear speaker using a plastic opening tool—easy does it!
Step 9
– Alright, those last two screws are ready to go! Use your T-4 bit and give ’em a spin. You got this!
Step 11
– Grab that trusty plastic opening tool and gently lift the black tab like you’re revealing a surprise!
– Next, take your tweezers and carefully pull up on the gold tab. Think of it as giving it a little encouraging nudge.
– Now, with your spudger in hand, slide it slowly under the gold sticker and give it a gentle pry. That sticker might be a bit clingy thanks to its strong adhesive, but you’ve got this!
Step 14
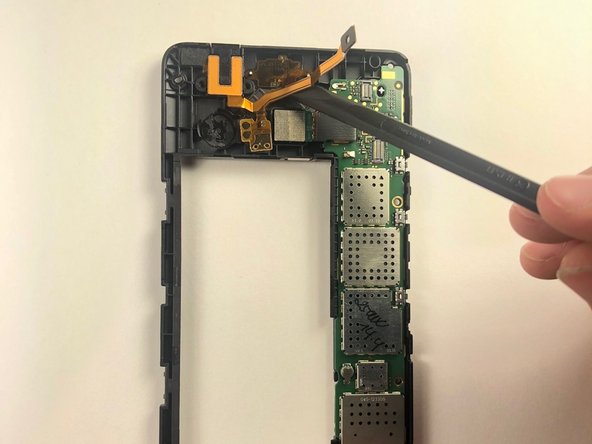
– Alright, grab your spudger and give that motherboard a little nudge. It’s time to gently coax it out of its cozy little home.
Tools Used
Step 15
– Ready to put your device back together? Just follow these steps in reverse and you’ll be all set!
– If you decided to take a break and not finish this guide, that’s totally okay!
– Remember, if you hit a snag and need some extra hands, you can always schedule a repair.
Success!


