DIY Microsoft Surface Laptop 4 13.5-inch Upper Case Replacement
Duration: 45 minutes
Steps: 11 Steps
Get ready to tackle the upper case replacement on your Microsoft Surface Laptop 4 (13.5-inch)! This part houses the keyboard and touchpad, and it’s important to handle it carefully, especially if you notice a swollen battery—safety first! While some of the images may feature a different model with minor differences in appearance, rest assured that the steps will guide you smoothly through the process. Let’s dive in and make your device as good as new!
Step 1


Hey there! Let your laptop battery drop below 25% before diving into this repair. A full battery could cause some fiery drama if things go wrong. Stay safe!
– Disconnect all the cables, give your laptop a moment of peace, and shut it down completely.
Step 2


– Gently close the screen and flip your laptop over so the back case is facing up. This will give you easy access to the four rubber feet!
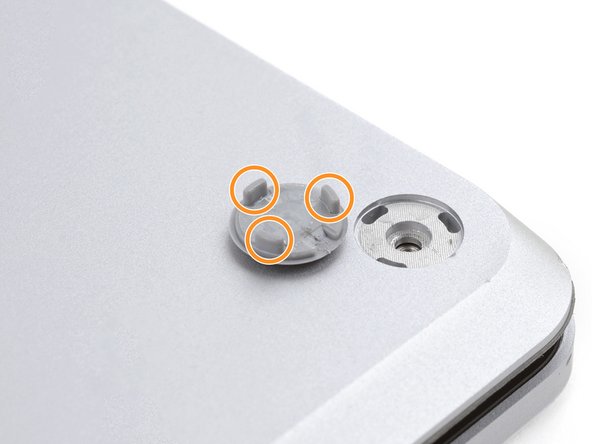
Step 3


Every foot has a handy little groove to make prying it off the laptop a breeze!
– The back feet are hanging out near the rear edge of the laptop—super easy to spot!
– The front feet are chilling closer to the front edge of the laptop—no detective work needed here!
Step 4


The feet pop out super fast—keep an eye on them so they don’t wander off!
– Slide one arm of your tweezers into the little nook of one of the feet.
– Give your tweezers a twist and gently pry up to break the adhesive seal and unclip that foot from the laptop.
– Pop off the foot.
– Now, just rinse and repeat this process for the other feet!
Tools Used

Step 5

– Your laptop’s got some fancy feet—two types, to be exact! When putting it all back together, make sure each foot finds its perfect little home in the correct recess.
– Give those feet a gentle press into their recesses to lock them snugly into the frame. Easy peasy!
– The rear feet have one center clip holding them in place—simple and straightforward.
– The front feet are a bit more sophisticated, rocking three clips and only fitting in one direction. Good vibes for precision!
– If the old feet aren’t sticking to the frame anymore, no worries! Peel off the old adhesive and slap on a bit of Tesa Tape where the sticky stuff used to be. Good as new!
Step 6


– If the feet are busted or worn out, grab some 8mm rubber furniture pads:
– Peel off a pad from its backing.
– Line up the pad over a foot cavity and press it down to secure. Easy as that!
Step 7

These screws can be a bit tricky! Make sure to keep a steady downward pressure to avoid any stripping mishaps.
As you go through this repair, keep tabs on every screw—each one has its special spot, so make sure it goes back home exactly where it belongs.
– Grab your trusty T5 Torx driver and tackle those four 3 mm screws holding down the upper case. You’ve got this!
Step 8


– Flip your laptop over and pop the screen wide open!
Step 9


Be careful not to completely remove the upper case just yet, it’s still hooked up to the laptop by a sneaky cable!
Make sure the upper case is properly seated and flush with the lower case all around. If there are any gaps, it could put pressure on the screen when you close it, and we don’t want that!
The top case is held in place by magnets.
– Grab the top edge of the upper case right above the keyboard and lift it straight up—don’t be shy, give it a confident tug to release it.
– Gently lift the bottom edge of the upper case up and away from the laptop, but take it easy—there’s a ribbon cable underneath that needs some love. Be careful not to strain it!
– When putting it all back together, lower the upper case onto the lower case until the magnets do their magic and snap it into place. Make sure it lays flat and you’re good to go!
Step 10

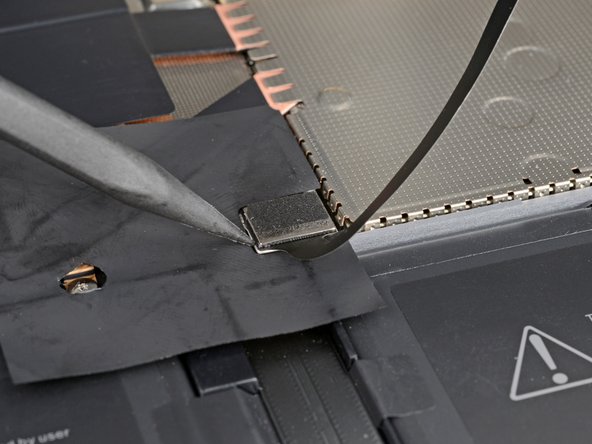
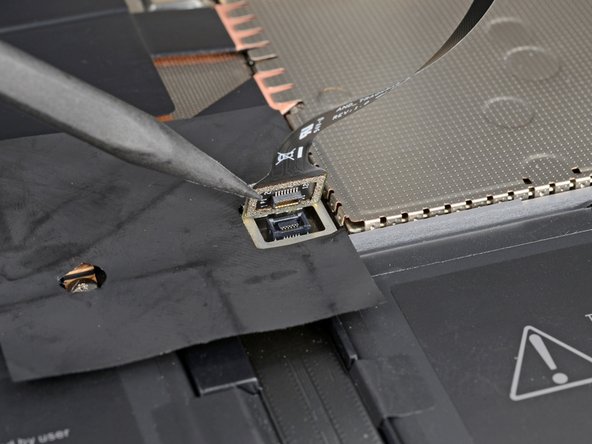
The keyboard and touchpad cable links the upper case to the rest of your laptop. It’s like the bridge that keeps things connected and ready to go!
– Gently wedge the pointy end of a spudger under one side of the magnet connector and pop it up to unplug.
– To reconnect the cable, line up the magnet connector over its socket with the cable facing downward. Give it a firm press to secure it.
Tools Used

Step 11

– Time to put your device back together! Just retrace your steps and follow these instructions in reverse.
– Got some e-waste? Make sure to drop it off at an R2 or e-Stewards certified recycler.
– Things didn’t go quite as planned? No worries! Give some basic troubleshooting a shot, or feel free to reach out to our Answers community for a helping hand.
–
Success!