DIY Nintendo Switch Lite Battery Replacement Guide
Duration: 45 minutes
Steps: 19 Steps
To keep things safe and sound, make sure your battery is under 25% charge before diving into disassembling your Switch.
Ready to swap out that tired old battery in your Nintendo Switch Lite? Let’s do it! The Switch Lite uses JIS screws, but don’t stress if you don’t have the exact tool—your trusty Phillips screwdriver will work in a pinch. Just be careful not to strip those screws! (Pro tip: precision bits that work with JIS screws can make this easier.) Safety first—discharge your battery below 25% before diving in to reduce any risk of a fiery surprise if the battery gets damaged. Got a swollen battery? Handle it with extra care! Heads up: you’ll need to remove the shield plate, which is stuck to the heat sink with thermal paste. That means you’ll have to clean off the old paste and slather on some fresh stuff before putting it back together. Let’s get to work!
Step 1

Before you dive into this repair adventure, let’s ensure your device is powered down and ready for some TLC.
As you go through this repair, keep an eye on every screw and make sure each one finds its way back to its original home. It’s like a puzzle, but the pieces are tiny screws!
– Time to get started! Use a Y00 screwdriver to carefully remove the four 6.3mm-long screws that are holding the back panel in place. This is the first step in getting your device back up and running, and you’re doing great!
Step 2


Keep those tight screws in check! Apply steady pressure downwards, take your time, and if the screwdriver isn’t doing the trick, swap it out for another one. Slow and steady wins this round!
– Grab your trusty JIS 000 driver or a good old PH 000 driver to tackle these screws holding the back panel in place:
– Two screws, 3.6 mm each, waiting at the top of your device
– Two more 3.6 mm screws at the bottom of the device
Step 3


Be careful not to push the opening tool too far in—it could cause damage to the speaker module. Take it easy, there’s no rush!
– Slide your opening tool into the left speaker grille at the bottom of the device.
– Give it a twist to pop those clips and free the back panel.
Step 4


– Take your opening tool and glide it around the bottom-left corner with style to pop those clips loose on the left side of the device. You’re doing great—keep it up!
Step 5


Careful now, don’t push the opening tool any deeper than necessary to avoid harming the speaker module.
– Slide an opening tool into the right speaker grille at the bottom of your device.
– Gently twist the opening tool to pop those clips loose.
Step 6


– Using your opening tool, slide and pry around the bottom-right corner to pop those clips off the right side.
Step 7


– Keep sliding and gently working that opening tool along the gap at the top of the device to pop those clips loose. Take your time—you’re doing great!
Step 8


– Gently prop open the bottom edge of the back panel, flipping it up like you’re cracking open a good book.
– Slide the back panel off with ease—you’re making progress!
Step 9

– Grab your trusty JIS 000 driver or a PH 000 driver and unscrew the following four little guys:
– Three screws measuring 3.1 mm each
– One screw measuring 4.5 mm
Step 10


You might feel a little pushback here, and that’s totally okay! The shield plate has a little love affair going on with the heat sink thanks to some thermal paste bonding them together.
– Grab a spudger or just use your trusty fingers to gently lift the shield plate out of the device—nice and easy!
– Take out the shield plate and set it aside like the rockstar you are.
– Wipe off that old, tired thermal paste from the shield plate and heat sink using some isopropyl alcohol and a microfiber cloth—clean it up like a pro. Before putting everything back together, show your heat sink some love by applying fresh thermal paste. Boom, you’re golden!
Tools Used


Step 11


– Grab an opening tool or just your fingernail and gently flip up the tiny, hinged locking tab on the ZIF connector for the motherboard interconnect cable. Easy does it—you’re doing great!
Step 12


Avoid using metal tweezers! Metallic tweezers might create a shortcut for your ribbon cable or connector. Play it safe and stick to nylon-tipped or ceramic-tipped tweezers.
– Grab your trusty tweezers and gently slide that interconnect cable out of its snug spot on the motherboard. You’ve got this!
Tools Used

Step 13


– Take the pointy end of your trusty spudger and gently pop the battery connector straight up and out of its snug little socket on the motherboard.
Tools Used
Step 14


Using more than a few drops of isopropyl alcohol might cause it to sneak into the screen, leading to a tougher (and pricier) screen replacement.
Before diving into the adhesive remover fun, make sure to get these prep steps sorted out first!
– Pour a few drops of adhesive remover or super-strong (90% or higher) isopropyl alcohol into the battery pocket along the top edge to loosen that stubborn adhesive.
Tools Used
Step 15


– Gently lift the top edge of your device to let that isopropyl alcohol sneak underneath the battery like a little helper.
– Hang tight for 1-2 minutes and give the isopropyl alcohol a chance to work its magic on the adhesive.
Tools Used
Step 16


Be careful not to jab or twist the battery with your tool—a damaged battery can leak nasty chemicals or even cause a fiery fiasco. Stay cool and take it slow!
– Slide an opening pick into the little gap between the battery and the battery well wall. It’s like unlocking a tiny secret door!
– Gently wiggle the tip of the pick under the battery and glide it along the edge to start loosening up that sticky adhesive. Take your time—steady hands win the race!
Step 17


Don’t apply more than a few drops at a time, or the liquid may seep under the screen.
– Keep that opening pick cozy in its spot and drizzle a few more drops of adhesive remover or isopropyl alcohol into the battery area—it’s like giving the adhesive a little nudge to let go.
– Gently tilt the top edge of your device upward and let it chill for a minute or two. This gives the adhesive remover some time to soften the grip of the sticky stuff.
– Now, take that pick and keep the party going along the top edge of the battery, slicing through more of that stubborn adhesive underneath. You’re on a roll!
Tools Used
Step 18


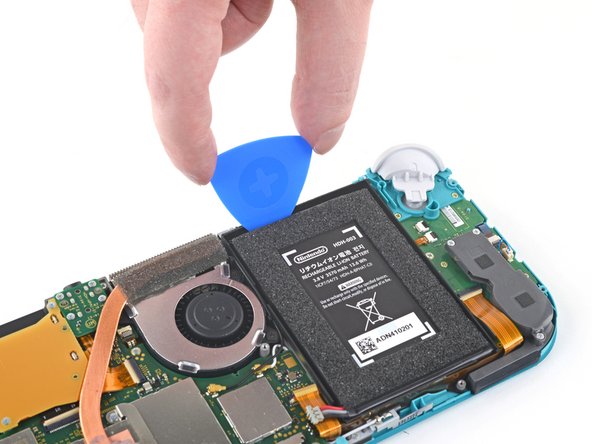
Take it easy when prying—no bending the battery, okay?
Once the battery is out, it’s retired for good. Pop in a fresh one to keep things safe and sound!
Having a hard time prying? Try adding a bit more isopropyl alcohol—it’s like magic in a bottle!
– Time to get that battery out! Carefully insert a plastic card under the battery and gently pry it up – you got this!
– Now that the battery is loose, go ahead and remove it. Easy peasy!
Tools Used
Step 19

– Grab some adhesive remover or isopropyl alcohol along with a microfiber cloth and gently wipe away any leftover adhesive in the battery well. This will help make room for your new battery.
– If your new battery didn’t come with adhesive pre-installed, no worries! Just follow this guide to add the pre-cut adhesive to the bottom of the battery before placing it in.
Tools Used
Success!