DIY PlayStation Repair Guide: Fix Your PlayStation TV Console
Duration: 45 minutes
Steps: 8 Steps
Keep in mind, this might just be a quick fix! While a permanent solution is possible, it’s not likely to last forever.
Heads up! This won’t bring back the KSM-440AAM and ACM laser assemblies. They tend to fail because of a plastic optical block that doesn’t age well. You’ll need to swap out the laser unit—there’s no shortcut here.
This guide is designed for the KSM-440ADM laser or any newer models.
Just a friendly reminder: if you go ahead with this, make sure to adjust the laser trimpot on the board!
Is your trusty PlayStation SCPH-550x having trouble reading games? Don’t worry, we’ve got you covered! This step-by-step guide will show you how to breathe new life into your existing laser, so you can keep gaming until you’re ready to upgrade or replace the laser unit. Please note that this fix may not be permanent and might only provide a temporary solution. On many older Playstations, the laser is a common failure point. In our test case, we were able to recover about 50-60% of the read functionality after adjustment. Unfortunately, the laser can’t be reliably readjusted and will eventually need to be replaced. This guide is designed for the KSM-440ADM laser or newer models, which use a durable magnesium optical block. If your laser is a KSM-440AAM or ACM, we’re afraid this guide won’t help – those lasers have a plastic optical block that can degrade over time, and the only solution is to replace the laser unit. If you’re feeling stuck or need expert help, you can always schedule a repair.
Step 1

Before you dive in, double-check that you’ve got a die cast laser handy. Those plastic lasers? They’re not coming back from this repair adventure!
– Got a plastic laser? Time to swap it out due to uneven wear.
– Rockin’ a Die cast laser? This might boost your read rate, though it’s more of an age-related issue. Heads-up: Sometimes, you’ll need to tweak the laser resistance.
Step 2


– Unscrew those 6 little screws at the bottom of your PlayStation using a trusty Phillips #2 screwdriver. You’ve got this!
– Gently lift off the top cover and reveal the magic inside!
Step 3


– Detach the laser from the system.
Step 4


If the laser is made of plastic, it’s a goner and needs to be replaced. The example shown here can be tweaked.
– Alright, with the laser out of the system, grab your Phillips PH1 screwdriver and remove those 2 screws. Double-check if that laser is plastic.
Step 5


Just tweak it enough so it can reliably read your games and music CDs again. If you go too fast, the laser might end up ‘burning’ your games or even damaging itself!
Anything below an 80-90% read rate is pretty much a no-go. These ones are tricky to bring back to life.
– Before you dive in, mark where the original adjustment point is and note down the factory settings. Trust me, going back to stock will be a real pain without it.
– Turn that trimpot little by little using a Phillips PH1 or any other bit that fits. Keep at it until your laser reads games like a champ.
Step 6


Boosting the read rate: If the results aren’t up to snuff, keep tweaking the motor. Keep at it until you’re satisfied with the read rate, or the motor stops spinning.
– Try testing on a known good system first.
– Spotting the Insert PlayStation CD-ROM screen? The motor’s a bit slow. Pump up that speed!
– Partially reassemble the system and give it a spin. If it’s running well, put it all back together.
– To check the read percentage, grab a few known good games and see which ones load. Aim for at least 5 test games. Only tweak the laser after each full test run.
– If the game loads, play it for a few minutes to check stability. Heads-up: Some early revisions have FMV issues – THIS IS NORMAL.
Step 7
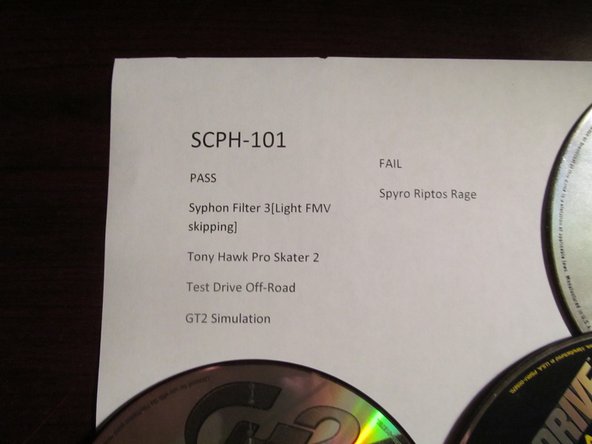

– System control results
Step 8


– Fixed SCPH-5501 outcomes
Success!