DIY Samsung Galaxy S21 Ultra Charging Board Replacement Guide
Duration: 45 minutes
Steps: 26 Steps
Hello, Galaxy SM-G998B/DS adventurers! Ready to tackle the project ahead? Let’s get going. If you run into a snag, remember: you can always schedule a repair. You’ve got this!
Hey there! Ready to give your Samsung Galaxy S21 Ultra a little TLC? Let’s dive in and swap out that charging board. Just a heads up, if you forget to replace the adhesive seals, your device should work fine, but it might lose its water resistance. Don’t sweat it though, just grab some replacement adhesive to stick everything back together. Need a hand? You can always schedule a repair with Salvation Repair!
Step 1

Make sure to unplug and power off your phone before getting started.
You can also use a hair dryer, heat gun, or hot plate, just remember, don’t overdo it with the heat! The display and internal battery don’t handle heat well.
– Alright folks, time to get our heat on! Grab an iOpener and let it chill on the back cover for at least 3 minutes. This’ll help us free up those sticky adhesives and make our work a breeze! If you need help, you can always schedule a repair.


Step 2


Got a back cover that’s shattered like a dropped disco ball? Try sticking some clear packing tape over it—your suction cup might grip better. Or skip the fuss and use some super sticky tape instead of the suction cup. If none of that sticks (literally), a dab of superglue on the suction cup can do the job!
Struggling to make a gap appear? Give it some more heat to melt that stubborn adhesive. Just keep calm and follow the iOpener instructions to keep things cool and avoid overdoing it!
– Get yourself a suction handle and securely attach it to the bottom edge of the back cover, as close to the edge as you can.
– Use the suction handle to lift up the back cover, creating a small gap between the back cover and the frame.
– Grab an opening pick and slide it into the gap you just made.
– Gently slide the opening pick to the lower left corner to cut through the adhesive.
– Keep the opening pick in place to make sure the adhesive doesn’t seal back up.
Tools Used

Step 3


– Pop in another opening pick along the bottom edge of your phone—it’s like having a buddy for your tech adventure!
– Give that pick a little glide down to the bottom right corner and slice through that pesky adhesive.
– Keep those picks in place like a pro to make sure the adhesive doesn’t sneak back together.
Step 4


Whoops! If the adhesive is being a tough cookie to cut, it’s probably gets chilly. Warm things up with your iOpener for about 2-3 minutes, and it’ll be ready to roll!
– Pop in a third opening pick at the bottom right corner of your phone.
– Gently slide that pick along the right edge of your phone to cut through the adhesive like a pro.
– Keep the opening pick wedged in the top right corner to stop the adhesive from sticking back together.
Tools Used
Step 5


When you’re getting close to the camera assembly, just slide in the tip of the opening pick (about 4-5 mm) to keep that camera safe and sound—no smudges or damage allowed!
– Take a fourth opening pick and sneak it under the top right corner of your phone.
– Glide that pick along the top edge and slice through the adhesive like a pro.
– Leave the opening pick chilling in the top left corner to keep the adhesive from sticking together again.
Step 6


Hey there! When you’re working near the power button, remember to gently slide in just the tip of the opening pick (~3-4 mm). This way, you’ll keep those power and volume buttons safe and sound from any harm.
– Slide a fifth opening pick under the top left corner like a pro.
– Gently glide the opening pick down the left edge of the back cover to cut through the last bits of adhesive.
Step 7


– Hey there! Let’s get this show on the road and take a gander at these steps for repairing your device. First up, let’s remove that back cover, shall we?
– Next, let’s do a quick power test before we seal it back up. Remember to turn it off before continuing.
– It’s time to brave the adhesive beast! Use your tweezers or fingers to remove any leftover chunks.
– Now let’s make sure there’s nothing sticky left behind with that 90%+ isopropyl alcohol spray.
– If you’re ready to get fancy with custom-cut adhesives, check out this helpful guide.
– And for you double-sided tape fans out there, follow along with this tutorial.
Step 8


– Slip an opening pick under the lower left side of the NFC antenna and charging coil assembly like you’re sneaking in a secret message.
– Gently glide that pick along the bottom left edge of the assembly to free it from its buddy, the battery. If you need help, you can always schedule a repair.
Step 9


– Gently slip an opening pick below the lower part of the NFC antenna and charging coil setup.
– Slide the pick carefully along the lower side of the setup to detach it from the speaker.
Step 10


– Grab your trusty spudger and gently lift that charging coil connector straight up from its socket. Easy does it! If you need help, you can always schedule a repair.
Tools Used

Step 11


– Grab your trusty spudger and pop off the NFC antenna by gently lifting the connector straight up from its little home. If you need help, you can always schedule a repair.
Tools Used
Step 12

– Grab your trusty Phillips screwdriver and take out the five 3.9 mm-long screws holding down the NFC antenna and charging coil assembly. Need a hand? No worries, you can always schedule a repair.
Step 13


– Hey there! Gently grab those trusty tweezers or your fingers and carefully peel away the NFC antenna and charging coil assembly. It’s like taking a sticker off a new gadget – slow and steady does it! Need a hand? You can always schedule a repair.
Step 14


– Grab your trusty spudger and gently pop the battery connector straight up from its socket like you’re lifting the trophy! Easy does it, and if you need help, you can always schedule a repair.
Tools Used
Step 15

– Grab a Phillips screwdriver and carefully unscrew those four 3.9 mm-long screws holding the loudspeaker assembly in place. You’ve got this!
Step 16


– Slide your trusty spudger into the little gap between the top of the loudspeaker assembly and the midframe. It’s a snug fit, but that’s where the magic happens!
– Once you’re in there, gently nudge the loudspeaker assembly upwards by tilting it downwards. Give it a little love and watch it pop up!
Tools Used
Step 17


– First up, let’s take out that loudspeaker assembly! It’s the loud little thing that keeps your tunes bumping.
– When you’re putting everything back together, don’t forget to slap on some fresh adhesive where it’s needed. Just make sure to tidy up those areas first with a bit of isopropyl alcohol (>90%) to get rid of any gunk!
Step 18


Feel free to skip this step if you’re not planning on tackling the motherboard or replacing the battery. Just move on to the next one with confidence!
– Grab your trusty spudger and gently pop that display flex cable connector straight up from its socket. Need a hand? You can always schedule a repair.
Tools Used
Step 19


– Grab your trusty spudger and gently pry the upper connectors of the main and interconnect flex cables straight up from their sockets to disconnect them from the motherboard. You’ve got this!
Tools Used
Step 20


– Grab your trusty spudger and gently pry the interconnect flex cable off the daughterboard by lifting its bottom connector straight up from the socket. Easy peasy!
– Now, using your fingers or a pair of tweezers, carefully wiggle and remove the interconnect flex cable. You’ve got this!
Tools Used
Step 21


– Grab your trusty spudger and let’s get that main flex cable disconnected from the daughterboard! Just gently pry the bottom connector straight up from its socket—easy peasy!
– Now, with a little finesse, use your fingers or some tweezers to carefully lift out the main flex cable. You’ve got this!
Tools Used
Step 22
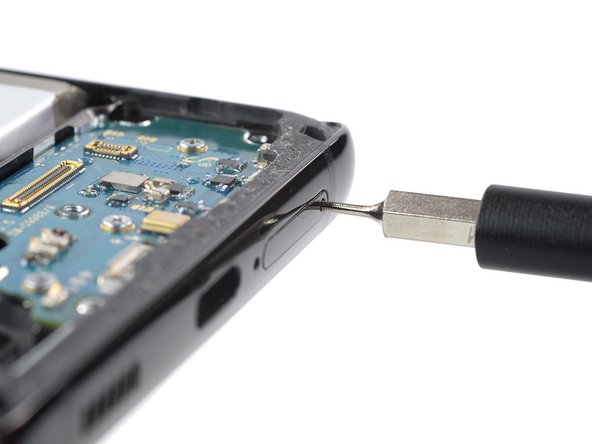

– Grab your trusty SIM card eject tool, a SIM eject bit, or even a straightened paper clip and gently slide it into the little hole on the SIM tray at the bottom edge of your phone.
– Give it a gentle push right into the hole to pop that SIM card tray out like a pro!
Tools Used

Step 23


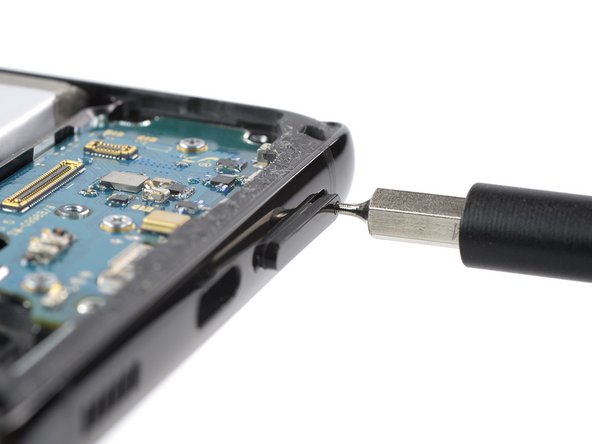
– Pop out the SIM card tray like a pro!
Step 24

– Grab your trusty Phillips screwdriver and unscrew those three 3.4 mm-long screws holding the charging board in place. You’ve got this!
Step 25

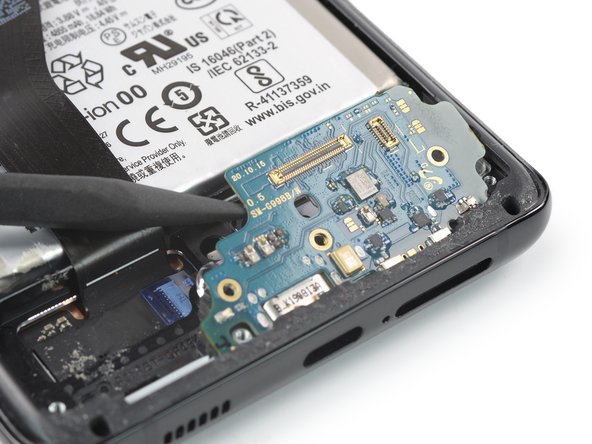
– Slide the sharp end of your trusty spudger under the left side of the charging board, right next to where the main flex cable connects. You’ve got this!
– Now, gently use that spudger to lift the charging board up. Easy peasy!
Tools Used
Step 26


– Grab a pair of blunt tweezers or just use your fingers to pop out the charging board. Lift up the top edge first, then gently slide the USB-C connector out of its spot.
– When putting it back together, apply fresh adhesive where it’s needed after cleaning the relevant areas with isopropyl alcohol (>90%). If you need help, you can always schedule a repair.


