DIY Samsung Galaxy S21 Ultra Earpiece Speaker Replacement Guide
Duration: 45 minutes
Steps: 22 Steps
Heads up, DIY techie! We’re diving into the nitty-gritty of your SM-G998B/DS. Keep your cool, follow these steps, and if things get tricky, you can always schedule a repair. Let’s get to it!
Ready to swap out the earpiece speaker on your Samsung Galaxy S21 Ultra? You’ve come to the right place! This guide is tailored for the SM-G998B/DS (international) model, but keep in mind that other models might have an extra antenna cable tucked away in the midframe. When you’re putting everything back together, remember that if you skip replacing those adhesive seals, your device will still work like a champ, but it might lose some of that sweet water protection. Don’t forget to grab some replacement adhesive to keep everything snug and secure during reassembly. If you need help, you can always schedule a repair.
Step 1

– Grab your trusty iOpener and give it a warm hug against the back cover for at least three minutes. This will help loosen up that stubborn adhesive hiding underneath, making your repair journey a breeze!
Alrighty, tech enthusiasts! Before you get your hands dirty, make sure you power down your device and unplug it first. Also, a hairdryer, heat gun, or hot plate is on the loose, just be extra careful and protect your phone from heat damage. Remember, you’ve got this, and if you need help, you can always schedule a repair!


Step 2


Hey there! If the back cover is looking a bit rough with cracks, try giving it some love by wrapping it in a layer of clear packing tape. This could help the suction cup stick just right. Or, if you’re feeling adventurous, you can rock some super strong tape instead. And if nothing else pans out, there’s always the ol’ superglue trick. You got this!
Having trouble creating that all-important gap? No sweat! Just turn up the heat a bit to soften things up. Remember to dance to the iOpener instructions so you don’t overheat things. Keep up the good work!
– Attach a nifty suction handle to the bottom edge of the back cover, keeping it snug against the edge.
– Hoist up the back cover using the suction handle to create a tiny gap between the back cover and the frame.
– Carefully slip an opening pick into the gap you’ve just made.
– Glide the opening pick to the bottom left corner to gently cut through the adhesive.
– Pop that opening pick in there to make sure the adhesive doesn’t stick the cover back on.
Tools Used

Step 3


– Get ready to jazz it up and insert a second opening pick at the bottom edge of your phone.
– Glide that opening pick to the bottom right corner like a smooth operator to slice through the adhesive.
– Keep those opening picks right where they are, so the adhesive doesn’t even think about resealing. It’s all about keeping it cool.
Step 4


If the adhesive is being a bit stubborn and hard to slice through, it probably needs a little warmth. Grab your iOpener and give it a go for two to three minutes to heat things up!
– Pop a third opening pick into the bottom right corner of your phone, like you’re unlocking a secret compartment.
– Gently glide that opening pick along the right edge of your phone to cut through the sticky stuff holding it together.
– Keep the opening pick in the top right corner to stop the adhesive from playing tricks and resealing itself.
Tools Used
Step 5


When you’re getting cozy with the camera assembly, just gently slide in the tip of your opening pick (around 4-5 mm) to keep that camera safe and sound—no smudges or damage allowed!
– Wedge a fourth opening pick under the top right corner of your phone.
– Glide the pick along the top edge to slice the adhesive.
– Keep the pick in the top left corner to prevent the adhesive from resealing.
Step 6


When you’re slicing close to the power button, just sneak in the tip of the opening pick (about 3-4 mm) to keep that power and volume button flex cable safe and sound. No need to stress, you’ve got this!
– Get that fifth opening pick in there under the top left corner.
– Glide that pick down the left edge of the back cover to cut through the rest of that adhesive.
Step 7


– Pop off the back cover.
– While putting things back together:
– Perfect time to power on your phone and test all functions before sealing it up. Make sure to power it back down completely before continuing.
– Toss out any leftover adhesive with tweezers or your fingers.
– Grab some high concentration (over 90%) isopropyl alcohol to wipe away any remaining adhesive.
– If you’re using custom-cut adhesives, follow this guide.
– If you’re using double-sided tape, follow this guide.
Step 8


– Slide an opening pick under the bottom left corner of the NFC antenna and charging coil assembly like you’re tucking in a cozy blanket.
– Gently glide that pick along the bottom left edge of the assembly to separate it from the battery, just like peeling a sticker off your favorite notebook.
Step 9


– Slide an opening pick under the bottom edge of the NFC antenna and charging coil assembly. You’re doing great!
– Gently glide the opening pick along the bottom of the assembly to detach it from the loudspeaker. Keep it up!
Step 10


– Grab that trusty spudger and gently pop the charging coil connector straight up from its socket.
Tools Used


Step 12

– Grab your trusty Phillips screwdriver and get ready to tackle those five 3.9 mm-long screws holding the NFC antenna and charging coil assembly in place. You’ve got this!
Step 13


– Grab a trusty pair of tweezers or just use your fingers to gently lift out the NFC antenna and charging coil assembly. You’ve got this!


Step 16

Hey there! For a touch of DIY magic, you can also opt for a hair dryer, heat gun, or hot plate. Just remember to keep it cool—both your display and internal battery can get a bit too toasty if things heat up too much.
– Get your iOpener ready and place it on the screen where the front-facing camera hangs out. Let it chill there for a solid two minutes to loosen up the sticky stuff underneath.
Step 17


– Gently slide an opening pick under the laser AF module to free it from the earpiece speaker assembly. You’re doing great!
– Now, use that trusty opening pick to lift the laser AF module up. Keep it up, you’re almost there!


Step 19

– Grab your trusty Phillips screwdriver and get ready to tackle those four 3.9 mm-long screws holding the earpiece speaker assembly in place. You’ve got this!
Step 20

– Grab your trusty spudger and gently lift the earpiece speaker cable connector straight up from its socket. If you need help, you can always schedule a repair
Tools Used
Step 21


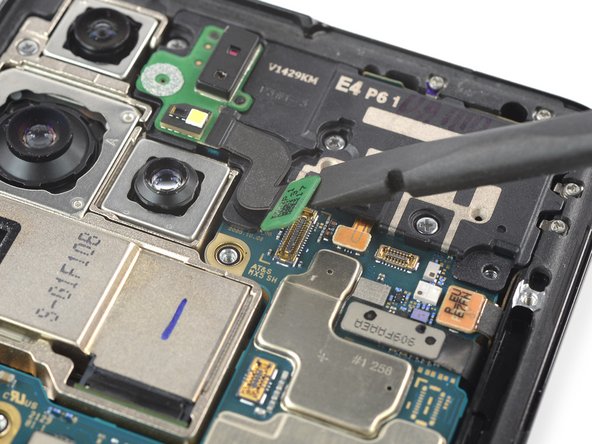
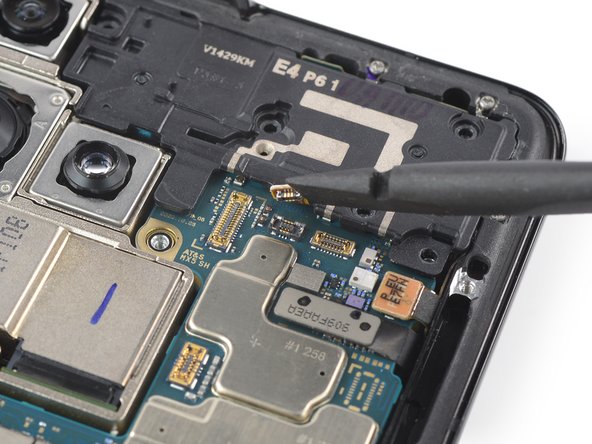
– Gently slide the flat end of your trusty spudger underneath the bottom edge of the earpiece speaker assembly. You’re doing great!
– Now, give that earpiece speaker assembly a little nudge with your spudger and pry it up. Keep up the good work!
Tools Used
Step 22

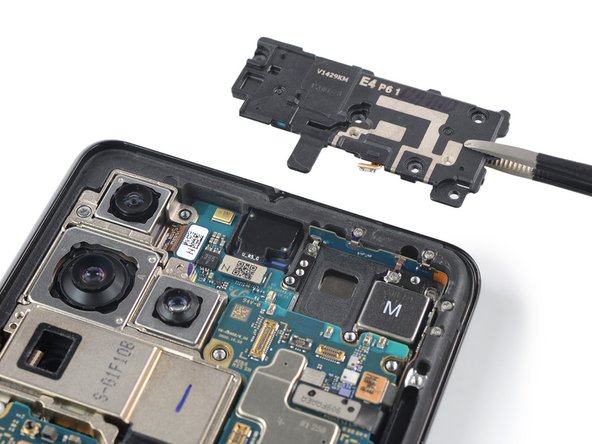
– Grab your trusty tweezers or simply use your fingers to gently take out the earpiece speaker assembly. You’ve got this!
– When you’re putting everything back together, don’t forget to add some fresh adhesive where it’s needed after giving those areas a good clean with isopropyl alcohol (>90%). A little TLC goes a long way!


