DIY Samsung Galaxy S6 Edge Midframe Assembly Replacement Tutorial
Duration: 45 minutes
Steps: 13 Steps
Heads up! Make sure you’re tackling this repair in a well-lit space and keep your tools organized. If you hit a snag or just want a helping hand, feel free to schedule a repair with us!
Ready to breathe new life into your Samsung Galaxy S6 Edge? Let’s get that midframe assembly replaced! Heads up: this repair means removing the rear glass, which will break the adhesive holding it down. If you need help, you can always schedule a repair. Now, follow these steps to reinstall the rear glass and you’re golden!
Step 1


Remember to be careful when searching for the SIM tray! Avoid using tools near the microphone, or you might face some trouble. If you need help, you can always schedule a repair
– Grab a paper clip or your trusty SIM eject tool, and gently slide it into the SIM card slot hole at the top of your phone.
– Give it a little push to pop out that SIM card tray.
– Now, carefully pull out the SIM card tray from your phone.
Step 2


Beware, our handy iOpener may get a little stuck, so watch out it doesn’t get too heated up!
Before diving in, give your microwave a quick clean to avoid any pesky grime getting on the iOpener.
– Pop the iOpener right into the center of the microwave.
Tools Used

Step 3

Handle the iOpener with care—overheating can make it burst! Keep it under 100˚C (212˚F).
If the iOpener looks puffy, hands off!
If it’s still too hot to touch in the middle, let it cool a bit more before reheating. Properly heated, it stays warm for up to 10 minutes.
Microwave wattage varies, so the heating time may differ. You’ll know the iOpener is ready when it’s just a bit too hot to comfortably handle.
– Pop that iOpener into the microwave for a quick thirty seconds to get it nice and toasty.
– As you dive into your repair adventure, remember to give the iOpener a little refresher in the microwave whenever it starts to chill out—just another thirty seconds each time should do the trick.
Tools Used
Step 4

Hey there! The iOpener is going to be pretty toasty, so handle it with care. Feel free to use an oven mitt if you want to play it safe.
– Carefully take the iOpener out of the microwave, holding it by one of the flat ends to keep your fingers away from the warm center.
Tools Used
Step 5


Be cautious, the iOpener gets super toasty! Make sure to grab it by the end tabs only.
No microwave? No problem! Just take a cue from the good old days and warm up your iOpener in a pot of boiling water.
– Fill up a pot or pan with water, making sure it’s enough to completely submerge your iOpener.
– Get that water nice and hot – bring it to a boil and then turn off the heat.
– Now, it’s time to give your iOpener a nice little soak in the hot tub for 2-3 minutes. Just make sure it’s taking a full dip!
– Using your handy dandy tongs, pluck that warmed-up iOpener out of the water.
– Grab a towel and give your iOpener a good drying off.
– Your trusty iOpener is now good to go! If it needs a little extra warmth later on, just bring that water back to a boil, turn off the heat, and let it soak again for 2-3 minutes.
Tools Used
Step 6


Feel free to use a hair dryer, heat gun, or hot plate if you need a little extra warmth, but watch out for the heat! Our OLED display and internal battery can be a bit sensitive, so let’s keep the heat in check to prevent any damage.
Popping open your phone? Wave goodbye to those waterproof seals. Make sure you’ve got replacement adhesive on hand, or avoid getting your phone wet if you reassemble it without the adhesive.
Got a shattered glass? Slap some packing tape over the whole panel to keep it together during the removal process.
Need more heat? You might have to reheat and reapply the iOpener a few times to get your phone warm enough. Follow the iOpener instructions to prevent overheating.
– Place the heated iOpener on the back panel for about two minutes to soften the adhesive holding the glass in place.
– Shift the iOpener to warm up the remaining part of the panel for another two minutes.
Tools Used
Step 7


If you’d like to give your adhesive a little nudge, feel free to drop a few drops of isopropyl alcohol into the gap after inserting the pick. It’ll help loosen things up for the steps ahead.
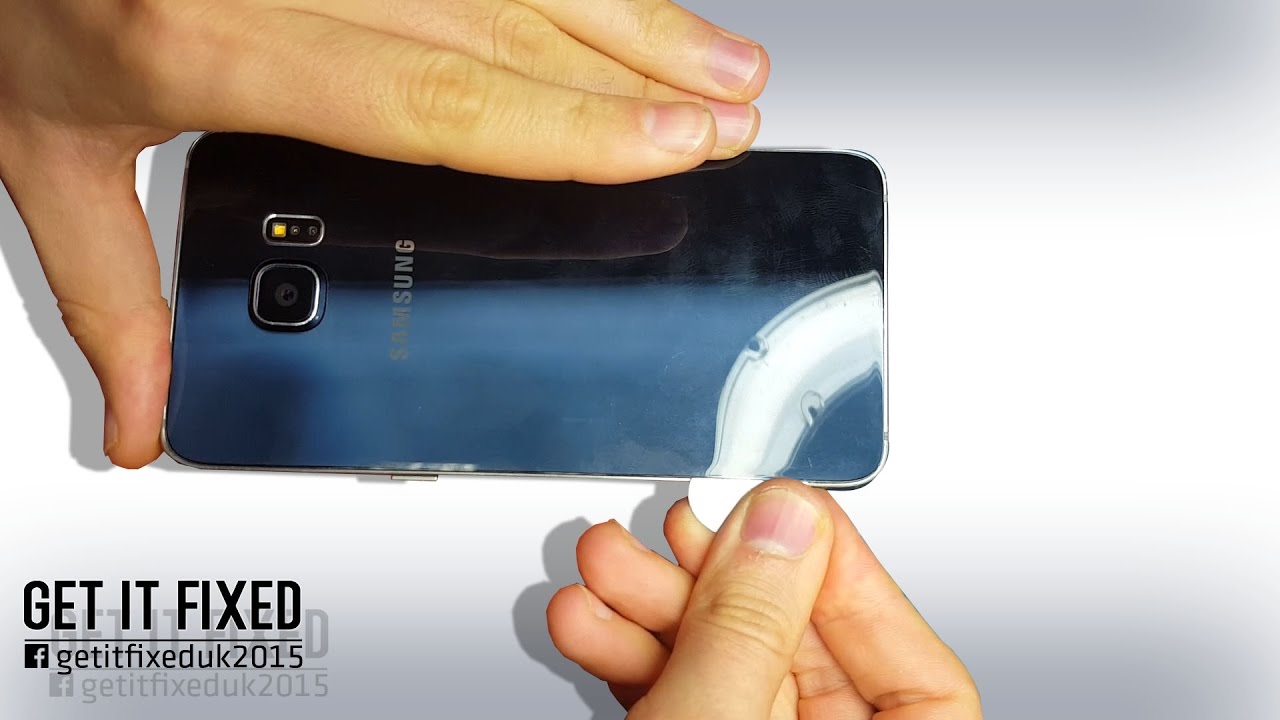
– Once the rear glass is warmed up and feels nice and toasty, plop a suction cup near the bottom edge of that glass.
– Give that suction cup a lift to open up a tiny space beneath the rear glass, then slide in an opening pick to keep it company.
Step 8


Hey there! Consider keeping the pick in place and getting another one as you move on to the next stage. Leaving it in can stop the glue you just separated from sticking back together.
Keep reheating the back glass when necessary to avoid the glue cooling and becoming tough.
– Gently glide the pick along the bottom edge of your phone, slicing through the adhesive that holds the rear glass in place. You’re making great progress!
Step 9


– Go ahead and repeat the heating and cutting procedure for the remaining three sides of the phone.
– Make sure to slide an opening pick under each edge to keep the adhesive from sealing back up.
Step 10


– Grab your trusty opening pick and gently slice through any stubborn adhesive that’s hanging around.
– Now, it’s time to carefully lift off the rear glass. You’ve got this!
Step 11


– To jazz up your device with a new rear glass:
– If you’re reusing the old rear glass or trying out glass without adhesive pre-installed, peep this guide .
– Bust out some tweezers to peel off any leftover adhesive from your device’s body.
– Get those adhesion spots squeaky clean using some high concentration isopropyl alcohol (90% or higher) and a lint-free cloth. Swipe in one single direction, none of that back and forth action. This will get your surface ready for the new adhesive.
– Strip off the adhesive backing from the fresh rear glass, gently align one edge with your device’s body, and give that glass a good old press onto your device.
Tools Used

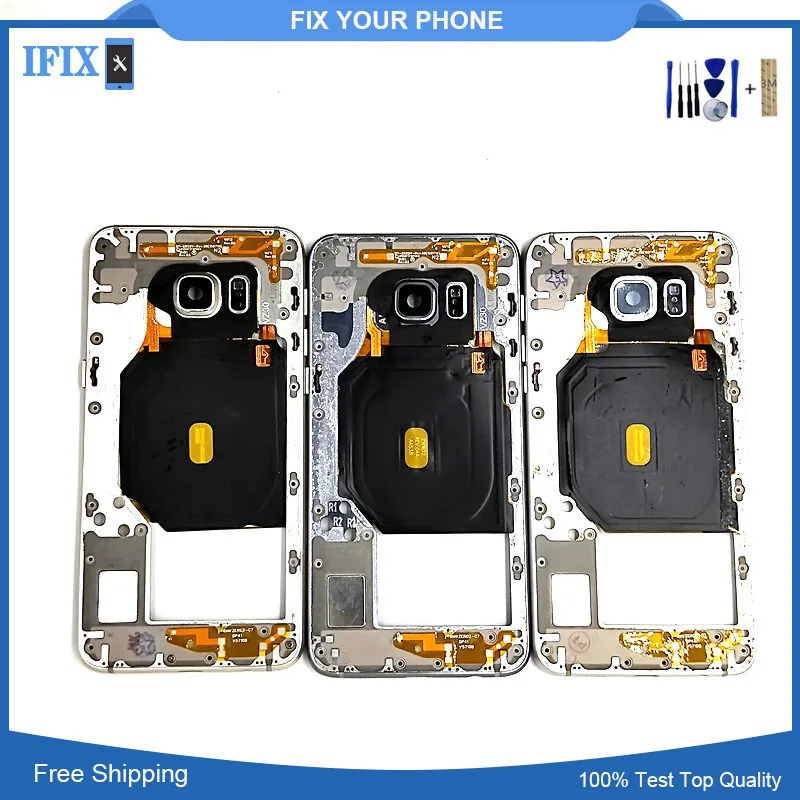
Step 12

– Let’s get those thirteen 3.3 mm Phillips #00 screws out of the midframe! Grab your trusty screwdriver and make it happen.
Step 13


– Gently press down on the back of the battery while lifting up on the edges of the midframe to separate it from the rest of the phone.