DIY Samsung Galaxy Tab 10.1 Flash Replacement Guide
Duration: 45 minutes
Steps: 8 Steps
Get ready to shine a light on your Samsung Galaxy Tab 10.1’s photo-taking capabilities! A wonky flash can leave your pics looking dull, so let’s get that LED flash light replaced. Before we dive in, just a couple of things to check off the list first!
Step 1
For model GT-P7500, you can skip this step because that model doesn’t have these two screws.
– Set the tablet down with the bottom side closest to you—like it’s about to tell you its secrets.
– Grab a Tri-Wing screwdriver and pop out those 4.1mm screws near the charging port. You’ve got this!
– If you spot any pesky plastic tabs covering the screws, just bust out some pointed tweezers and gently pry them off. Easy peasy!
Step 2
Stay sharp and be gentle – too much force can leave you with a cracked screen!
Keep those opening picks snugly in place along the side you’ve already popped open to ensure the back panel stays separated from the rest of your device. You’re doing great!
– Let’s get started! Begin by inserting a plastic opening tool into the seam between the rear panel and the front panel assembly, right in the middle of the left side. Easy does it!
– Now, gently work your way along the left and top edge with the plastic opening tool, carefully prying the rear panel away from the rest of the device. Take your time, you’ve got this!
Step 3
– Grab your trusty plastic opening tools and gently glide along the right and bottom edges. Once you’ve worked your way around, carefully lift the screen up from the back panel. Slow and steady wins the race!
Step 4
– Pop open those little flaps on the ZIF connectors that hold down the three big ribbon cables.
– Gently tug those ribbon cables out from their spots on the motherboard.
Step 5
– Time to unscrew those ten 3 mm Phillips #00 screws keeping the battery in place. Let’s get them out and set them aside safely!
Step 6
– Pop the edge of the battery up with your finger or a spudger.
– Ease the battery off the motherboard, keeping the board steady while you lift.
Tools Used
Step 7
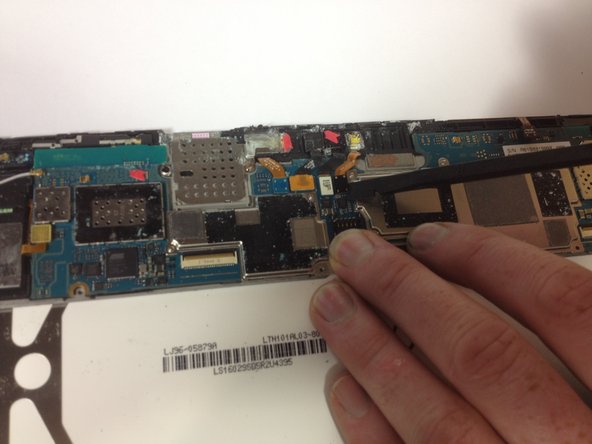
– Gently use your spudger to lift the black LED flash connector off the motherboard. You’re doing great!
Tools Used
Step 8
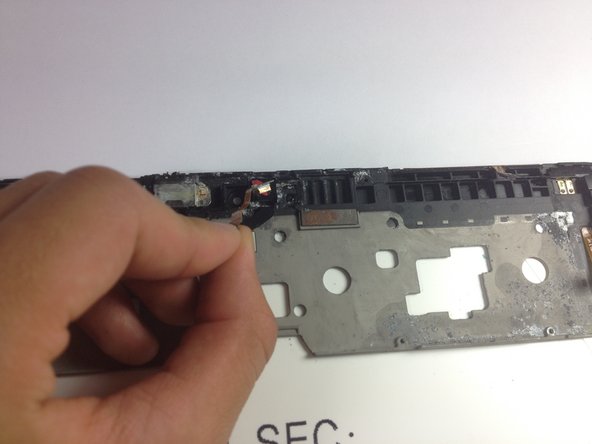
We’ve taken out the motherboard in these shots to give you a clearer view, but don’t worry, it’s not a must-do for this step.
– With a gentle grip, take hold of the black connector and carefully lift it out of its slot.
Success!


