DIY Tutorial: iPhone SE 2020 Rear Camera Replacement Guide
Duration: 45 minutes
Steps: 26 Steps
Heads up, tech warrior! Be gentle and take your time while performing these steps. If things get tricky, you can always schedule a repair. You’ve got this!
Ready to give your iPhone SE 2020 a little makeover? This guide will walk you through the steps to effortlessly remove and replace that rear camera. Let’s get your phone snapping pics like a pro again! If you need help, you can always schedule a repair.
Step 1
Before diving in, make sure your iPhone battery is below 25%. An overcharged lithium-ion battery might throw a firework show if punctured (and not the fun kind).
Shut down your iPhone before you start taking things apart.
Opening up your iPhone’s display can mess up its waterproof seals. Before moving forward, have replacement seals on hand or be super cautious about avoiding liquid exposure if you’re putting your iPhone back together without new seals. If you need help, you can always schedule a repair.
– Let’s get started by removing the two 3.5 mm pentalobe screws located on the bottom edge of your iPhone. Take your time and make sure they’re completely out before moving on to the next step. If you need help, you can always schedule a repair
Step 2
Oh no! Careful now, if your opening pick goes in too deep, it might do more harm than good. Follow this step to mark your pick and keep your device safe from harm.
– Measure 3mm from the tip and jazz up the opening pick with a hip permanent marker.
Step 3
In the next three steps, we’re introducing the Anti-Clamp, a nifty tool we created to simplify the opening process. Not using the Anti-Clamp? No worries! Just skip ahead three steps for another method.
– Give that blue handle a little tug backwards to free up the Anti-Clamp’s arms.
– Gently slide those arms over to the left or right edge of your iPhone—your choice!
– Place those suction cups near the lower edge of your iPhone, right above the home button—one in the front and one at the back.
– Squish those cups together to get them suctioned onto the spot you want.
Step 4
– Give that blue handle a little forward pull to lock those arms in place!
– Now, twist that handle a full 360 degrees or until you see those suction cups starting to stretch out.
– Keep an eye on those suction cups and make sure they’re staying in sync with each other. If they start to wander off course, just loosen them a tad and realign those arms like a pro!
Step 5
– Warm up an iOpener and thread it through the Anti-Clamp’s arms.
– Fold the iOpener and place it on the iPhone’s bottom edge.
– Wait for about a minute to let the adhesive loosen and create an opening gap.
– Slip an opening pick into the gap.
– Skip the next three steps.
Tools Used
Step 6
The following steps will guide you through separating the screen using a trusty suction cup.
– Give the lower edge of your iPhone a little warm-up! This will help loosen that stubborn adhesive holding the display in place, making it a breeze to pop open.
– Grab your trusty hairdryer or whip up an iOpener and let it work its magic on the lower edge of the phone for about 90 seconds. This will soften the adhesive hiding underneath and get you one step closer to a successful repair!
Tools Used
Step 7
– Place a suction cup on the lower half of the front panel, just above the home button. Need a hand? You can always schedule a repair.
Step 8
Struggling to create that initial gap? Fear not! Just like a stubborn pickle jar, a little extra heat and a gentle wiggle will do the trick. Keep at it until you’ve got enough room to slip in your trusty tool.
– Pull up on the suction cup with steady, firm pressure to create a slight gap between the screen and the frame.
– Slide an opening pick into that gap.
Step 9
Remember, gently does it! Avoid prying the top edge of the display from the rear case to keep those plastic clips intact and happy.
– Gently slide the opening pick along the left edge of the phone, starting from the bottom and moving towards the volume buttons and silent switch, to separate the adhesive holding the display.
– Pause near the top left corner of the display.
Step 10
Hey there! Just a heads up – there are some super delicate cables running along the right edge of your iPhone. Be careful not to insert your pick in this area to avoid any mishaps, as it could damage these cables.
Step 11
– Gently slide your tool back into the lower right corner of the iPhone, then make your way around the corner and up the right side of the phone to loosen that adhesive. You’ve got this!
Step 12
– With a gentle tug, lift the suction cup to raise the bottom edge of the display. You’re almost there!
– Give that little nub on the suction cup a pull to detach it from the front panel. You’ve got this!
Step 13
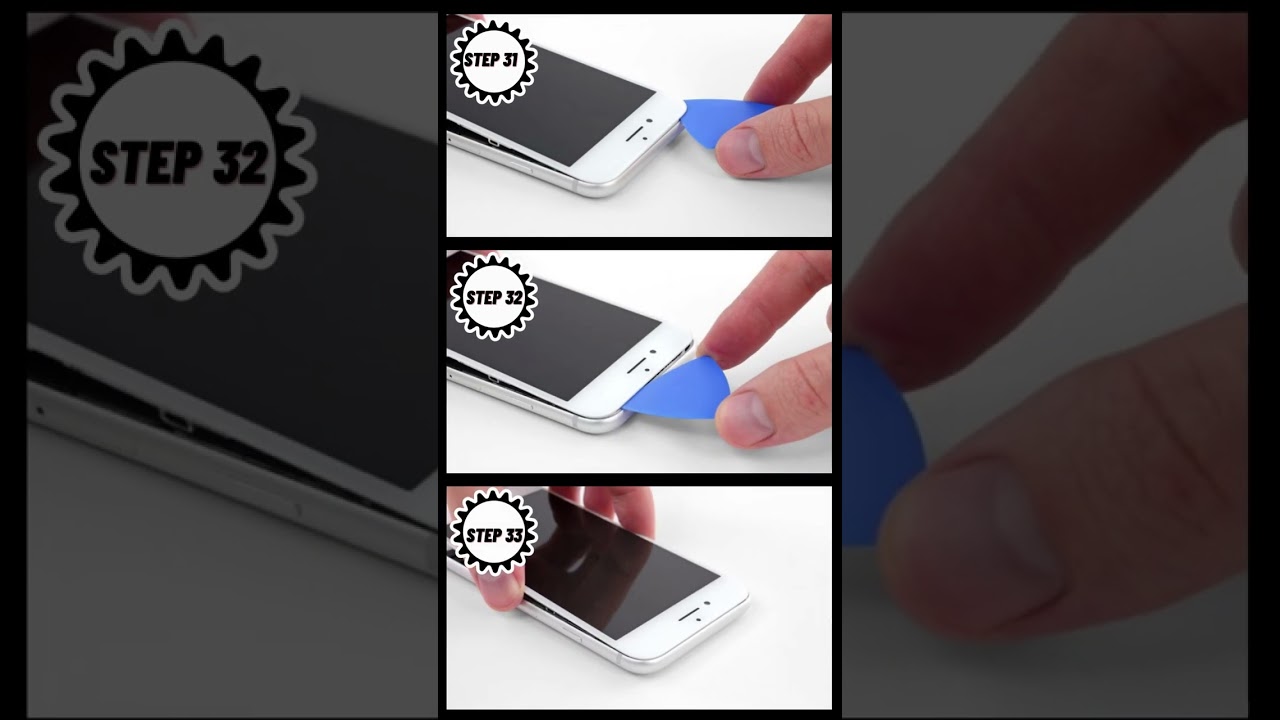
– Gently slide an opening pick under the display at the top left corner and along the top edge of your phone to help free up the last bit of stubborn adhesive. You’ve got this!
Step 14
– Gently shift the display assembly downwards (away from the top of the device) to release the clips securing it to the back cover.
Step 16
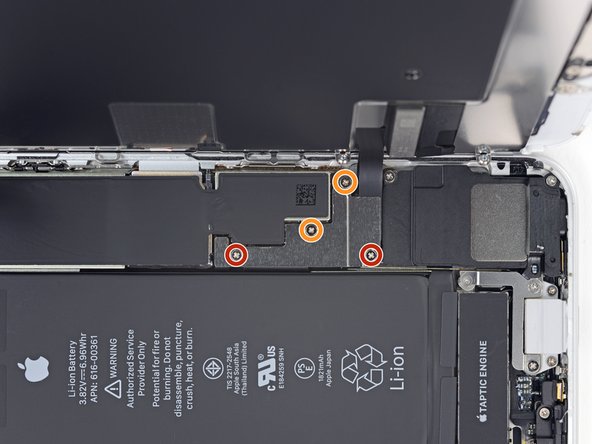
– Take out the four Phillips screws holding the lower display cable bracket to the logic board. Here are the lengths you’ll need to know:
– As you go through this guide, keep track of your screws! Putting a screw in the wrong place can cause permanent damage.
– Lift and remove the bracket.
Step 17
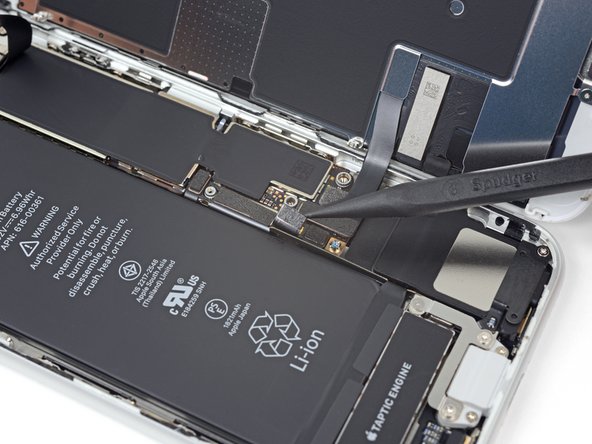
– Gently use a spudger to pop the battery connector out of its socket on the logic board.
– Carefully bend the battery connector cable slightly away from the logic board to avoid any accidental contact and power-up while you’re working.
Tools Used
Step 18
– Get ready to charm that lower display connector out of its socket using the point of a spudger.
– To get those press connectors back in business, apply some gentle pressure to one side until you hear a satisfying click, then do the same dance on the other side. Keep away from the center! A little misalignment can lead to a big bend and some not-so-happy permanent damage.
Tools Used
Step 20
– Pop out those three 1.3 mm Phillips screws holding the bracket over the front panel sensor assembly connector.
– Lift off the bracket.
Step 24
– First things first, let’s get that rear-facing camera bracket to loosen up! Grab your trusty screwdriver and remove those two screws holding it down.
Step 25
– Take off that rear-facing camera bracket.
Step 26
– Gently lift the rear camera straight up from its cozy little spot. It’s like giving it a little hug goodbye before you move on with the repair adventure!
