DIY Xbox 360 Dual Fans Replacement Guide
Duration: 45 minutes
Steps: 35 Steps
Give your Xbox a breath of fresh air and keep it cool under pressure by swapping out that dual fan assembly!
Step 1


– Grab the hard drive assembly and give that release button a gentle press while lifting up the front edge.
– Carefully pull the hard drive assembly out from the top vent.
Step 2

During this opening adventure, feel free to swap out a spudger for the trusty finger of an Xbox 360 opening tool. Let’s get this repair party started!
– Position the console upright with the bottom edge pointing skyward.
– Gently slide the flat end of a spudger or an Xbox 360 opening tool into the tiny gap at the front of the bottom vent.
– Carefully pry the front edge of the bottom vent away from the faceplate.
Tools Used


Step 3


Alright, let’s get those clips on the left and right sides of the bottom vent to let loose! Grab the tip of a spudger or your trusty Xbox 360 opening tool and gently work them free. You’ll find their secret hideouts marked in red, so you can’t miss them!
Now, slide your tool into the little holes designed in the white plastic side case pieces. It’s like a puzzle piece coming together!
Tools Used


Step 5


– Now, let’s do the same thing to those two middle clips on the bottom vent. You’ve got this!


Step 7

– Pop off the bottom vent from your 360 like it’s a cool sticker you just can’t resist peeling!
Step 8


Want to try a different approach? You can also use the edge of the Xbox 360 opening tool to get the job done, just be careful not to scratch that plastic case.
Or, go old school and use your hands to gently pry the faceplate away from the Xbox – it’s easier than you think!
– Start by carefully inserting the flat edge of a spudger between the faceplate and the outer casing, right near the power button – it’s time to get this repair started!
– Now, gently run your spudger along the edge of the faceplate to release the clips that hold it in place, and you’ll be one step closer to fixing your device.
Tools Used
Step 9

– Now do the same thing on the other side to free the left side of the faceplate.
Step 10

– Alright, let’s get started! Gently detach the faceplate from the front of the console.
Step 11


– Get your console ready by standing it up vertically with the top edge facing upwards – easy peasy!
– Now, let’s talk about the top vent. It’s attached to the console using clips, and the first two are hiding underneath, closest to the faceplate. Take a look at the pictures to see what we mean.
Step 12


Feeling adventurous? The long finger of an Xbox 360 opening tool can also do the trick here.
– Now it’s time to get those clips to release. Insert the flat end of a spudger into the small gaps you found earlier, and gently pry them open. You’re making great progress!
Tools Used
Step 13


Now it’s time to get those clips released along the left and right sides of the top vent. Use the tip of a spudger or the finger of an Xbox 360 opening tool to gently pry them loose – their locations are highlighted in red for your convenience.
Tools Used


Step 16


The final clip is cleverly tucked away beneath the rubber foot closest to the back of the console.
– Grab your trusty spudger and gently nudge the clip on the top vent closest to the back of the Xbox. It’s like giving it a little high-five!
– Once that’s done, carefully lift off the top vent from the 360. You’re making great progress!
Tools Used
Step 17

– Let’s get this show on the road! Position your console upright – top facing down.
– Now, gently peel off that warranty sticker. It’s time to get our hands dirty!
Step 18


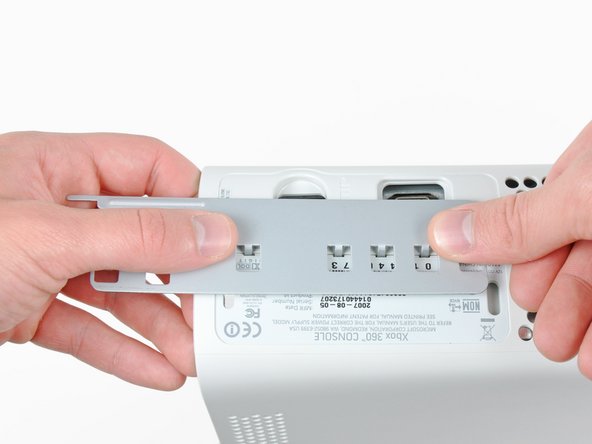
Alright, let’s get those cases apart! You’ll find some latches hiding out in the front and back of the console. Just give those a gentle nudge to get the upper case free and ready for action.
– Grab your trusty spudger and gently slide the flat end in to pop open the following latches:
– Right above the front-facing USB ports.
– Just underneath those USB ports.
– And up above the Memory Unit slots.
Tools Used

Step 20

– Gently raise the front part of the lower case to make sure those little latches at the front have had their chance to fully let go.
Step 21


The upper and lower cases are connected by seven sneaky release latches hiding on the back of the console – we’ve highlighted their spots in red for you.
Step 22


– Time to get this repair started! Use your Xbox 360 opening tool to gently pry the clips that hold the lower case to the upper case, near the I/O ports. Make sure it’s securely in place.
– Now, apply some gentle pressure to the tool and carefully pull the lower and upper cases apart. This will help release the retaining clips, and you’ll be one step closer to fixing your device.
Tools Used
Step 23


– Now it’s time to get this case open. While gently prying the upper and lower cases apart, use a spudger or an Xbox 360 opening tool to carefully push the long clip towards the center of the device.
– Keep going until the clip releases – at this point, the only things holding the cases together should be the clips near the power connector. You’re making great progress!
Tools Used
Step 24

– Now it’s time to get this Xbox 360 case open – use your trusty opening tool to release those last two clips near the power connector, nice and easy!
– Give the upper and lower cases a gentle push apart, and you’ll feel the retaining clips release – you’re making great progress!
Tools Used
Step 25

Go easy on the lower case near the power plug. Bending it too much can turn it into a cracked-up comedian!
– Let’s flip that console over so the front is taking a little nap facing down.
– Give the back of the lower case a gentle lift upwards, separating it from the console. You got this!
Step 26


You can also tackle this with an Xbox 360 opening tool—it’s a nifty little helper!
– Start by using the tip of a spudger to carefully release the clip that’s holding the eject button in place on the metal casing – it’s like setting it free!
– Next, slide the flat end of a spudger between the eject button and the optical drive, making sure not to push too hard
– Now, gently pry the eject button off its retaining posts and remove it from the 360 – you’re making great progress!
Tools Used
Step 27

– Unscrew those six shiny 64 mm T10 Torx screws that are holding the upper case snugly against the metal casing. You’ve got this!
Step 28

– Let’s get started by flipping the console over so the upper case is facing up – easy peasy!
– Now, gently lift the upper case straight up and set it aside. You’re making great progress!
Step 29

– Gently peel away the shiny silver tape that’s holding the optical drive snugly against the metal casing. You’ve got this!
Step 30

Hold your horses! We’re not quite ready to yank that optical drive out just yet. There are still a couple of cables holding it to the motherboard.
– Gently raise the optical drive to give yourself some breathing room to unplug the SATA and power connectors tucked away on the back of the optical drive. You’ve got this!
Step 31


– Let’s get this party started! Grab the power connector by its cables and give it a gentle tug to pull it straight out of its socket on the optical drive.
– Now, let’s disconnect that SATA data connector. Just give it a little pull straight away from its socket on the optical drive. You got this!

Step 33


– Slide the flat end of a spudger into the nifty little rectangular gap at the top of the cooling fan duct. Easy peasy!
– With a gentle touch, pop the fan duct retaining clip free and lift that fan duct right out of the Xbox.
– If you’re feeling fancy, you can also use the metal finger of an Xbox 360 opening tool to release the clip – your call!
Tools Used
Step 34


Hold your horses! Don’t go fully detaching that dual fan assembly just yet—the cable is still cozy with the motherboard.
– Alright, now that you’re lifting the metal strip above those dual fans, gently pull them toward the center of the motherboard. Easy does it!
Step 35

Some fan connectors come with a nifty locking tab. If yours has one, just give it a little press while you disconnect the fan from the motherboard. You’ve got this!
– Now you’re ready to put your device back together! Just follow the steps you took to take it apart, but in reverse order.
– If you didn’t quite make it through the whole guide, no worries! You can always schedule a repair.
– You got this!
Success!