
DIY Xbox 360 E CD Drive Replacement Guide
Duration: 45 minutes
Steps: 16 Steps
Get ready to dive into the world of the Xbox 360 E! Keep in mind, this process is a bit more hands-on than swapping out other Xbox parts. But don’t sweat it—it’s totally doable! Just take your time and follow the steps, and if you hit a snag, remember, help is just a click away. If you need help, you can always schedule a repair!

Step 2

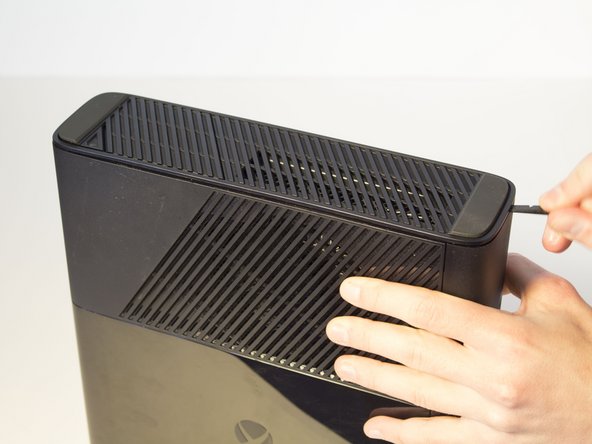
– Gently glide the spudger along the gap you’ve created between the grated panel and the bottom of your Xbox. It’s like giving it a little massage!
– Remember to pull back on the spudger every now and then like it’s a lever, while keeping it snug in the crevice. A little push and pull goes a long way!
Tools Used


Step 4

– Unscrew the 11 mm screw to the left of the green wifi-card using your trusty T9 Torx screw bit. You’ve got this!
Step 5


– Grab that green Wi-Fi card like a pro and give it a confident pull to remove it from the Xbox.


Step 8


– Gently wiggle that spudger in the crevice while sliding it to loosen up the bottom plate. You’re doing great!
– Keep sliding the spudger along that crevice all the way around the bottom panel’s edge. Smooth moves!
– Now, just give a little pull to take that bottom panel off. You’ve got this!
Tools Used
Step 9


– First, let’s get started by removing the five long black 55 mm screws labeled C2-5 and C7 – you’ll need a T9 Torx screwdriver for this step, so make sure you’ve got one handy.
– Now it’s time to carefully flip your device over and gently pull off the body. To do this, lift from the metal section that’s attached to the plastic exterior – it’s a bit like opening a clamshell, so take your time and be patient.
Step 10


– Flip your Xbox over so the bottom is facing up. Look for those rubber feet to confirm you’re on the right side!
– Gently lift the bottom part away from the core at a cool 45-degree angle.
Step 11


Removing the warranty sticker is part of this disassembly step. Just a heads up, doing this will void your warranty. For more details, check out the main page for warranty info from Microsoft.
The sticker isn’t necessary when putting things back together.
– Flip that Xbox around, so you’re looking at the back end. You got this!
– Time to peel that sticker off the back. Easy peasy!
Step 12


– Give that Xbox a little twist to the left – you’ll find a clip holding the body together.
– Grab your trusty spudger and give that clip a little push upward, like you’re opening a latch. Repeat that same move on the other end to release the other clip. You’re doing great!
Tools Used


Step 14


– Time to get hands-on! Carefully use your fingers to gently disconnect the blue ribbon cable from the CD drive.
Step 15

– Gently grab those blue and pink wires with your trusty tweezers and give them a little tug to unplug them. You’ve got this!
Step 16

– Now it’s time to put everything back together! Just follow these steps in reverse, and you’ll be all set!
– If you need to call it quits, no worries, just hit cancel.
– And remember, if you find yourself in a pickle, you can always schedule a repair!
Success!
