DIY Xbox Disc Drive Replacement Guide: Step-by-Step Tutorial
Duration: 45 minutes
Steps: 11 Steps
Dive into this guide to swap out the disk drive in your Microsoft Xbox. It’s easier than you’d think! Just follow along and you’ll have your console up and running in no time. And remember, if you need help, you can always schedule a repair.
Step 1

– Alright, champ! Let’s get this Xbox party started. First things first, make sure that bad boy is unplugged and chilling on a nice, flat surface. Safety first, right?
Step 2

Flip your Xbox upside down to uncover the four little rubber feet waiting to be revealed.
– Grab a metal spudger and gently poke at those four rubber feet to pop them off. You’ve got this!
Tools Used

Step 3


– Guess what? There are two sneaky screws hiding beneath the labels on the bottom of the case! Don’t worry, it’s not a magic trick.
– You have a couple of options here: you can either peel off those labels or just give them a gentle poke to find the screw holes. If you’re feeling adventurous, go ahead and cut or punch a little hole through them!
Step 4

– Unscrew those six T20 Torx screws that are holding the top cover snugly against the bottom cover. Let’s get that cover off!
Step 5


– Now that the bottom and top shells have parted ways, gently flip the Xbox right-side-up and lift off the top cover like a pro!
Step 6


The screw in the lower left corner of the disk drive might look like it’s snug in its hole, but surprise! It’s actually just hanging out a bit closer to the corner. Keep that in mind as you dive into your repair adventure!
– Let’s start by taking out those three tiny 3 mm T10 screws holding that hard drive to the Xbox – teamwork makes the dream work!
– Keep your eyes peeled, because there’s a sneaky little screw hiding on the rear left side of the hard drive. You’ll see it once you lift up that IDE ribbon cable. The other two screws are chillin’ at the front right and left sides of the hard drive, ready to be removed!
Step 7


– First, gently release the hard drive power cable from the carrier to get some extra slack – you’ll need it to lift out the hard drive.
– Next, carefully lift the plastic hard drive carrier out of the Xbox case. If you’re having trouble, don’t worry, it’s a bit tricky – but you’ve got this!
Step 8


– First off, let’s tackle those four pesky 3.4 mm T15 Torx screws hanging out on the plastic hard drive carrier—two screws on each side. Get them out of there!
– Now, it’s time to gently coax the hard drive out of its cozy plastic home. A little bit of gentle rocking will help it slide right out without any fuss.
Step 9


These components might be snug in their spots, so take it easy when you’re trying to take them out. Remember, pulling on the wires could lead to some unwanted damage to the cable assembly, so handle with care!
– Gently lift both the hard drive data ribbon cable and the power cable straight up from the hard drive. You’ve got this!
Step 10

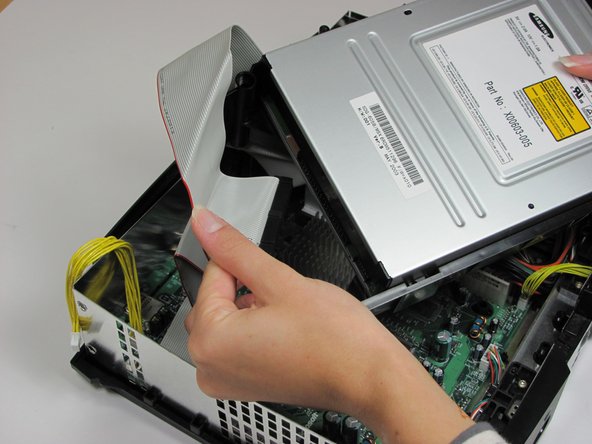

– Gently pull out the disk drive – it should come out easily.
– Next, carefully unplug the ribbon cable and yellow cables from the back of the disk drive.
Step 11

Hey, just a heads-up! If you’re taking the disk drive out to get to the motherboard, the plastic housing can chill right there. No need to remove it.
– Gently pry back the black plastic tabs surrounding the disk drive to release it from its housing. Once you’ve freed it, carefully set the drive aside for now.
Success!