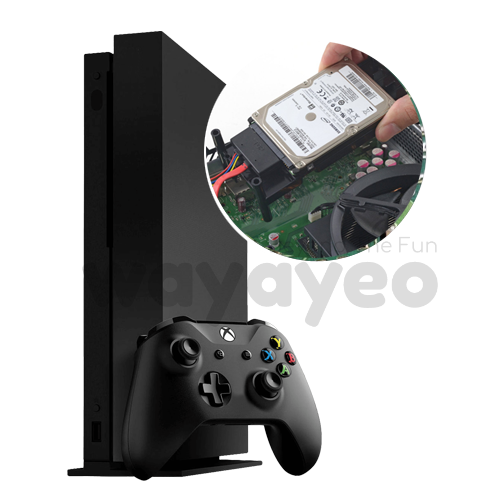
DIY Xbox One S Power Block Replacement Guide: Step-by-Step Tutorial
Duration: 45 minutes
Steps: 18 Steps
The power block’s connector to the motherboard can be a bit stubborn to disconnect by hand at first. To make things easier, we recommend removing the motherboard from the silver casing to get better access to the power block’s connector. This extra step might seem like a hassle, but trust us, it’s worth it to avoid any potential damage or frustration.
Step 1

– Give your Xbox One S a little flip-flop and get that bottom side facing up. You’re almost there!
Step 2

Heads up! Those clips can be a bit fragile when you’re taking the bottom off. Just be gentle and you’ll be good to go.
Get ready for some satisfying clicks as you pry the case open – it might take a bit of elbow grease, but don’t worry, it’s doable!
Start at the back where the warranty sticker is, and work your way along the rear edge until all the clips are free. Then, move on to each side. When you’ve got three sides loose, start at the front edge opposite the sync button. Take your time, be gentle, and you’ll have it open in no time without causing any damage.
– Let’s start by tackling the back case, where the warranty sticker hangs out. Find the gap between the bottom of the case and the grated top side. That’s where you’ll slip in your trusty plastic opening tool. Now, look for those sneaky clips holding the case together. Gently pry them out with your tool, working your way around the case.
– Keep going! You’re doing great! Just keep prizing that black case away from the bottom. You got this! You’ll be a pro in no time. If you need help, you can always schedule a repair
Step 3

– Now that all the clips are happily unlatched, go ahead and gently lift off the bottom part of the case. You’ve got this!
Step 4


– Grab your trusty T10 Torx screwdriver and give those six green 50 mm screws a spin! You’ll find them on the metal case, labeled F1 through F6. It’s like a little screw treasure hunt!
Step 5


– Take it easy and carefully wiggle the inner case away from the snazzy white outer shell using the right technique.
– Gently nudge those white plastic edges outward from the back to pop it free from the plastic I/O shield. You’ve got this!
Step 6


Let’s get that plastic casing around the hard drive loosened up so it can easily separate from the console. It’s all part of the plan!
Keep in mind, some of you might find you need a little extra help from tools C4 and C5.
– Alright, time to give your Xbox One S a little TLC! First, let’s flip that console over so we can get to work. Now, locate the two 10 mm T-10 Torx screws labeled C3 and C5 on the backside. Go ahead and remove those screws, and you’ll be one step closer to a shiny new hard drive!
Step 7


– Carefully unhook the hard drive from the motherboard by gently pulling at the two plastic connector bodies. You’ve got this!
Step 8

– To kick off this repair, let’s start by removing the optical disc drive. Begin by taking out the silver 10 mm T-10 Torx screw labeled ‘C4’ – it’s time to set that drive free!
Step 9

– Gently nudge the disc drive away from the motherboard and detach those plastic connectors with care. You’ve got this!
Step 10

– Kick off the motherboard replacement adventure by unscrewing the three shiny silver 10 mm T-10 Torx screws marked “C1,” “C2,” and “C6.” You’ve got this!
– Next up, let’s tackle those four mysterious black 8 mm T-8 Torx screws labelled “A1,” “A2,” “A3,” and “A4.” Unleash your inner handyman!
Step 11

– Alright, let’s find that silver clamp on the opposite corner of the power block – you can’t miss it, it’s rectangular!
– Next, let’s give that black bracket near the fan a little nudge and send it on its way.
Step 12

Don’t be afraid to give it a little gentle squeeze to get the clamp off the silver casing. This metal is tough, so you can bend it back into shape if you need to.
– Snag the clamp with your trusty tweezers. Gently tug it upwards, away from the shiny silver casing. If it’s feeling a bit stubborn, give it a little wiggle like you’re flossing a tooth!
Tools Used

Step 13

– Go ahead and unscrew those four black 8 mm T-9 Torx screws that are labeled “E1,” “E2,” “E3,” and “E4.” You’ve got this!
Step 14

– Say goodbye to those three black 8 mm T-9 Torx screws named ‘D1,’ ‘D2,’ and ‘D3.’ Just remove them to free the Mediatek board. You’re almost there!
Step 15

– With the clamp out of the way, carefully lift the motherboard by its edges, easing it out from the metal casing. It should slide out smoothly, just like a champ!
Step 16

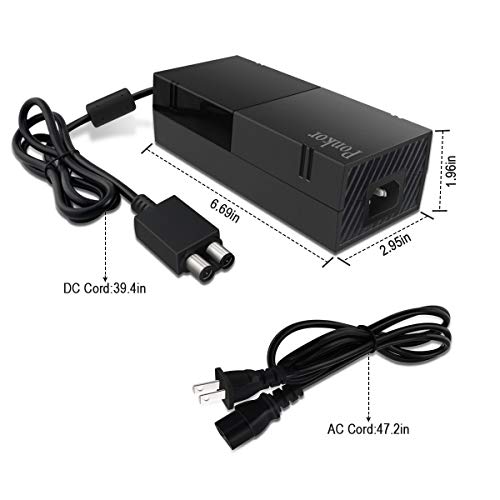
– Gently lift the power block off the motherboard, kind of like you’re giving it a little hug to help it move on to the next adventure!
Step 17

Check out the nifty rectangular piece of plastic sticking out, marked in orange—it’s the locking tab that keeps everything snug and secure!
– Find the little black connector that links the power block to the motherboard. You’ve got this!
Step 18

– Time to put everything back together! Just follow these steps in reverse, and you’ll be golden.
– If you need a break, feel free to step away. It’s all good!
– And remember, if you hit a snag, you can always schedule a repair.
Success!