DIY Xbox Series S Motherboard Replacement Guide
Duration: 45 minutes
Steps: 29 Steps
Get ready to dive into the exciting world of Xbox Series S motherboard replacement! First things first, when you’re tackling that heat sink, don’t forget to swap out the thermal compound between the plate and the heat sink. Regular thermal paste might not be up to the task of filling those larger gaps, so grab some K5 Pro viscous thermal paste instead! And hey, you’ll still need the usual thermal paste for the APU. Just a heads up—there might be a few photo hiccups with the exterior Bluetooth, Wi-Fi, and power boards, but no worries! These little quirks won’t mess with your repair mission. If you need help, you can always schedule a repair.
Step 1


Hey there! Before you dive into this guide, make sure to power off your Xbox and unplug all those pesky cables. Safety first, right?
– Grab your trusty tweezers and gently lift off the two snazzy white screw covers nestled in the bottom corners of the back panel. You’re doing great!
Tools Used

Step 2

As you tackle this repair, remember to keep an eye on every screw and return it to its cozy little home when you’re done!
– Grab your trusty T8 Torx driver and get ready to tackle those two 10 mm-long screws that are holding the back panel snugly in place on the bottom panel. Let’s do this!
Step 3


Gently wiggle those clips free from their snug little homes in the plastic case.
– Gently slide the bottom panel back, like you’re tucking it in for a cozy nap, until it hits a little wall and can’t go any further.
– Now, give it a lift-off! Raise the bottom panel straight up and away from the plastic case, just like a magician revealing their latest trick.
Step 4

– Grab your trusty T10 Torx driver and let’s get to work! Unscrew those seven 51 mm-long screws that are keeping the chassis tight against the plastic case. You’ve got this!
Step 5


Heads up! Don’t try to yank the chassis all the way out of the plastic case—this move might crack it. If you need help, you can always schedule a repair.
Time to get that back panel cozy on those clips at the rear of the plastic case! It’s all about that snug fit.
Just a heads up, the back panel is now officially part of the aluminum chassis family. No turning back now!
– Alright, let’s give this Xbox a little love! With the bottom of the Xbox facing you, gently pull the two bottom-rear corners of the plastic case away from each other.
– Keep pulling those corners apart, and then slide the back panel down towards the bottom of the device. It’s like giving the panel a little dance move – it’ll pop right off!
Step 6


Don’t be afraid to give the chassis a little lift to help free it from those pesky clips on the bottom-front of the plastic case. You’ve got this!
– Gently pull the bottom-left corner away from the chassis as you swing the chassis away from the plastic case—it’s a little dance you and your device will do!
– Now, it’s time to say goodbye to that plastic case—carefully lift it off the chassis!
Step 7

– Grab your trusty T8 Torx driver and let’s tackle those three 9.5 mm-long screws that are holding the Bluetooth board snugly to the long edge of the chassis. You’ve got this!
Step 8


Don’t go poking around the bottom or sides of the Bluetooth board, you might bend the connector! It’s delicate like a butterfly’s wing.
– Grab your spudger and give that Bluetooth board a little nudge to loosen it up.
– Now, gently pull the Bluetooth board straight out – it’s like saying goodbye to a friend, but with a little less hugging.
Tools Used

Step 9

– Grab your trusty T8 Torx driver and carefully unscrew the 9.5 mm-long screw that’s keeping the power button board snugly attached to the chassis.
Step 10


Avoid prying from the bottom of the power button board; doing so might bend the connector, and nobody wants that kind of drama!
– Grab your trusty spudger and gently nudge the power button board to loosen it up.
– Now, give it a little tug and pull the power button board straight out to disconnect it from the chassis.
Tools Used
Step 11

– Grab your trusty T8 Torx driver and unscrew the three 9.5 mm-long screws holding the Wi-Fi board in place on the short edge of the chassis. Easy peasy!
Step 12


Avoid prying at the bottom or sides of the Wi-Fi board to keep the connector happy and straight!
– Grab your trusty spudger and gently wiggle it to loosen the Wi-Fi board. You’ve got this!
– Now, with a smooth motion, pull the Wi-Fi board straight out to disconnect it from the chassis. Easy peasy!
Tools Used
Step 13

– Grab your trusty T10 Torx driver and get ready to unscrew! You’ll want to take out those seven 11.3 mm-long screws that are holding the power supply snugly in its cozy chassis. Let’s make this power supply feel a little less at home!
Step 14


– Time to flip your device over like a pro!
– Now, gently lift the upper chassis straight up to set it free!
Step 15


– Gently lift the power supply straight up to unplug it from the motherboard. You’ve got this!
– Now, go ahead and remove the power supply completely. You’re making great progress!
Step 16

– Let’s get started by removing the two 11.3 mm-long screws that hold the fan in place. Grab your trusty T10 Torx driver and get to work!
Step 17


Be gentle when turning the chassis over—it’s like a delicate dance since the fan is feeling a bit loose!
When you’re disconnecting the fan, take it easy on those wires! Tugging too hard might just break the connector’s heart.
Getting this connector out might feel like a tricky game, but don’t worry! A neat trick is to gently shimmy it up and out of its socket using a spudger—your new best friend.
If you’re feeling a bit adventurous, you might just manage to pop this connector out without removing the power supply. Just grab a pair of needle-nose pliers and give it a gentle tug!
– Alright, let’s give that device a little flip, shall we? Time to turn it over!
– Now, use your fingers to gently pull and disconnect that fan connector from its cozy spot on the motherboard. You’ve got this!
Tools Used


Step 19

– Grab your trusty T8 Torx driver and get ready to unleash your inner tech wizard! Carefully unscrew the four screws, each measuring 9.4 mm, that are holding the motherboard snugly in the chassis. You’ve got this!


Step 21


– Now, get a grip on that heat sink, give it a little lift, and gently raise the front of the motherboard up. We’re gonna give it some air!
– Just pull that motherboard towards the front of the chassis, and bam! It’s outta there. You’re doing great!
Step 22

– Alright, let’s get this SSD card out! Grab your trusty T8 Torx driver and give that 5.1 mm-long screw securing the SSD card to the motherboard a little twist. You’re almost there!
Step 23


– Gently pull the SSD card straight out of its slot on the motherboard – it’s time to set it free! Remove it completely to get it out of the way.
Step 24

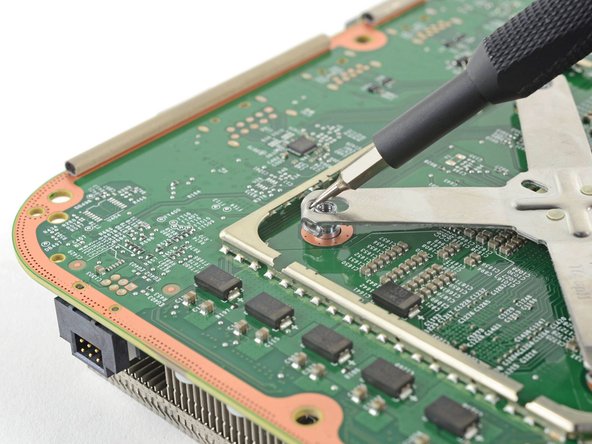

Hey there! Just a quick reminder: don’t try to fully release the x-clamp using this method. Keep it steady and safe!
– Grab your trusty 1.5 mm flathead screwdriver and slide it in between the heat sink pin and the x-clamp, right from the top.
– Now gently pry the x-clamp away from the heat sink pin, loosening it up. Just a little wiggle and it’ll come free.
Step 25


Having a little trouble? No worries! Grab a bigger flathead screwdriver and give it a go.
As you give it a twist, the x-clamp should pop right off that heat sink pin. If it’s feeling stubborn, just backtrack a bit and try that last step again.
– Position the head parallel to the motherboard, and gently slide a flathead screwdriver in from the side, finding the sweet spot between the heat sink pin and the x-clamp hook.
– Give that flathead screwdriver a little clockwise twist to nudge the bottom edge of the x-clamp out of the groove in the heat sink pin.
Step 26

– Keep on truckin’ with the same technique from the last two steps. Work your way through all the heat sink pins until the x-clamp is free. You’re doing great!
Step 27


– Take off the x-clamp, it’s time for a little break!
– When putting the x-clamp back on, you should find that you can easily secure two to three corners just by pushing down the x-clamp hooks onto the heat sink pins. After that, grab your flathead screwdriver and gently nudge those x-clamp hooks over the heat sink pins. You’ve got this!
Step 28


Watch out when you flip that motherboard! The heat sink might just decide to take a little vacation and fall out. Keep it steady!
– Time to flip that motherboard over like a pancake! You’ve got this!
– Now, gently lift the heat sink straight up to free it from the motherboard. It’s like giving it a little hug goodbye!
Step 29


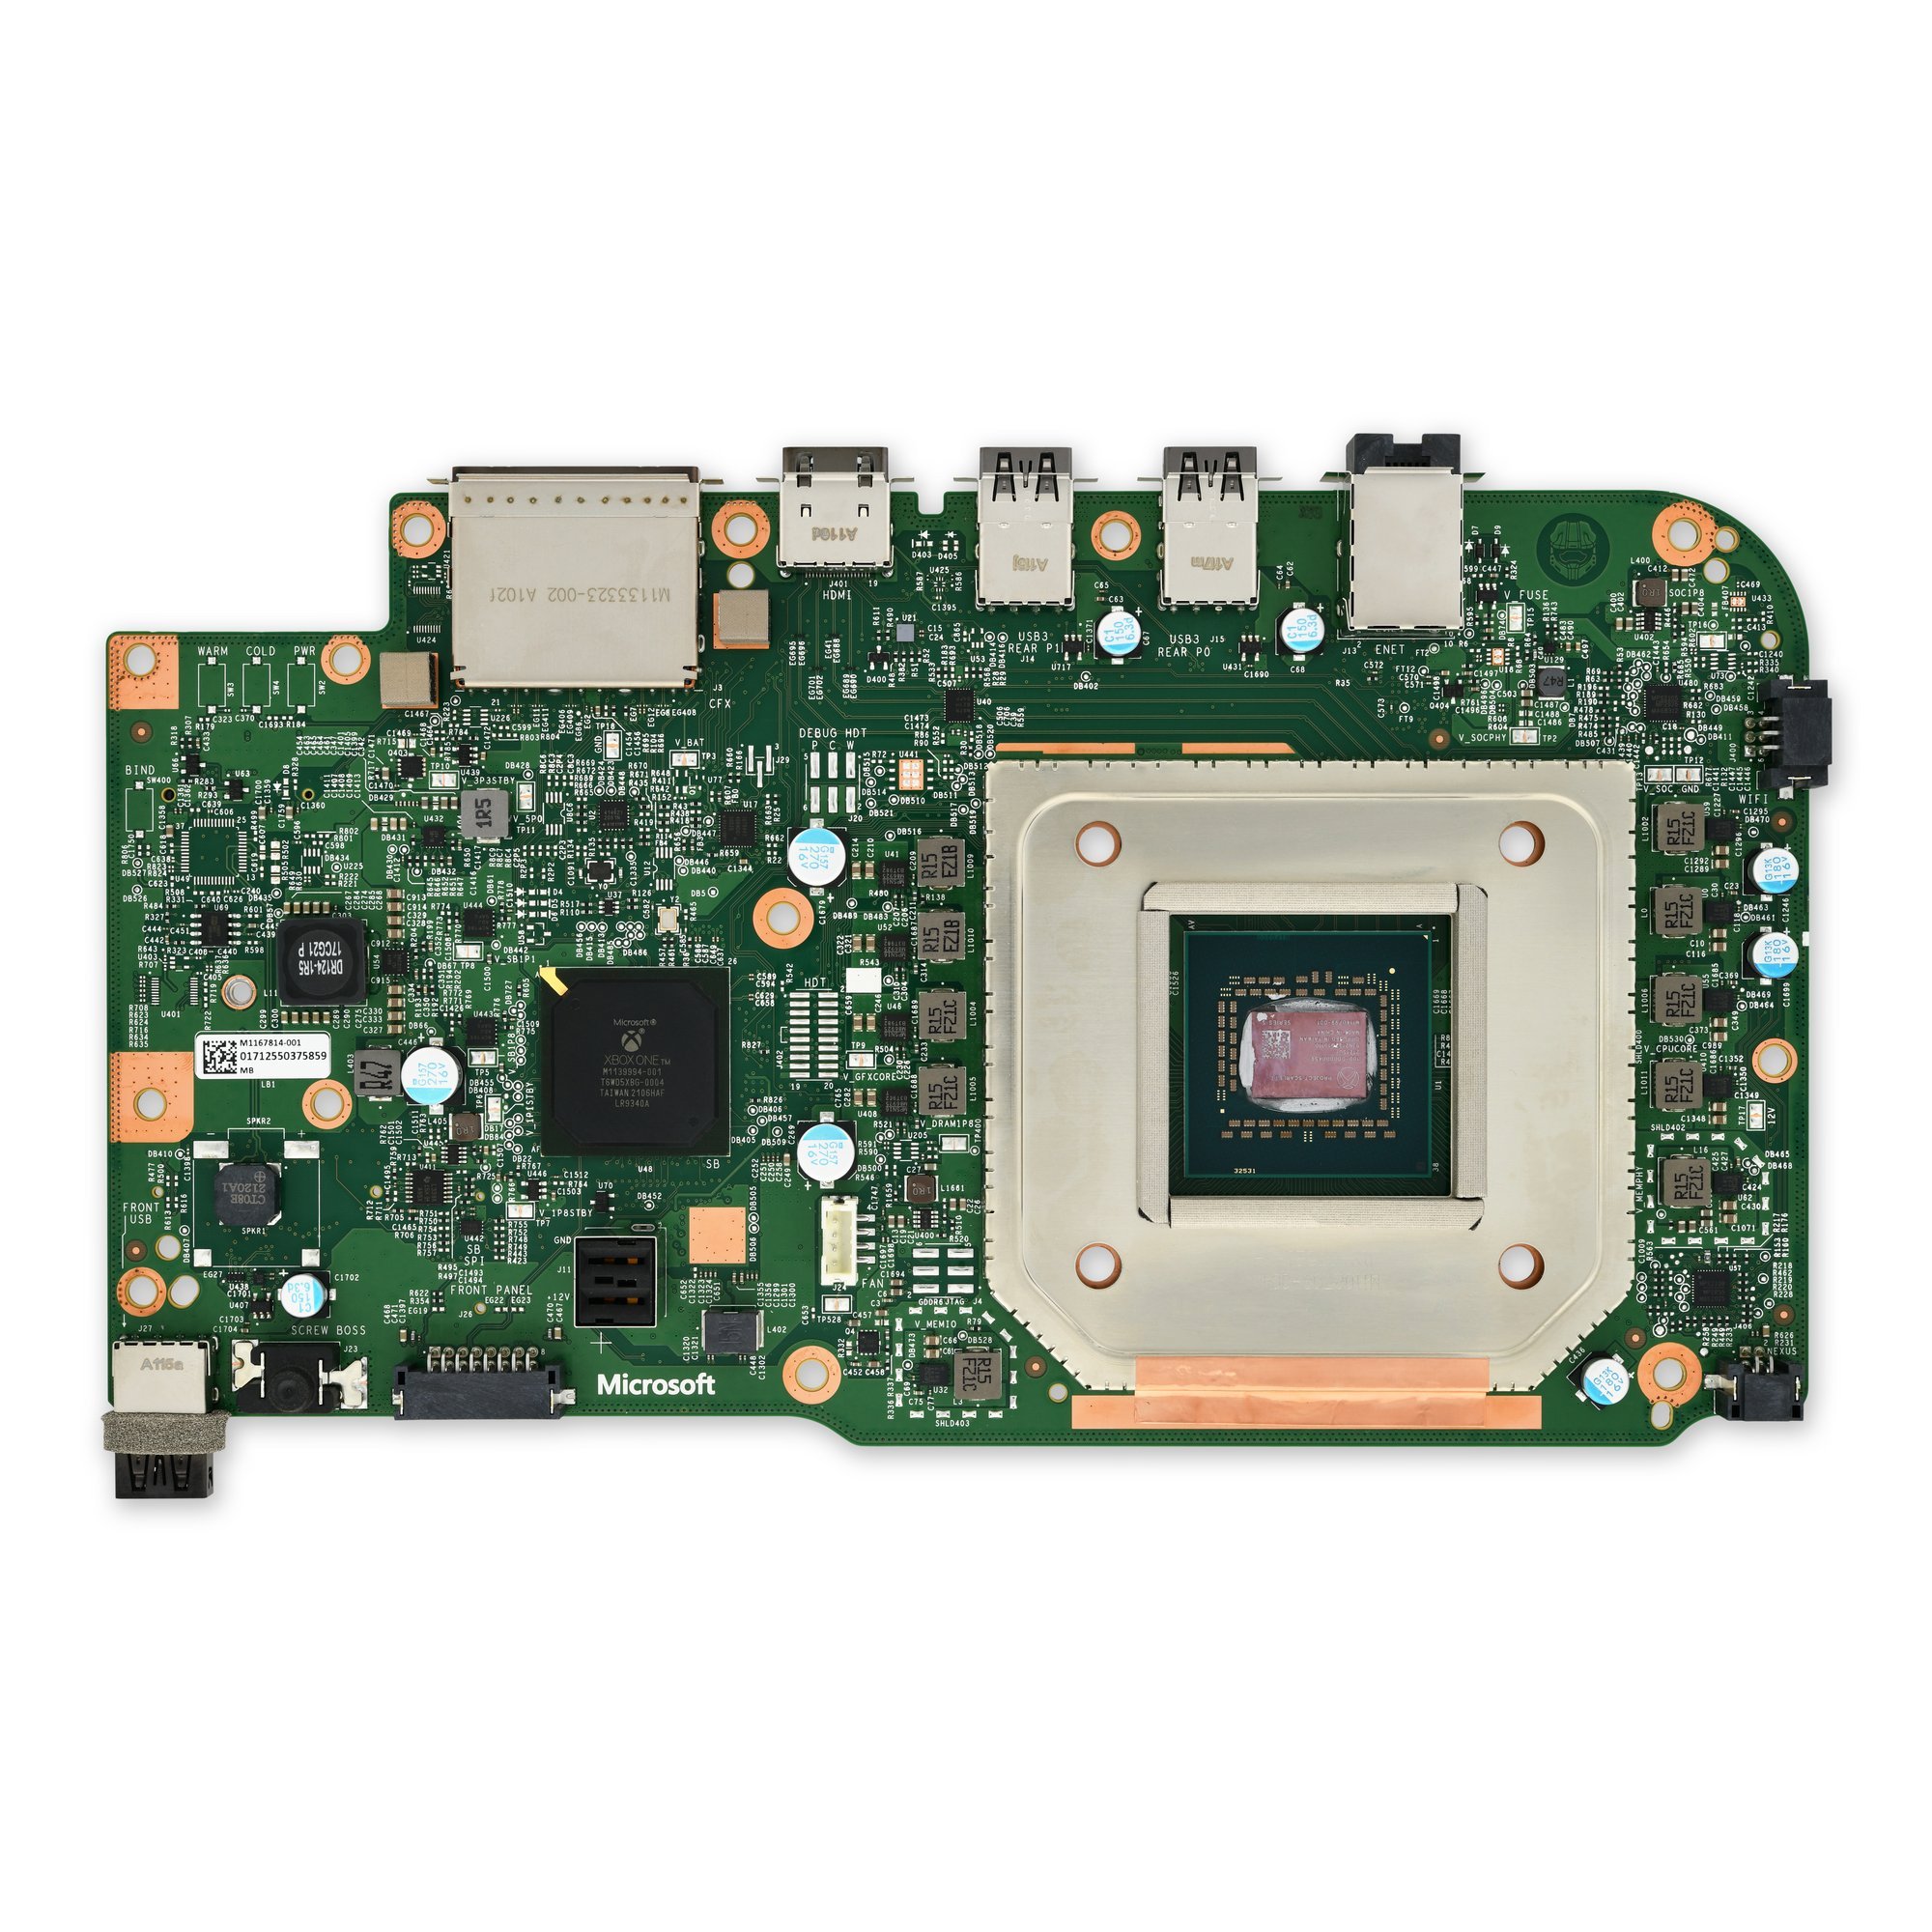
– Alright, superstar, you’ve made it this far! You’re down to the motherboard – you’re basically a tech wizard now!
– Let’s take a peek at this guide for the scoop on applying thermal paste to the processor and shield plate.
– Now, here’s the thing – regular thermal paste isn’t quite cut out for the big gaps between the shield plate and the heat sink. You’ll want to use K5 Pro viscous thermal paste to take care of that. It’s like super glue for heat! But for the APU, you’ll need normal thermal paste. It’s like having the right tool for the job, you know?
Tools Used

Success!