FlashForge Adventurer 3 Case Teardown
Duration: 45 minutes
Steps: 17 Steps
Follow these steps to safely open up your Adventurer 3 case from top to bottom. Remember to handle all parts gently and keep track of screws and components. If you need help at any point, you can always schedule a repair to get professional assistance. Stay patient and enjoy the process of giving your device a new lease on life!
Step 1

– First things first, give that tabletop a good clean! You’re about to lay your printer on its side to access the case, so let’s keep it scratch-free. Take a moment to sweep away those pesky filament bits and maybe lay down a towel for some extra padding—trust me, your printer will thank you!
– Next up, remove the white filament cover plate located on the right side of the printer.
– Now, let’s unload your filament by following the prompts on the screen.
– Finally, turn off and unplug your printer before proceeding.
Step 2


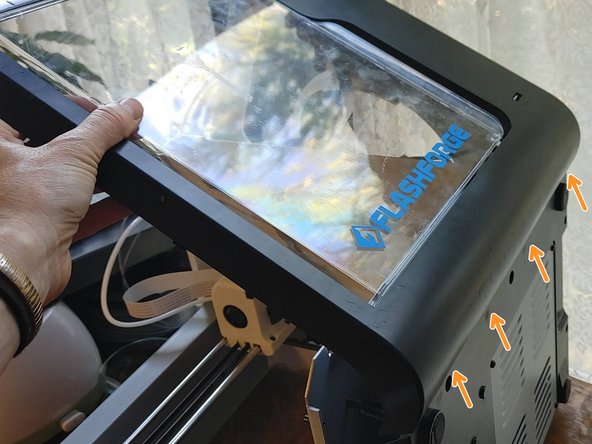
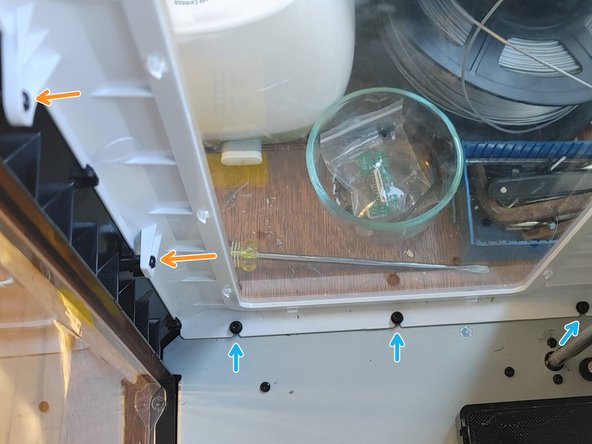
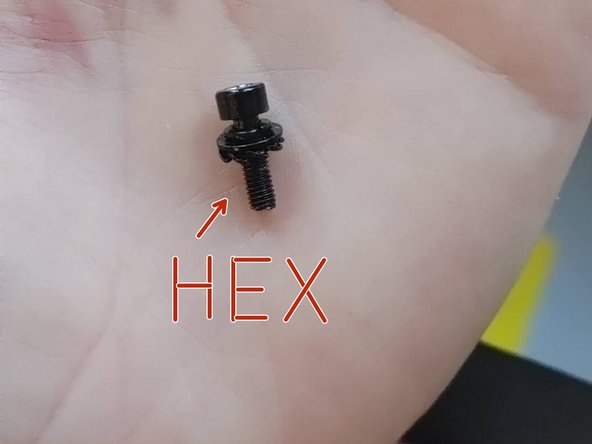
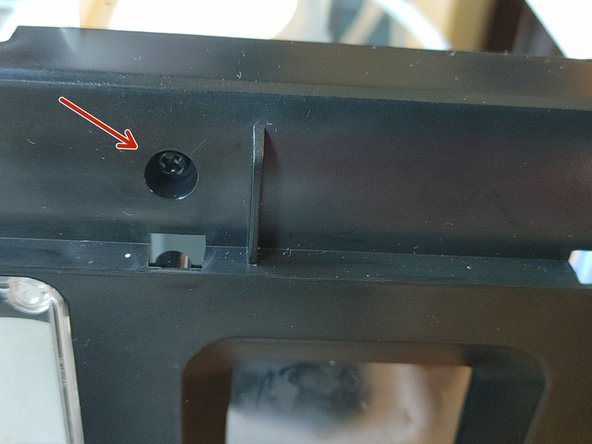
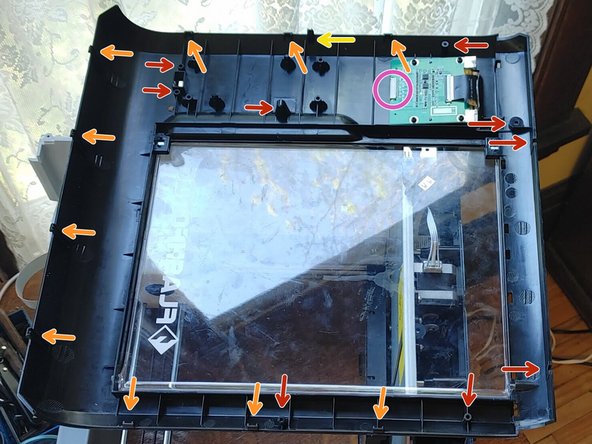
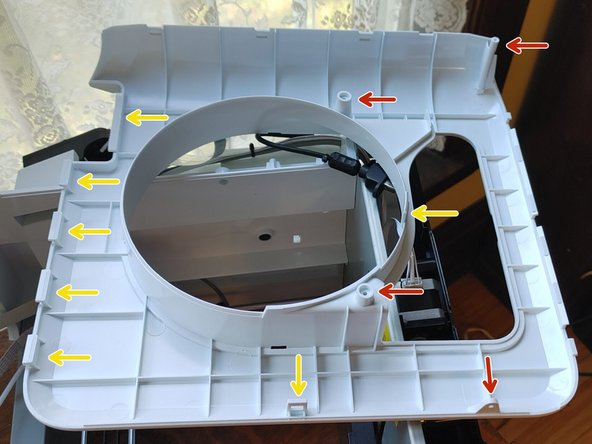
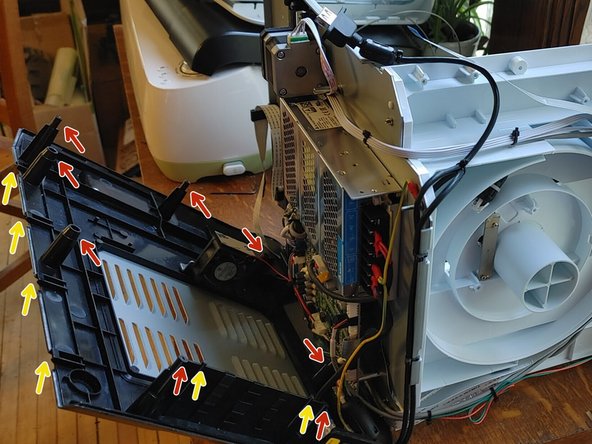
– SCREWS: Four long silver hex screws hold down the base. Five short black hex screws (with washers) keep the sides attached to the floor inside. The rest? All short black Phillips (+) screws. Two are a little longer and belong in the back top corners. Toss them all in a bowl so they don’t pull a disappearing act. Look for red arrows in the photos to spot these little guys.
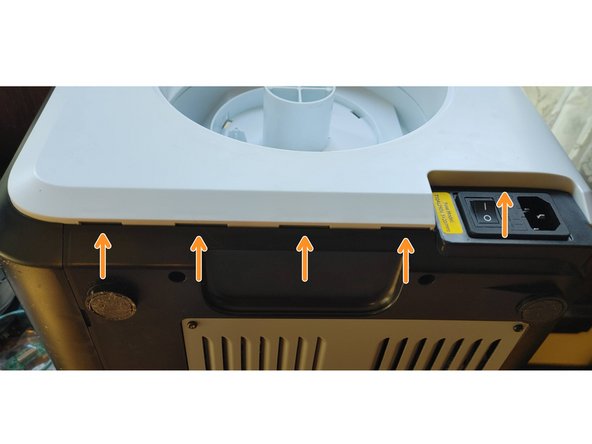
– TABS: Flat plastic tabs that slide right out—no tools, no drama. Just pull them straight out. Yellow arrows in the photos will point you in the right direction.
– PUSH CLIPS: These sneaky clips look a lot like tabs, but there’s a twist: they’ve got a backward hook that latches into place. Use a plastic spudger or flathead screwdriver to press the body of the clip inward and pop them free. Orange arrows in the photos show you where they’re hiding.
Tools Used

Step 3
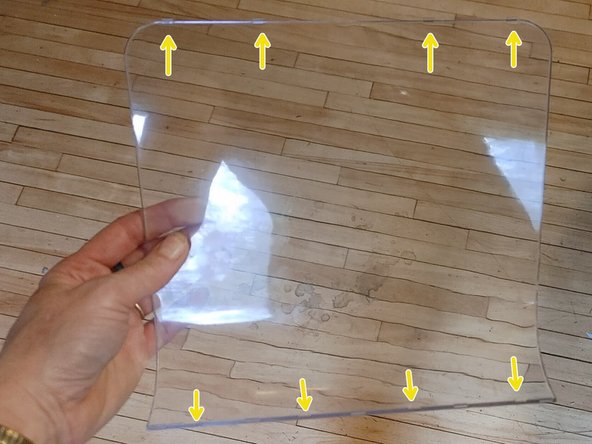

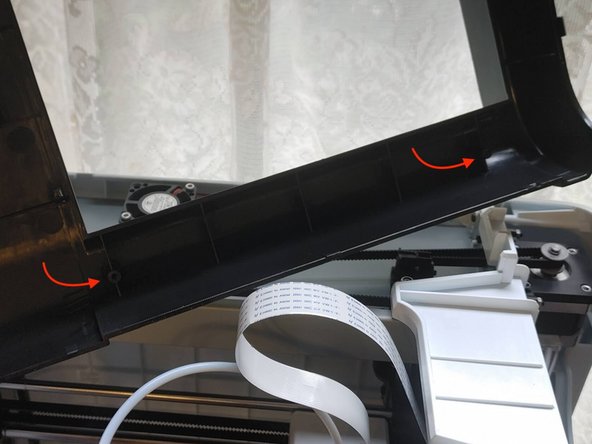
– At the top of your printer, you’ll find a clear plastic window. It’s held in place by flat tabs, so no screws or tricky clips here. There are four tabs at the front and another four at the back, but no tabs on the sides. To pop it out, open the front door, grip the window with one hand on each side, and gently give it a little push.
– If it’s being stubborn and won’t budge, a plastic spudger or a flathead screwdriver can help you coax it out—just be cautious not to scratch the window or the case. A little masking tape can protect the surface if you’re worried about damage.
– This step isn’t necessary for a full teardown since you can remove the top panel without taking out the window, but it does make things easier if you’re just trying to reach the extruder without going all in.
Tools Used
Step 4


– Alright, let’s kick things off! You’ll find two black screws holding the top panel snug against the front panel, one located on each side of the door (just follow your index fingers to find them). Grab your trusty Phillips screwdriver, remove those screws, and toss them in your bowl so they don’t go MIA!
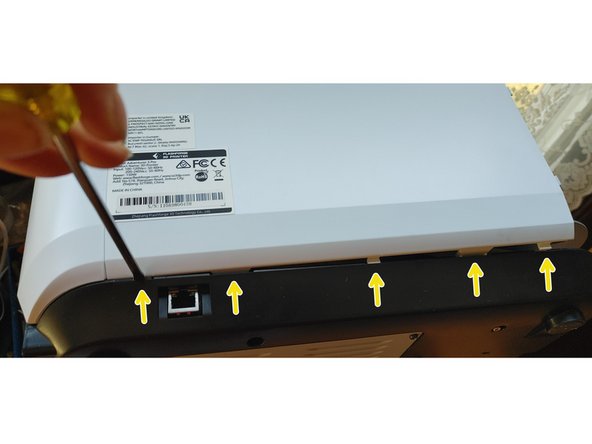
– Next up, let’s tackle the sides and back edge of the top panel. Each of these has three push clips waiting for you. Use a plastic spudger or a flathead screwdriver to gently push on the base of each clip to release them. You’ve got this!
– Now, for the grand finale at the front edge of the top panel, there are four tabs—two over the door and two over the control screen. No need for any fancy prying here; they’ll just pop right out once those push clips are free. Easy peasy!
Tools Used
Step 5


– You’ve already popped out the three push clips along the top edge of the left side panel—those kept the top panel in place.
– Next, look at the top of the machine and unscrew the three black Phillips screws at the back left corner. Heads up: the corner screw is one of the longer ones.
– Inside the printer, just left of the door, remove the two black Phillips screws connecting the left panel to the front panel.
– Still inside, spot the three black screws with washers holding the left panel to the floor plate. These are hex heads, not Phillips—and you don’t need to take them all the way out. Just loosen them and leave them in the floor plate for safe keeping.
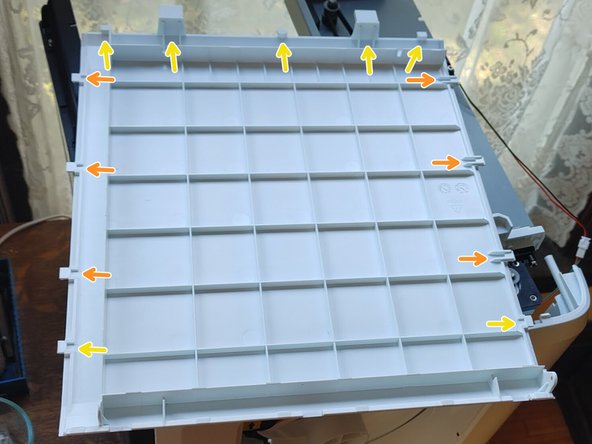
– On the bottom outside edge of the left panel, you’ll see six push clips lined up horizontally. Use a plastic spudger or a flathead screwdriver to press at the base of each and release them.
– At the back left corner, where the back panel meets the left, you’ll find four more push clips stacked vertically—release those too.
– The panel should now come off the printer with a gentle pull. Almost there!
Tools Used
Step 6
– Here’s the sequence for popping off those last side panels: back, then front, then right. But—pro tip—it’s usually smoother to take off the front and right panels together as one mighty duo before tackling the back.
– Why? Those two panels are joined with snap-fit joints that practically beg to be separated after you’ve removed their screws—makes the whole process way less fiddly. If you go for the back panel first, you’re just asking for some awkward wiggling and unnecessary pressure on those poor joints.
– Want to try the tag-team approach? Skip ahead to Step 9 and save yourself some hassle.
Step 7
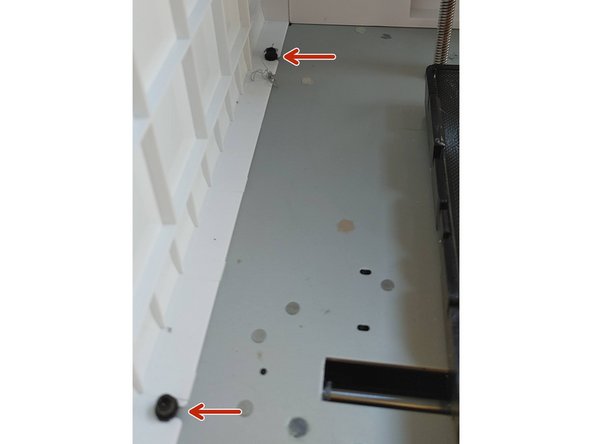

– Start by removing the black screw located at the back left corner near the top of the printer. Then, gently release the four push clips along that same left edge to free the back panel from the side. Next, at the top rear right corner, unscrew the black Phillips head (+) screw—it’s one of the two longer screws in that area. Be aware that there are two other screws in front of it, but those are not attached to the case, so you can leave them alone. Inside the printer, you’ll notice two black hex screws securing the back panel to the floor plate, each with a small washer. You can loosen the left one without removing it completely, but it’s recommended to remove the right one entirely to lift the back panel off. Loosen that screw, then screw it back in loosely for safe storage. If you need help at any point, you can always schedule a repair.
Step 8

– Gently pull the back panel away from the right side panel to detach it. These sneaky push clips don’t have visible release sockets, so you’ll need to apply a little inward pressure on the back panel while pulling outward on the right side panel, since three of the fasteners are those tricky clips. Just a heads up, the bottom corner can be a bit stubborn!
– The five tabs along the bottom edge of the back panel should pop out easily, but if they’re feeling shy, grab a plastic spudger or a flat head screwdriver to give them a hand.
– Carefully screw the right hex washer screw back into the flooring plate a few turns to keep it cozy and secure.
Tools Used
Step 9


– Great job on removing those black Phillips head screws near the door! You’ve tackled two above the door and two more to the left. Remember, when you took off the top panel, those four tabs on the outside of the case were released too. Nice work!
– Now, let’s find another black screw just inside the door, slightly to the right and about halfway up the inside wall. Go ahead and remove that one.
– Next up, close to the input screen, there’s a sneaky black screw hiding just above its left corner. Time to show it who’s boss and remove it!
– Finally, at the top right corner of the printer, there’s one more black screw waiting for you. But no worries about the fastener lower down inside the machine—it’s just a tab, so you can skip that one!
Step 10

– Grab a plastic spludger or flat head screwdriver and pop off those four push clips at the bottom of the panel.
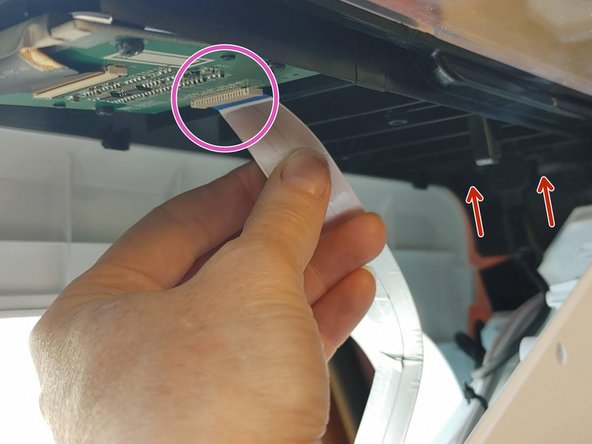
– Gently pull the top of the front panel away from the printer, but only a couple of inches – no need to rush!
– Now that you’ve got some space, carefully pull out the wire tape from the input screen.
– Right below the wire tape, at the very bottom of the front panel, locate and remove the two black Phillips screws holding the USB port in place.
– At this point, the front panel should be free to come off completely.
Step 11

– You’ve already tackled most of the fasteners holding this panel in place. On the left edge, you found a black screw in the top corner and a tab halfway down. Over on the right, there’s another black screw at the top, plus a tab and a row of three push clips running down the side. Don’t forget those three push clips along the top edge holding the panel on.
– Now grab your Phillips screwdriver and take out the two black screws from the right side panel—there’s one on each upper side of the filament spindle.
– Right between those screws, there’s a tab that just slides right out. Easy does it!
Step 12

– Gently slide the tab at the top of the filament recess, between the two screws – it should pop right out.
– Next, the five tabs along the bottom of the panel will easily slide out as well.
– Now, carefully remove the right side panel.
Step 13

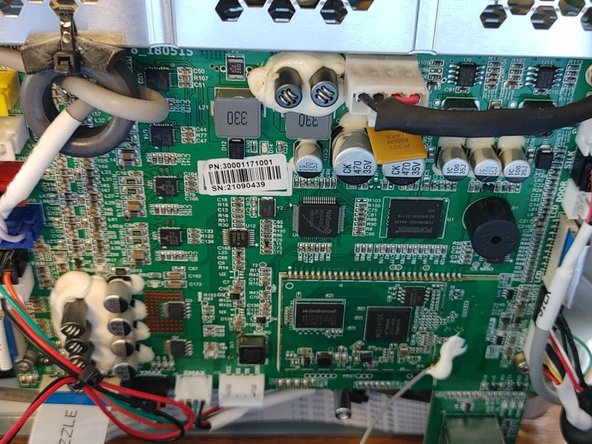
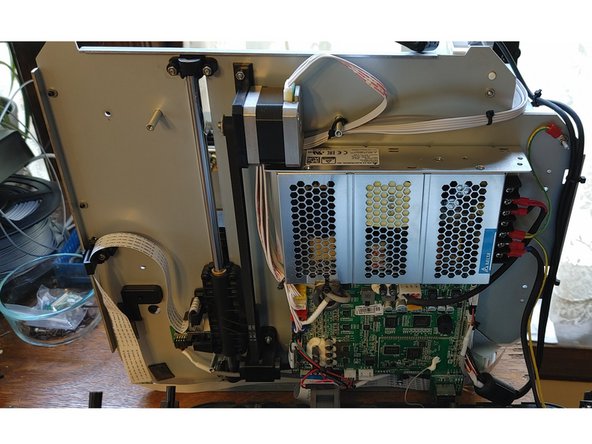
– Ready to dive into the motherboard? There’s a nifty access plate on the bottom of the printer, held in place by four black screws in the corners. Just unscrew them, and you’re in!
– But hey, if you’re just looking to remove the whole base panel, this step is optional. You can totally skip it and still get everything off without a hitch.
Step 14

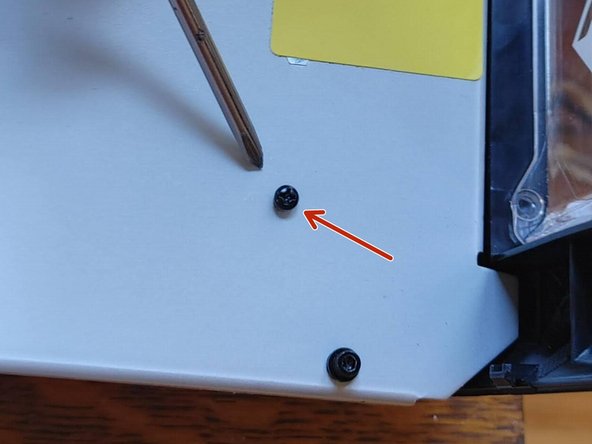
– Start by removing all the push clips holding the four sidewalls to the base panel—easy peasy! Then, flip the printer onto its back, with the door side facing up and the base panel right in front of you. Next, locate the four deep inset holes containing silver HEX HEAD screws—you’ll want to use a HEX driver here, as attempting to use a Phillips screwdriver might strip them. Keep in mind, there are also three plastic-capped fake inset screw holes at the bottom of each well, plus a fourth under the front left foot. These aren’t real screws, so no need to worry. To access the actual screws, look inside the printer at the interior floor plate. On the left side of this plate, find the two black screws—one toward the front and one toward the back—that secure through the floor into those fake inset screw holes, and remove them. If you need a hand with any step, you can always schedule a repair.
Step 15


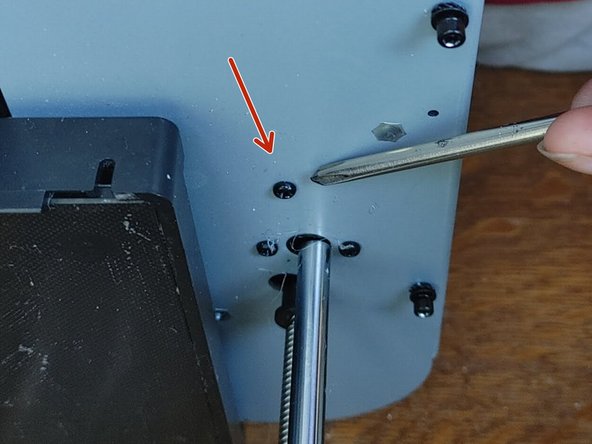
– Grab a screwdriver and remove the two screws located at the lower edge on the right side, which is standing upright. Next, gently lift the front edge of the base panel away from the front door side of the printer—make sure to keep the bottom edge near the printer intact. Inside, you’ll spot wires connected in three spots that need disconnecting to fully remove the base panel. If your repair doesn’t require removing the entire panel, it’s best to leave it partially attached, especially since the center wire can be a bit tricky. On the left side, carefully pull out the red and black wires from their motherboard connections. On the right, you’ll see a black casing containing a red wire, a blue wire, and a separate yellow wire; these can be pulled straight out from their attachment points or unscrewed from above the motherboard. The central white wire appears to be soldered on both ends, making removal more challenging—proceed with caution or seek professional help if needed. Remember, if you’re unsure or need extra assistance, you can always schedule a repair with Salvation Repair.
Step 16

– Nice job! The Adventure 3 case is off and you’re one step closer to getting things back in shape.
Step 17
– Putting the casing back together can be a bit of a puzzle, but don’t worry! Here’s a helpful order to keep things flowing smoothly:
– First up, let’s start with the base panel. This part is a breeze!
– Next, give the back panel a dry fit—no screws yet, just see how it sits.
– Now, grab that single screw and join the front and side panels together at the spot where they meet.
– After that, let’s focus on the front of the combined panels. Angle the bottom edge of the front panel into the base panel like a pro.
– The right back corner can be a bit tricky. Make sure the tabs on the right panel fit into the base panel at the bottom edge, all while lining it up with the tabs on the back panel. You might need a plastic spudger or flat head screwdriver to gently push in the side panel’s flange by the power cord outlet. You got this!
– Once everything’s dry-fitted perfectly, secure it all down with screws. Finally, attach the left side panel and the top panel without any fuss!
Tools Used
Success!