Google Pixel 2 Back Camera Lens Replacement
Duration: 45 minutes
Steps: 24 Steps
In today’s world, having a camera on your phone is pretty much a must-have! So, if you’re ready to tackle the task of removing the camera module, you’ve come to the right place. Let’s dive in and get that camera out safely and smoothly!
Step 1


The suction cup might struggle to get a solid grip on the curved glass edges. No worries, just keep trying to get a secure hold before moving forward!
– Got a cracked display glass? No worries! Just tape it up to keep any further breakage in check and avoid any accidental pokes while you work your magic. Taping it also gives you a smooth surface for that trusty suction cup to adhere to!
– Now, grab your suction cup and place it as close to the volume button edge of the phone as possible, steering clear of the curved edge. You’re doing great!
Step 2


Heads-up! The display panel is super delicate. If you’re planning to keep your display looking sharp, make sure your tool only goes in just enough to break the adhesive bond—no deeper! Pushing in too far might mess up the OLED panel hiding under the glass.
Keep it cool: Don’t stick the pick in farther than 1.5 mm, or you could risk hurting your OLED panel.
This step calls for some serious effort and a good dose of patience. If things get tricky, try wiggling the suction cup and screen to loosen the adhesive, or use some heat with an iOpener, heat gun, or hair dryer to make it a bit more cooperative.
– Give the suction cup a good tug with steady, confident pressure while sliding an opening pick into the gap between the front panel and the rear case.


Step 3


Heads up! In the next few steps, a little extra care goes a long way to keep your device in one piece:
Be gentle with that opening tool! Going deeper than 1.5 mm along the sides or 9 mm at the top and bottom could cause some serious damage to the display. Trust us, you don’t want that!
– Keep that pick of yours no deeper than 9 mm into the bottom edge of the phone. If it happens to bump into the folded area of the OLED panel, you might end up with a display that’s seen better days.
– When you’re making those cuts in the upper left corner, remember to keep it light and breezy. Prying too deep could put a real damper on your front-facing camera.
Step 4


Handle those side bezels with kid gloves—they’re just 1.5 mm deep and pretty easy to nudge the wrong way.
As you dive into the following steps, remember to keep the flat side of your opening pick in action—avoid using the corners! This little tip will help you steer clear of going too deep and causing any mishaps.
– Let’s get this repair started! Slide the opening pick up the right side of the phone to loosen the display adhesive and carefully separate the display from the rest of the phone.
Step 5


There’s a nifty mesh over the earpiece speaker at the top edge of the screen. If you don’t have a spare mesh handy, be extra careful not to damage or misplace this little guy!
– Gently slide the opening pick around the upper-right corner, then keep it moving along the top edge of the phone. Take your time and let the pick do its thing!
Step 6


– Gently glide the pick around the top-left corner of your phone and make your way down the left edge. You’ve got this!
Step 7


Be careful not to push the opening pick deeper than 9 mm – we don’t want any accidental damage to that OLED panel!
– Gently glide the pick around the bottom-left corner, then sweep it across the bottom edge of the phone. Keep it tilted slightly away from the screen—no one wants to mess with those delicate OLED corners, right?
Step 8


Hold up! Don’t yank the display off just yet—there’s a delicate ribbon cable still tethering it to the phone’s motherboard. Take it easy!
If the display isn’t popping off easily, give it a little extra love with your prying tool to break free the last of that sticky stuff. Just a heads up, the adhesive near the top speaker is a bit more stubborn than the rest.
– Slide the pick back into the top edge of the phone and gently lift the display up like you’re unveiling a surprise!
Step 9


– Gently place the display on the rear case just like this, being careful not to crinkle or damage that delicate display ribbon cable.
– Unscrew the two 4.0 mm T5 Torx screws that are holding the display cable bracket in place.
– As you work through this repair, keep a close eye on each screw and remember to put it back in its original spot.
Step 10

– Time to take off that display cable bracket! Let’s get it out of the way so we can keep moving forward.
Step 11


Keep your spudger at a safe distance from the motherboard! Those little components around the socket are more delicate than they look. Let’s treat them with the care they deserve!
– Gently use the spudger’s tip to lift the display cable connector out of its socket on the motherboard. A little nudge, and you’re on your way!
– To reconnect, carefully align the connector and press down on one side until it clicks into place, then do the same on the other side. Avoid pressing in the center—this helps prevent any pin bending. Misalignment could cause some serious issues, so be mindful.
– If your screen stops responding to touch after the repair, try reseating the connector. Ensure it clicks into place fully and double-check for any dust or debris blocking the connection.
– When you’re putting everything back together, don’t forget to replace the adhesive around the display edges. It’ll help everything stay nice and secure.
Tools Used

Step 12


– Grab your trusty spudger and use the flat end to gently pop off the charging assembly connector. Easy peasy, right?
Tools Used
Step 13

– Grab a plastic dropper or syringe and fill it up with some high-concentration isopropyl alcohol. Drop a few drops under each corner of the battery and let it sit for about a minute. This should help loosen up that sticky adhesive holding the battery in place.
– Alternatively, you can warm up an iOpener and place it on the back of your phone right above the battery. Let it sit there for at least two minutes, then give it another heat boost if needed. Repeat until the battery adhesive softens enough to make your next moves easier.
Tools Used
Step 14


Hey there, remember to treat that battery with care! Soft-shell lithium-ion batteries can be temperamental—damage them and they might leak nasty stuff, play with fire (literally), or even go kaboom. So, stay cool and avoid cranking up the pressure or poking at it with metal tools.
– Gently nudge the charging assembly cable out of your way and slide an opening pick along the bottom edge of the battery. You’re already crushing this!
– Keep it steady—apply smooth, even pressure as you carefully lift the battery up and away from the phone. Slow and steady wins the race here.
– If it’s being stubborn, no worries! Just add a little more alcohol under the battery and give it another go. You’ll get it!
– Stick to prying at the center of the battery. Trust me, you’ll want to keep those delicate ribbon cables on either side intact and happy!
Step 15


Once you’ve popped that battery out, resist the urge to reuse it—it’s not worth the risk! Grab yourself a fresh one and keep things safe and sound.
– Pop out the battery—easy peasy!
– Ready to pop in a fresh one? Here’s the game plan:
– Grab a trusty spudger and scrape away any leftover sticky stuff from the phone. Then, give those glued areas a quick spritz with isopropyl alcohol and wipe it down with a lint-free cloth. Clean is key!
– Stick it to ’em—literally! Use pre-cut adhesive or double-sided tape to secure the new battery. Pro tip: apply the adhesive onto the phone itself, not directly on the battery. Keep those cables underneath clear of sticky situations.
– Press that battery into place like a boss! Give it a solid squeeze for 20–30 seconds to lock it in.
Tools Used
Step 16


– Grab the flat end of your spudger and gently pop the charging assembly connector off the motherboard. Just a little nudge, and you’re on your way!
Tools Used
Step 17


– Grab a paperclip or SIM eject tool and gently poke it into the tiny hole on the left side of your phone—don’t be shy, give it a little push until the SIM card tray slides out like magic.
– Carefully slide out the SIM card tray and set it aside. You’re off to a great start!
Step 18

– Take out the two 2.5 mm PH00 screws—it’s like they’re the bouncers keeping the party inside. Keep those screws safe; you’ll need them for reassembly.
Step 19


– Let’s get started! Begin by disconnecting the two connectors located at the bottom edge of the motherboard.
Step 20


– Gently lift up the motherboard with a trusty plastic opening tool—nice and easy does it!
– Carefully remove the motherboard and set it aside like the treasure it is.
Step 21


The motherboard has successfully made its grand exit from the phone!
– Flip the motherboard around like a pro.
– Undo the fingerprint sensor cable with finesse—you’re almost there!
Step 22

– Gently flip that motherboard over so you can get to the camera lens ribbon connector—it’s hiding like a shy turtle!
– Now, let’s find that cheeky blue camera lens ribbon connector. It’s waiting for you to discover it!
Step 23
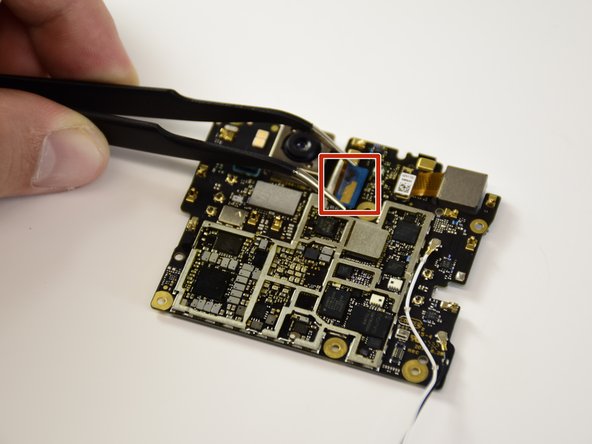
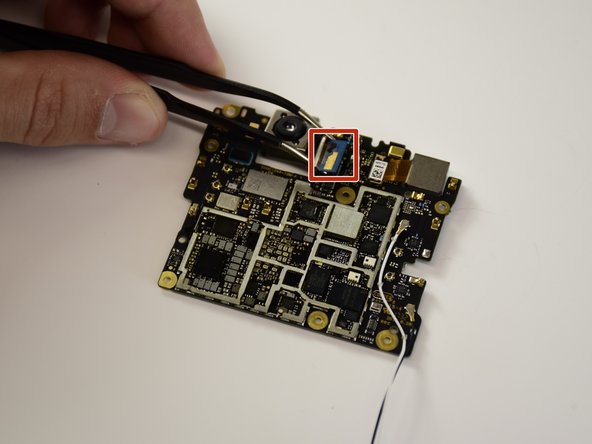
– Gently grab the ribbon connector that links the camera lens to the motherboard with your tweezers, then carefully lift it up. It’s like a little handshake between the parts—just give it a gentle nudge and you’re golden!
Tools Used

Step 24

– Make sure to compare your shiny new replacement part with the original—sometimes you’ll need to move over some components or peel off adhesive backings from the new piece before it slides into place.
– When it’s time to put everything back together, just retrace your steps in reverse. It’s like a dance, but with screws and wires!
– Got some old tech lying around? Don’t toss it! Take your e-waste to an R2 or e-Stewards certified recycler and give it a second life.
– If things didn’t go quite as planned, don’t sweat it! Swing by our Answers community for some troubleshooting tips and tricks.
– Remember, if you ever feel stuck, you can always schedule a repair.
Success!
