Google Pixel 2 XL Back Glass Replacement Guide: Easy DIY Repair Tutorial
Duration: 45 minutes
Steps: 25 Steps
Thanks for checking out this repair guide, courtesy of the Salvation Repair community! We’re stoked you’re taking the DIY route. Keep in mind that this guide hasn’t been officially endorsed by Google, but we’ve got you covered. If you need help or want to learn more about our repair process, you can always schedule a repair.
Get ready to breathe new life into your Google Pixel 2 XL by replacing the back glass with this easy-to-follow repair guide, courtesy of the experts at Salvation Repair. We’ve got you covered every step of the way. If you need help or want some extra guidance, you can always schedule a repair.
Step 1


– Grab your trusty SIM card eject tool or a simple paperclip and gently insert it into the tiny hole on the SIM card tray, which you’ll find on the left side of your phone, right across from the power and volume buttons.
– Give it a firm press to pop that tray out like a pro!
Tools Used

Step 2

The SIM card is going to pop right out of the tray without any fuss.
– Time to free that SIM card! Carefully remove the SIM card tray from your phone.
– When you’re ready to put it back, make sure that SIM card is facing the right way in the tray. It’s like giving your phone a little high five!
Step 3


Got a cracked display? No worries! Just tape it up to keep your fingers safe and prevent any further damage. Plus, it creates a nice smooth surface for that suction cup to stick to.
Heads up! The suction cup may struggle to seal on the curved edges of the glass.
– Gently place a suction cup near the SIM slot edge of your phone, steering clear of that sneaky curved edge. You’ve got this!
Step 4


Don’t worry, we’ve got you covered. Removing this part can be a bit tough, so be prepared to use some elbow grease. If it’s not budging, try gently rocking the suction cup and screen back and forth to loosen the adhesive. You can also apply some heat using an iOpener, heat gun, or hair dryer to help it come off more easily. If you need help, you can always schedule a repair
– Alright, let’s get this party started! Grab that suction cup and give it a good pull, then gently slide an opening pick between the front panel and the rear case. You got this!
Tools Used

Step 5


Heads up! In the following steps, be extra careful in certain spots to keep your phone safe and sound. If you need help, you can always schedule a repair
– Hey! Be gentle and don’t go more than 0.25 inches (6 mm) deep with that pick. We don’t want any damage to your phone’s display, am I right? It’s like playing a delicate game of Operation!
– Careful now, buff! The left edge is a no-go zone for our pick. We don’t want to accidentally snip those fragile display cables, okay dude?
– Alrighty, let’s take it slow and make teeny, tiny cuts only in that top left corner. Hearts are on the line here—we don’t wanna destroy the all-important front-facing camera!
Step 6


– Gently slide the opening pick down the right edge of your phone to break free that display adhesive. You’ve got this!
Step 7


Hey there! Don’t fret if you accidentally go a bit too deep at first. Just gently wiggle that flat opening pick and you’ll be back on track in no time. If you’re feeling stuck or need a little extra guidance, don’t hesitate to schedule a repair. We’ll be happy to help you out!
– Now it’s time to get this repair started – gently slide the opening pick around the lower-right corner and along the bottom edge of the phone. If you need help, you can always schedule a repair
Step 8


– Now, let’s get this phone open! Take that trusty pick and gently slip the flat edge into the top-right corner. Then, just slide it along that corner and up the top edge. You’re practically done!
Step 9


Be careful not to completely detach the display just yet – there are still some delicate ribbon cables connecting it to the phone’s motherboard. If you need help, you can always schedule a repair
If it’s being a little stubborn and doesn’t want to come loose right away, don’t sweat it! Just give it a little more encouragement with your prying tool, and you’ll get that display popping right off. If you need help, you can always schedule a repair.
Step 10


Be gentle when prying to avoid damaging the cable underneath or misplacing the cover. If you’re not feeling confident, you can always schedule a repair
Hang onto this component – you’ll need it for reassembly later.
The clip that secures this cover is located along the bottom edge, so take note of that for when you’re putting everything back together. If you need help, you can always schedule a repair
– Let’s give that digitizer cable connector cover a little nudge! Use the corner of your opening tool to gently pry it up and unclip it from the lower edge.
– Now that you’ve popped it open, go ahead and remove that connector cover. You’re doing great!
Step 11


– Time to give that digitizer cable connector a little nudge! Use the tip of your spudger to gently lift it up and out of its socket on the motherboard.
– Now, let’s put that connector back where it belongs! Carefully align it and press down on one side until you hear a satisfying click. Then, repeat on the other side. Resist the urge to press down in the middle – we want to keep those pins happy and straight!
– If your screen isn’t playing nice after your repair, give that connector another gentle push to make sure it’s seated properly. Double-check that there’s no dust or other debris blocking the socket. If you’re still having trouble, you can always schedule a repair
Tools Used


Step 13


Keep this part safe—you’ll need it when you put everything back together! Don’t worry, you’ve got this.
– Time to get started – insert the point of a spudger into the small hole on the edge of the display connector cover, it’s a great first step.
– Now, use that spudger to gently pry the cover out of its recess, you’re making progress.
– Almost there, remove the connector cover and you’ll be one step closer to fixing your device. If you need help, you can always schedule a repair
Tools Used


Step 15

– Carefully take out eleven 3.8 mm Phillips screws that are holding the midframe in place. Remember, each screw has its own special spot, so keep them organized and put them back where they belong!
– As you work through this repair, keep an eye on those screws and make sure they find their way home. You’ve got this!
Step 16


– Time to get started. Insert an opening tool into the notch in the midframe, right by the volume buttons, and gently pry the midframe up and away from the rest of the phone – you got this.
– Now that the midframe is loose, go ahead and remove it. If you need help, you can always schedule a repair


Step 18

– Grab your trusty spudger and gently use its point to disconnect the front-facing camera connector. You’ve got this!
– When it’s time to put everything back together, it’s a breeze to connect the front camera to the motherboard first, then slide that motherboard into place. Easy peasy!
Tools Used

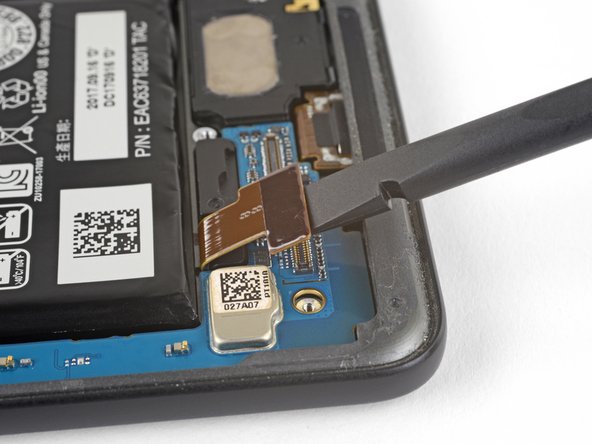
Step 20

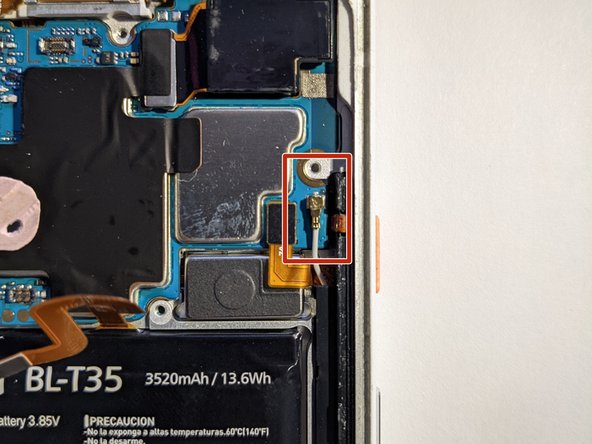
– Grab that spudger and pop the fingerprint sensor connector out. If you need help, you can always schedule a repair.
Tools Used

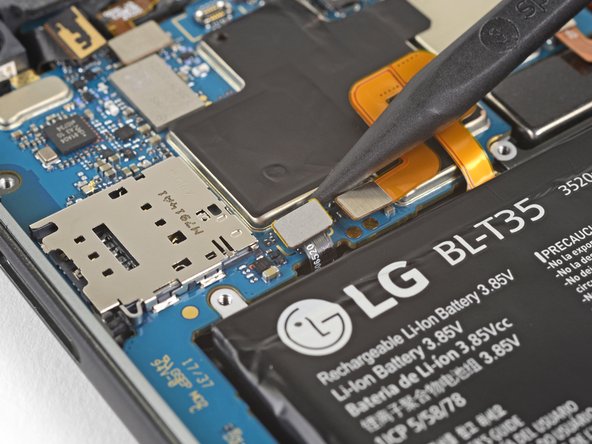
Step 22

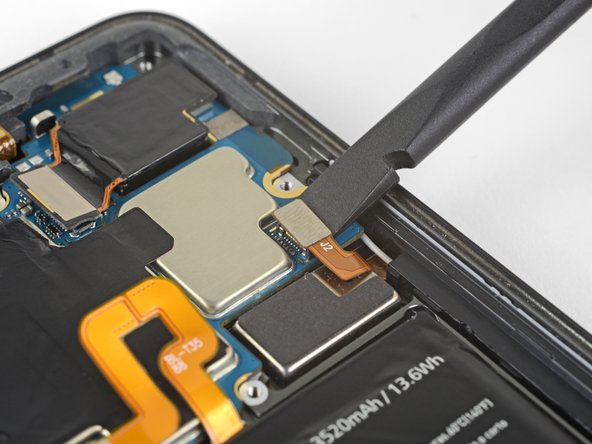
– Time to disconnect that charging assembly connector! Use the flat end of a spudger to gently pop it off. If you need help, you can always schedule a repair
Tools Used
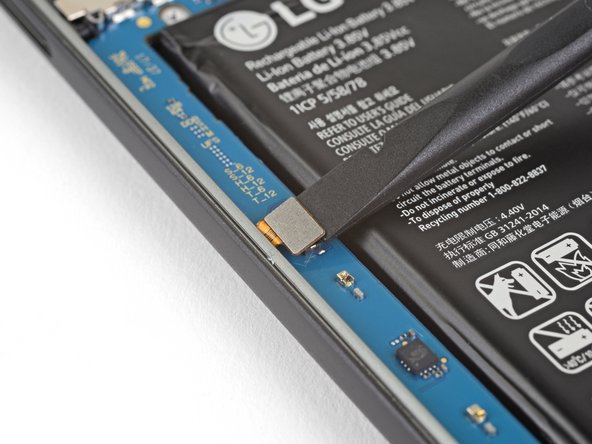
Step 23


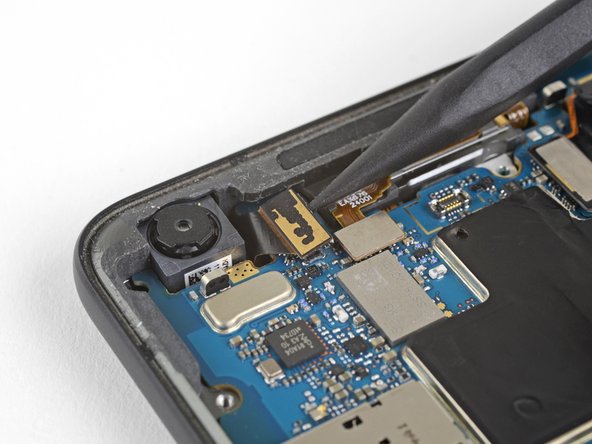
– Now it’s time to disconnect the front-facing sensor assembly connector – simply use the point of a spudger to gently release it. If you need help, you can always schedule a repair
Tools Used
Step 24
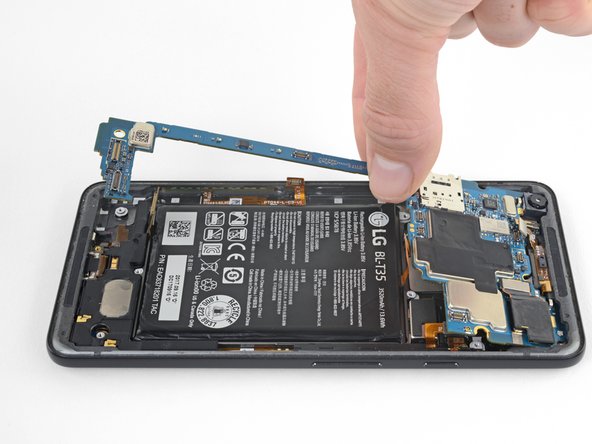


Hey there! That motherboard is pretty delicate, so be careful when you’re lifting it. If it starts to bend, take a pause and make sure there’s nothing holding it down. It should pop right up if it’s clear to go. If you need help, you can always schedule a repair.
– Alright, let’s get this motherboard out! First things first, make sure all the cables and connectors are clear of the board. Then, use the flat edge of your trusty spudger tool to gently lift the bottom of the motherboard.
– Now, holding the wider part of the motherboard near the SIM card slot, carefully slide the board toward the bottom of the phone while lifting it out. Think of it like a dance!
– And there you have it, the motherboard is out!
– Keep the phone flat with the battery facing up after you remove the motherboard, because the front-facing camera is a little shy and might fall out of the phone case if you’re not careful.
– When you’re ready to put the motherboard back in, move all the cables and connectors out of the way so they don’t get in the way. Make sure all the connectors are lined up with their sockets – those little guys like to hold hands. If you need help, you can always schedule a repair
Tools Used
Step 25
The suction cup in your iFixit kit might be a bit too large, but don’t worry, we’ve got you covered. If you need help, you can always schedule a repair
– Warm up the right side of the back glass with plenty of heat.
– Grab a small suction cup, lift the glass and slide an opening pick underneath.
– No suction cup? No problem! You can try using a jimmy tool, but be warned—you might scratch the enamel.
– Keep that heat coming and slowly work the opening picks around the top of the phone.
Tools Used