Google Pixel 3 Front Facing Cameras Replacement Guide: DIY Tutorial
Duration: 45 minutes
Steps: 19 Steps
This repair guide was put together by the folks at Salvation Repair, and while we’re totally impressed with Google’s tech, this ain’t an official Google guide. We’re all about helping you fix things, so if you need a hand, you can always schedule a repair.
When you’re looking at the display, the wide-angle camera is on the left side, and the regular camera is on the right. Easy peasy, right?
Hey there, techie! This repair guide’s all about giving your Pixel 3 a fresh set of selfie cameras. Think of it as a camera makeover. The cameras are pretty easy to swap out, so you can get that selfie game back on point. It’s a modular design, meaning each camera’s independent. When you’re looking at the screen, the wide-angle camera’s on the left, while the normal angle camera’s on the right. This guide also shows some love to the motherboard, so you’ll find some extra tips in there. If you need help, you can always schedule a repair.
Step 1

– Let’s get this repair started! Heat an iOpener and apply it to the bottom of your phone for about a minute. If you need help along the way, you can always schedule a repair
Tools Used

Step 2


Double-check that you’re not confusing the screen side with the back cover side. It happens!
Avoid using metal tools to pry – you don’t want to risk damaging or shattering that glass back cover. If things are stuck, give it another go with some extra heat from a hair dryer or heat gun.
Got a badly cracked back cover? No worries, just slap some clear packing tape on it and the suction cup should stick like a charm.
Having trouble getting it to budge? Don’t sweat it, just apply some more heat and give it another shot. If you’re still stuck, remember: Salvation Repair’s got your back – If you need help, you can always schedule a repair.
– Stick a suction cup to the warm bottom of the back cover. It’s like a mini-hug for your phone.
– Gently pull on the suction cup, creating a little crack. Think of it as a phone-opening dance party!
– Slide a trusty opening pick into the gap you created. You’re almost there! If you need help, you can always schedule a repair
Step 3

When you’re slipping an opening pick above the power button, just be gentle and don’t push it in too far – you don’t want to accidentally damage that fingerprint sensor cable. If you need help, you can always schedule a repair
Step 4


– Carefully slice through the adhesive along the bottom edge of your phone and around the right corner – you’re making great progress!
– Leave a pick in the bottom edge to keep the adhesive from re-sealing, and take a moment to pat yourself on the back – you’re doing a fantastic job! If you need help, you can always schedule a repair
Step 5


The adhesive can be pretty sticky, so try moving the pick in and out with a gentle sawing motion to help it slice through more easily. If you’re having trouble, don’t worry – it’s all part of the process. And if you need help, you can always schedule a repair
– Now it’s time to get this repair started. Heat the right edge with an iOpener and use an opening pick to carefully slice through the adhesive. If you need help, you can always schedule a repair
Tools Used
Step 6


When slicing above the power button, be sure to keep your pick chill and only go halfway in. This will help avoid a fingerprint sensor cable meltdown! If you need help, you can always schedule a repair
– Now it’s time to keep the heat on and slice through the rest of the phone’s perimeter. Make sure to leave a pick in each edge – this will prevent the adhesive from sneaking back in and resealing.
Step 7


Be careful not to remove the back cover just yet – it’s still connected to the phone by the fingerprint sensor cable. If you need help, you can always schedule a repair
– Alright, now that you’ve carefully sliced around the phone’s edge, gently lift the back cover from the left side.
– Carefully flip the back cover so it rests along its long side, making sure you don’t strain the fingerprint sensor cable. You got this!
Step 8

– Let’s loosen up those two 4.1 mm-long Phillips screws holding the fingerprint connector bracket in place. They’re like little party poppers, ready to get this show on the road!
– Don’t lose your cool – make sure you keep track of each little screw. Think of them like your trusty sidekicks – they’re gonna be back in their original spot when we’re done!
– Alright, let’s put this thing back together! Remember, when you’re tightening those screws, go easy on them – you don’t want to make your display feel like it’s been in a fight, right?


Step 10


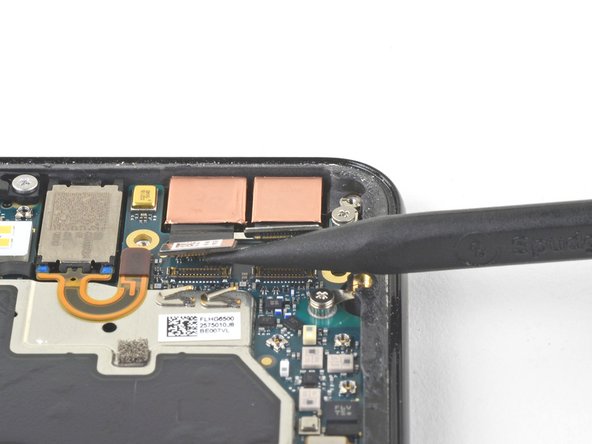
When you’re unplugging those connectors, watch out for those tiny surface-mounted parts around the socket – don’t accidentally kick ’em loose!
– Grab your trusty spudger and gently pry up to disconnect the fingerprint connector from its cozy socket. Easy peasy!
– When it’s time to reattach, just align those connectors like a pro! Press down on one side until you hear that satisfying click, then do the same on the other side. Remember, no pressing in the middle! If things get misaligned, those little pins can bend, and we definitely don’t want that. Keep it smooth and steady!
Tools Used
Step 11


– Time to detach that back cover! Let’s do this.
– Before you slide on that shiny new back cover, take a moment to scrub away any old adhesive leftovers from the phone frame. A trusty opening tool and some high-strength isopropyl alcohol will make the surface squeaky clean!
– If you’re giving the original back cover a second chance, just make sure to evict any old adhesive and give it a fresh layer of back cover adhesive.
– Installing a new back cover? Awesome! Just make sure to give it a side-by-side comparison with the original. Don’t forget to swap over any leftover parts, like the flash diffuser, to your new superstar.
– Need a hand with applying that new back cover adhesive? Just follow this guide to nail it!
Tools Used

Step 12

– Alright, let’s pop this wireless charging coil off! We’ve got five Phillips screws holding it in place:
– Two little guys at 1.9 mm
– Two bigger ones at 4.2 mm
– And one final 4.3 mm screw. You got this!
Step 13

– Gently lift and remove the wireless charging coil. It’s a bit like peeling off a sticker—just be careful not to damage anything underneath.


Step 15


Standoff screws are a bit tricky, but don’t worry! A standoff bit is the perfect tool for the job. If you don’t have one, a small flathead screwdriver will work in a pinch. Just be super careful not to slip and damage anything around it. You got this!
– Start by loosening the two screws that are holding the camera bracket in place.
– Once the screws are out, carefully remove the camera bracket.
– You’ll need a 4.1 mm Phillips screw to tackle one of those screws.
– The other screw is a 4 mm standoff screw.
Step 16

First things first, if you’re swapping out those front-facing cameras, make sure you know which one needs to go! It’s all about getting the right fit.
Now, if you’re diving into the motherboard removal, you’ll need to say goodbye to both cameras. It’s a team effort!
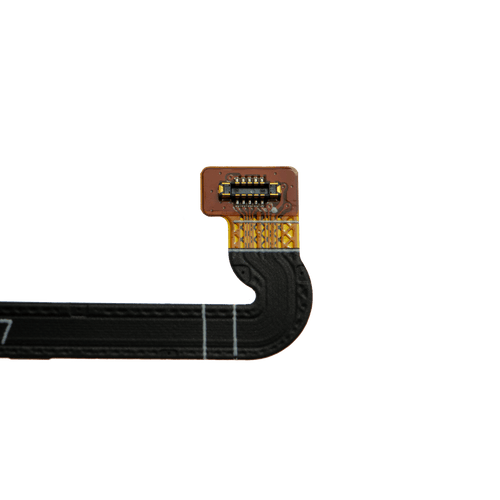
– Hey there! Let’s take a peek at the cameras on this device. We’ve got two to check out: the ‘Normal view’ camera, which is your everyday camera, and the ‘Wide-angle’ camera, which is perfect for capturing those epic group selfies or capturing the whole scene.


Step 18


The cameras are stuck in place with some pretty strong adhesive, so be prepared to gently coax them out.
– Alright, you ready to rock this camera module removal? Keep it cool, use the spudger to get behind that edge, and just gently pry up – don’t worry, it’s not going anywhere! If you need help, you can always schedule a repair.
Tools Used
Step 19

– Grab a pair of blunt nose tweezers and gently lift out the camera(s).
– If the adhesive holding your camera module is still in good shape, feel free to use it again! If it’s looking a bit tired, swap it out for some double-sided Tesa tape.
– When you’re putting in that shiny new camera module, make sure the lens area on the phone frame is squeaky clean and free from any sticky residue or debris.
Tools Used