Google Pixel 3 Loudspeaker Replacement
Duration: 45 minutes
Steps: 20 Steps
Hey there! This repair guide is brought to you by the crew at Salvation Repair. We’re here to help you fix your stuff, but remember: if things get too tough, you can always schedule a repair with us.
The team at Salvation Repair put together this step-by-step guide to help you remove the bottom loudspeaker from your Pixel 3. Keep in mind that taking out the loudspeaker will affect your phone’s water resistance. If you’re not feeling confident, don’t worry – we’ve got you covered. If you need help, you can always schedule a repair. Ready to get started? Follow these easy steps to remove the loudspeaker and get your phone back in working order.
Step 1

– Let’s get this repair started! Heat an iOpener and apply it to the bottom of your phone for about a minute. If you need help, you can always schedule a repair
Tools Used

Step 2


Double-check that you’re working with the correct side – we don’t want you to accidentally mix up the screen and back cover.
Remember to use plastic tools to pry, as metal can damage or shatter the glass back cover. If it’s being stubborn, try applying a bit more heat with a hair dryer or heat gun. And if you’re still having trouble, don’t worry – you can always schedule a repair
If your back cover is cracked up pretty badly, a layer of clear packing tape can help the suction cup stick better.
Depending on your phone’s age, you might need to apply a bit more muscle here. If things aren’t budging, try adding a bit more heat and give it another go.
– Stick a suction cup onto the warmed-up bottom edge of the back cover.
– Give that suction cup a solid, steady pull to create a little opening.
– Slide an opening pick into the gap you’ve just made.
Step 3

While popping your opening pick above the power button, make sure you don’t slide it in too deep, or you’ll mess up the fingerprint sensor cable. If you need help, you can always schedule a repair
Step 4


– Let’s get this phone open! Carefully slice the adhesive along the bottom edge and around the right corner.
– Now, keep that adhesive from sticking back together by leaving a pick in the bottom edge. It’s like giving it a little hug, so it doesn’t want to go back together! If you need help, you can always schedule a repair
Step 5


The adhesive can be pretty sticky, so try moving the pick in and out with a gentle sawing motion to help it slice through more easily. If you’re having trouble, don’t worry – it’s all part of the process. If you need help, you can always schedule a repair
– Now it’s time to get this repair started – heat up the right edge with an iOpener and use an opening pick to carefully slice through the adhesive. If you need help, you can always schedule a repair
Tools Used
Step 6


Be careful when slicing above the power button – don’t insert the pick more than halfway to avoid damaging that fingerprint sensor cable. If you need help, you can always schedule a repair
– Keep heating and slicing around the rest of the phone’s edges. Leave a pick in each edge to help keep the adhesive from sticking back together.
Step 7


Be careful not to remove the back cover just yet – it’s still connected to the phone by the fingerprint sensor cable. If you need help, you can always schedule a repair
– Once you’ve sliced around the phone’s edge, carefully lift the left side of the back cover.
– Flip the back cover along its long side and rest it so that the fingerprint sensor cable stays stress-free. If you need help, you can always schedule a repair.
Step 8

– Start by unscrewing the two Phillips screws that are 4.1 mm long, holding the fingerprint connector bracket in place. You’ve got this!
– As you go through this repair, keep an eye on each screw and remember where it belongs. It’s like a little puzzle!
– When you’re putting everything back together, just a friendly reminder: don’t over-tighten those screws, or you might end up with a display that’s not so happy.
Step 9


– Grab your trusty spudger and gently slide the point under the fingerprint connector bracket to pop it out from beneath the NFC coil. Easy peasy!
– Now, go ahead and remove that fingerprint connector bracket like a pro!
Tools Used

Step 10


When disconnecting connectors, be gentle to avoid dislodging the tiny surface-mounted components nearby. If you need help, you can always schedule a repair
– Grab your trusty spudger and gently poke at the fingerprint connector to lift it out of its cozy socket. Easy does it!
– When it’s time to reconnect, just line up those connectors like a pro! Press down on one side until you hear that satisfying click, then do the same on the other side. Remember, no poking down the middle! If things get a bit off-kilter, those pins might bend and we definitely don’t want that. You’ve got this!
Tools Used
Step 11


– Pop off that back cover.
– Before slapping on a new cover, make sure to scrape off all that old adhesive gunk from the phone frame. Grab an opening tool and some high concentration isopropyl alcohol to get the job done right.
– If you’re reusing the old cover, clean off any sticky residue and apply new adhesive.
– When installing a new cover, compare it with the original. Transfer any bits and bobs like the flash diffuser over to the new cover.
– Follow this guide for a smooth adhesive application. If you need help, you can always schedule a repair.
Tools Used

Step 12

– Let’s get that wireless charging coil out of there! First up, you’ll need to tackle those five Phillips screws holding it snugly in place:
– Two trusty 1.9 mm screws
– Two slightly taller 4.2 mm screws
– And don’t forget the lone warrior, a 4.3 mm screw
Step 13

– Gently lift and take out the wireless charging coil. You’ve got this!
Step 14


– Time to get started with your repair. Use the point of a spudger to carefully pry up and disconnect the battery press connector from its socket, which you’ll find near the right edge of the phone. If you need help, you can always schedule a repair
Tools Used
Step 15
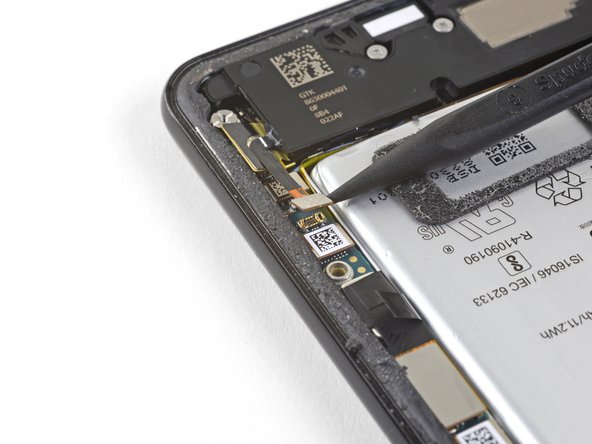

Watch out for that battery! The spudger is your friend, but let’s not give the battery a surprise poke.
– Gently use the point of a spudger to lift and unplug the loudspeaker connector from its cozy spot on the motherboard, located near the right edge of your phone.
Tools Used
Step 16


Don’t forget to pop that insert back in before you secure the daughterboard with screws!
– Let’s get started by removing these four Phillips screws.
– Next, gently take out the tiny grounding clip from the left screw hole—just be careful not to lose it!
– Pop out the small plastic insert from the right side of the USB-C port. It’s a simple step, but worth noting!
– Unscrew the 1.9 mm screw.
– Remove the 4.3 mm screw.
– Take out the two 4.3 mm screws with thinner shanks.
– When reinstalling the grounding clip, make sure the contoured edge faces the left side of the phone. It’s a little detail that makes a difference!
Step 17


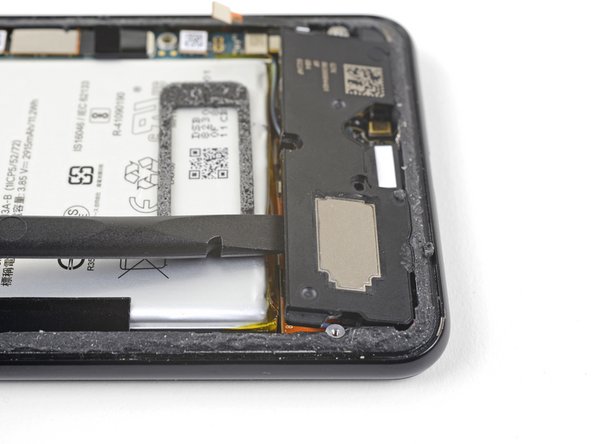
The loudspeaker is secured with a super-sticky adhesive gasket. Before you dive in to remove it, give it a gentle pry in a few spots to break that adhesive seal. You’ve got this!
– Let’s get that loudspeaker out! Slide the tip of your spudger under the bottom right corner of the loudspeaker.
– Now, give it a little pry to gently lift the loudspeaker away from the phone. Easy peasy!
Tools Used
Step 18


Watch out for the battery! Don’t let the spudger poke it – that could cause some trouble. Keep a steady hand, and if you’re unsure, feel free to schedule a repair.
– Time to get this loudspeaker loose. Start by sliding the point of a spudger under the top left corner.
– Gently pry up to loosen the loudspeaker – you’re making great progress. If you need help, you can always schedule a repair
Tools Used
Step 19

– Gently slide the flat end of your spudger under the top edge of the loudspeaker, near the left side.
– Apply a little pressure to pry it up and loosen the loudspeaker. It should come free without too much effort.
Tools Used
Step 20


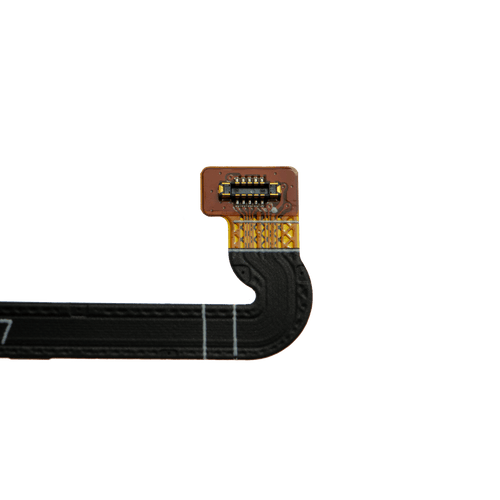
– Let’s get started by removing the loudspeaker – it’s the first step to getting your device sounding great again.
– Before you put in a new loudspeaker, take a look at the adhesive gasket. If it’s still in good shape, you can reuse it – just make sure it’s not covering the exit hole.
– If the gasket has been pulled out of place, don’t worry – just remove it and replace the adhesive with a pre-cut strip or some Tesa tape. Easy peasy!
– If you’re not feeling confident about this step, or any part of the process, don’t hesitate to schedule a repair with Salvation Repair – we’re here to help.