Google Pixel 3 XL Replacement Guide
Duration: 45 minutes
Steps: 17 Steps
This repair guide comes to you from the awesome folks at Salvation Repair, and while it’s not officially backed by Google, we’re here to help you every step of the way. Want to dive deeper into our repair guides? Check them out here.
Welcome to your go-to guide brought to you by the awesome team at Salvation Repair! While we haven’t gotten the thumbs up from Google, we’re here to help you every step of the way. This guide will walk you through the process of removing and swapping out the glass back cover or back panel for your Pixel 3 XL. Keep in mind, depending on the replacement part you have, you might need to move over a few extra components to your new back cover. We’ve included handy steps to help you transfer the fingerprint sensor, flash diffuser, and camera bracket to ensure everything fits perfectly. Just a heads up, we won’t be covering the NFC antenna replacement in this guide. If you need help, you can always schedule a repair.
Step 1


Hey there, repair enthusiast! If you’re using a heat source like a hair dryer, heat gun, or hot plate, just remember to keep the phone cool. We don’t want to fry the display or the battery. If you need help, you can always schedule a repair.
– Get your iOpener nice and toasty and put it on the right side of the back cover for a minute. Let’s get that adhesive nice and loose!
– While you’re waiting, keep an eye out for these things:
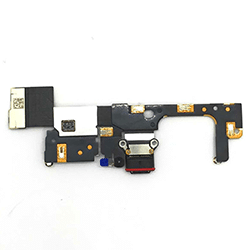
– You’ll see some strong adhesive hanging out near the bottom of the phone. It’s doing its best to keep things glued together!
– There’s also a fingerprint sensor cable hiding under there. Just be gentle so you don’t accidentally cut it while you’re working. It’s a bit of a delicate fella!
Tools Used

Step 2


– Get a grip on that back cover by applying a suction cup to the heated edge – the closer to the edge, the better.
– Give the suction cup a firm, steady pull to create some space between the cover and the phone. You got this!
– Next, carefully insert the point of an opening pick into the gap you just created.
– If your phone is a bit older, this part might be a tad tricky. Don’t worry, just apply some heat to the edge and try again. And remember, if you need help, you can always schedule a repair
Step 3


– Now it’s time to get this repair started – slide the opening pick along the right edge to carefully cut through the adhesive. Take your time and work slowly.
– Here’s a tip: if the adhesive starts to cool and gets tough to cut, just reapply some heat to the edge and it’ll be a breeze again. We’ve all been there, and it’s an easy fix.
– Once you’ve made your way through the edge, leave an opening pick in the seam to keep the adhesive from sealing back up. You’re making great progress – keep going! If you need help, you can always schedule a repair
Step 4

– Warm up a heated iOpener and press it against the bottom of the back cover for about a minute. If you need help, you can always schedule a repair
Tools Used
Step 5


Take your time as you carefully slice around the corner to avoid cracking the panel. If you feel resistance, heat it up again to make it easier.
– Use an opening pick to gently slice around the bottom right corner and continue along the bottom edge of the phone. It’s like a little dance for your pick!
– Leave a pick in the edge to stop the adhesive from getting too cozy again. We don’t want things getting stuck!
Step 6


– Keep the heat going and gently slice along the rest of the phone’s edges.
– Watch your step as you glide along the left edge! If your pick seems to be stuck at the top, you might have accidentally caught the fingerprint sensor. Just ease the pick back a bit and give it another go.
– Make sure to tackle those thicker adhesive spots near the bottom and right edge of the phone with confidence!
Step 7

– Carefully lift the right edge of the back cover like you’re unveiling a surprise.
– Grab an opening pick and glide it along the edges to cut through any stubborn adhesive that’s still hanging on.
Step 8


Keep a little wiggle room on that fingerprint sensor cable! We want to make sure it stays cozy and doesn’t get squished. You’ve got this!
– Lift the right side of the back cover and flip it over to rest it on the left side of the phone.
– Before sealing it up, take a moment to power on your phone and ensure everything is working fine. Remember to shut it back down completely before you proceed.
– During reassembly, use this guide to install the custom-cut adhesives for your back cover.
– If you swapped out the fingerprint sensor, you’ll need to use this software tool to make sure your phone recognizes the new sensor.
Step 9

– Gather your tiny tweezers and prepare to be a geek hero as you carefully lift the sticky yellow tape that’s guarding the fingerprint sensor connector. It’s like playing a game of ‘pin the tail on the donkey,’ but way more rewarding! If you need help, you can always schedule a repair.
Tools Used

Step 10


Watch out for those metal contacts on the flex cable! Give them some space and keep your tweezers clear to avoid any accidental shorting. You’ve got this!
– Grab your trusty spudger and give that black lock bar on the fingerprint sensor’s ZIF socket a gentle nudge to flip it up. You’ve got this!
– Next, with a light touch, hold the cable’s tab using your fingers or tweezers and smoothly wiggle that flex cable out of the socket. Easy peasy!

Step 11

– Start by carefully removing the back cover. Take it slow and steady.
– Next, follow this guide to get the new back cover adhesive applied just right. It’s easier than it sounds!
Step 12

– Let’s get this fingerprint sensor nice and toasty! Apply a heated iOpener over it for about a minute.
Tools Used
Step 13
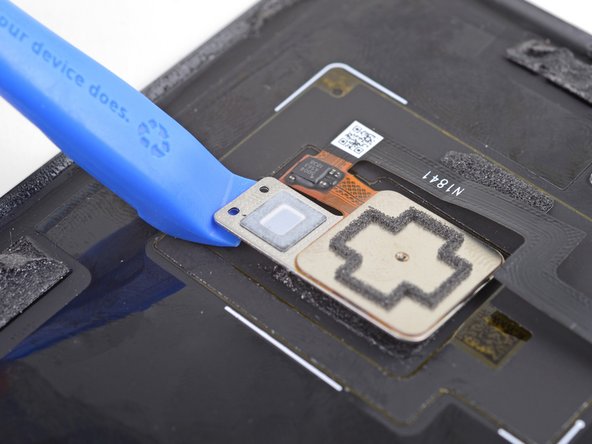


– Gently slide the edge of your trusty opening tool under the square part of the fingerprint sensor and give it a little nudge to start loosening it up.
– Keep working your way around the edges of the fingerprint sensor, prying it up until it’s nice and loose.
Step 14

– From the outer edge of the back cover, gently nudge the fingerprint sensor out of its snug little home with your finger.
Step 15

– Time to say goodbye to the fingerprint sensor! Carefully remove it from its cozy spot.
– If you’re giving your fingerprint sensor a new home on a fresh back cover, grab some double-sided tape like Tesa tape and stick it down securely to the new panel. It’s like a warm welcome to its new digs!
Step 16

– Slide the tip of your trusty opening tool under the plastic flash diffuser and gently lift it up to release the diffuser from its snug spot.
– Carefully take the diffuser out and set it aside.
Step 17

– Start by sliding the edge of your trusty opening tool under the camera bracket, then give it a gentle pry to loosen it up.
– Once it’s loose, carefully lift out the camera bracket and transfer it over to your shiny new replacement part.
– Now, take a moment to compare your brand new back cover with the original. You might need to move some extra components around or peel off those pesky adhesive backings from your new part before you get to the installation.