Google Pixel 3a Teardown
Duration: 45 minutes
Steps: 12 Steps
The Pixel 3a certainly breaks the mold—with its polycarbonate back, absence of wireless charging, noticeable bezels, a beloved headphone jack, and an outstanding camera, all packed in a budget-friendly device. Curious about what makes this device tick? A teardown might just hold the answers! For all the latest teardown updates, don’t forget to check out our Facebook, Instagram, or Twitter. Want those updates delivered right to you? Subscribe to our newsletter!
Step 1


This wallet-friendly Pixel skips a few extras: no wireless charging and no water resistance rating. It’s like a nostalgic throwback to 2016!
– While this phone’s specs might not make you jump out of your seat, there’s definitely a lot of bang for your buck here:
– 5.6″ OLED display serving up a crisp FHD+ 2220 × 1080 resolution (441 ppi) protected by Dragontrail Glass, so it’s tough too!
– Powered by an octa-core, 64-bit Qualcomm Snapdragon 670 processor (2.0 GHz + 1.7 GHz) with 4 GB LPDDR4x RAM, it can handle your daily tasks like a champ.
– The main camera is a solid 12.2 MP with ƒ/1.8 and OIS for those picture-perfect moments, plus an 8 MP selfie camera to capture all your best angles.
– You get 64 GB of built-in storage to stash all your favorite apps and memories.
– Featuring USB-C connectivity and yes, the classic 3.5 mm headphone jack for your music needs.
– Runs on Android 9.0 Pie, bringing you a smooth user experience.
Step 2


The polycarbonate design is probably tougher than a glass back, though it might not quite measure up to the solid strength of the old-school metal frames. Keep that in mind as you dive into your repair journey!
– Short on time? Here’s the teardown highlights, served up in X-ray vision—big thanks to Creative Electron!
– For those of us not blessed with X-ray abilities, we get to admire this clean, polycarbonate shell the old-fashioned way.
– One thing that’s stuck around through all the material swaps—the signature partial matte finish on the back.
– The real showstopper here? A rear camera packing serious punch, just like the rest of the 3a lineup. This budget-friendly device isn’t messing around.
– Swinging around to the front, this notch-free design brings some familiar bezels reminiscent of the standard 3—though this one rolls with just a single front-facing camera.
Step 3


– The 3a is a stylish sibling to the Pixel 3, boasting a sleeker design with fewer seams. Ours sports a unique hue that we’re calling ‘Thanos Edition’ instead of the bland ‘Purple-ish’ label.
– It even features a headphone jack! That’s right, it feels like a rare luxury in this budget-friendly phone.
– At first glance from the back, it’s tricky to distinguish between the 3 and 3a. While that glass back claims to add a touch of elegance, we’re not really noticing any difference from this angle.
– Sure, the iPhone XR and Galaxy S10e are vying for your hard-earned budget dollars, but at over $700, they’re not really putting in much effort. The Pixel 3a cuts costs by dialing down the processing power and embracing a durable plastic body.
– That seamless design hints at a user-friendly screen replacement experience, fingers crossed it’s simpler than the Pixel 3. Let’s hope for an easy fix!
– Avoid the dread and tackle those screen repairs head-on—they’re just part of the deal!
Step 4


Heads up: we’re diving into a 3a XL teardown, and guess what? It’s rocking a Samsung panel, too.
– What, no iOpener? While that would be handy, opening this phone without heat is a pleasant surprise—definitely a rare find these days!
– Those sleek little side bezels sure make this pricey OLED panel a bit vulnerable to our trusty opening pick. Anticipating this, we carefully slice alongside the display and set it free from the phone.
– Just like the good old days, the display connects to the motherboard with a single ribbon cable. Simple as that!
– There were whispers about a “gOLED” display from LG, but it’s clear this beauty is rocking a Samsung panel.
– A soft, easily removable adhesive holds the display in place—which is a win for repairs. Just a heads up, though: it might sacrifice some waterproofing, so keep that in mind.
– Onboard, we also have the Synaptics S3706 touchscreen controller making things happen.
– And let’s not forget the GigaDevice GD25LH40C 4 Mb Serial Flash Memory!
Step 5


– Our toolkit’s got the goods—64 driver bits in total—but we only need one trusty Torx driver to bid farewell to those screws and free the midframe. Oh, and the embedded earpiece speaker tags along for the ride!
– Next up, a quick cable shuffle! We gently fold away a couple of shiny golden flex cables meant for the Active Edge sensors. Good news—they’re no longer lurking under the battery like they used to, ready to cause trouble with any accidental poking around. Safe and sound now, just how we like it.
– Let’s tackle that battery—there are two sticky adhesive strips standing guard. We spot the pull tabs, give them a gentle tug, and they play nice. Victory! The battery’s free!
– This new battery’s got some serious juice—clocking in at 11.55 Wh (3.85 V, 3000 mAh), it’s a step up from its predecessor’s 11.2 Wh. That puts it nicely between two big players: 11.16 Wh for one and 11.94 Wh for the other. Who doesn’t love an upgrade?
Tools Used

Step 6


Our teardown experts have become quite the pros at handling tools, almost like they’ve developed a special talent for them!
– Next up is the motherboard, which comes with some quirky little antenna bits hanging out on its underside.
– The 3a keeps the beloved 12.2 MP rear camera from the Pixel 3. Instead of rocking two 8 MP selfie cameras, it features just one, combining the ƒ/1.8 and ƒ/2.2 apertures into a decent ƒ/2.0.
– It might seem a bit shocking, but who better to extract those tiny cameras than some nimble fingers?
Step 7

This time, we’re not catching a glimpse of the Pixel Visual Core like we did in our previous teardowns. Let’s dive in and see what surprises await us inside!
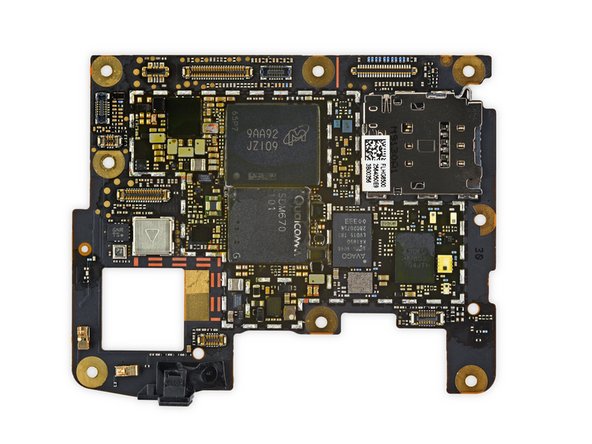
– Let’s scope out these components and uncover what makes the magic happen.
– Qualcomm SDM670 Snapdragon 670 octa-core processor paired with an Adreno 615 GPU.
– Micron MT29VZZZAD8DQKSL-046 W.9K8 64 GB flash storage with 4 GB of LPDDR4X DRAM.
– Avago AFEM-9046, which is most likely a front-end module.
– Qorvo QM78035, probably acting as a voltage-controlled oscillator.
– Qualcomm PM670A PMIC for power management.
– Skyworks SKY77365-11 Quad-Band GSM / GPRS / EDGE Power Amplifier Module.
Step 8


– Back side:
– H1C2M Titan M security chip – this little guy is all about keeping things secure.
– STMicroelectronics ST33J2M0 ARM SecureCore microcontroller – the brain that ensures smooth performance.
– Qualcomm WCN3990 wireless combo SoC – this helps keep you connected, making sure you’re always in the loop.
– Qorvo QM78012 RF fusion module – a high-tech module for all your wireless needs.
– Qualcomm SDR660 RF transceiver – handles the signals, so everything runs like a well-oiled machine.
– NXP PN81B – likely the NFC controller with Secure Element, making secure communication a breeze.
– Murata SWUA 370 90 and Qualcomm PM670 PMIC – power management and connectivity, the dynamic duo keeping everything energized.
Step 9


– Bonus chips to jazz things up! We’ve got the Cirrus Logic CS35L36-CWZR audio amplifier in the mix, ready to enhance your sound experience.
– Meet the Qualcomm PM3003A power management chip, your trusty sidekick in keeping everything powered up and running smoothly.
– Say hello to the Texas Instruments TLV7113318DDSE 200 mA LDO regulator, because who doesn’t love a reliable regulator to keep the voltage just right?
– Next up, we’ve got the Texas Instruments TLV70728PDQN 200 mA LDO regulator—another fantastic addition to your repair toolkit!
– Don’t forget about the Texas Instruments TLV70718PDQN 200 mA LDO regulator, working hard to ensure your device stays in top shape.
– Check out the Texas Instruments TLV73318PDQN 300 mA LDO regulator—more power, more fun!
– Last but certainly not least, we’ve got the Skyworks SKY13351-378LF GaAs SPDT switch, ready to help you toggle things like a pro!
Step 10


– Now, let’s talk about the sensors:
– We’ve got the Bosch Sensortec BMI160, a nifty little 3-axis accelerometer/gyroscope that keeps everything balanced.
– Next up is the Bosch Sensortec BMP388, a pressure sensor that helps you keep an eye on the atmosphere.
– And last but not least, there’s the AKM Semiconductor AK09915C, a 3-axis electronic compass that always knows which way is north.
Step 11


– Once the motherboard is out of the way, we’ve got a clear path ahead. It’s great to see that each part comes out smoothly and intact.
– Let’s start off by extracting the fingerprint sensor, complete with its clever little flex cable tail.
– Next up are these nifty plastic rails—working double duty as both cable guides and brackets to keep those squeeze sensors snugly in place.
– At the bottom edge, we uncover a modular USB-C port! This design is a delightful feature for this often-used component, especially since this model isn’t equipped for wireless charging.
– Moving down, we also spot the familiar vibration motor—a compact, round Linear Resonant Actuator (LRA), a staple in just about every smartphone except those made by certain big-name brands. No high-tech haptic motor here for our Pixel.
– And let’s not forget, the headphone jack makes a stylish modular return!
Step 12

Looking for a more cinematic take on this series? Check out our Pixel 3a XL teardown video. It’s like a behind-the-scenes tour, but with more tools and less red carpet.
Want to take a closer look at all those cool inner parts? We’ve got some wallpapers to feed your curiosity—check them out!
– After navigating through this teardown adventure, we’ve laid out our seemingly endless array of component pieces.
– Taking this phone apart wasn’t exactly a walk in the park, but we appreciated the nostalgic nods to a time when repairs were a bit easier.
– So, how does this phone stack up in the repair showdown? Check out the score below to find out!
Success!
