
Google Pixel 4a Battery Replacement Guide
Duration: 45 minutes
Steps: 31 Steps
This repair guide was written by the Salvation Repair team. You can always schedule a repair if you need help.
Keep your phone safe! Let’s power down your battery before you start disassembling it. Aim for that 25% mark or lower.
Heads up! Your Pixel 4a has a screen that’s a little on the delicate side, so be careful.
Authored by the awesome iFixit team (not endorsed by Google), this guide leads you through replacing the battery on a Google Pixel 4a. For your safety, make sure the battery charge is below 25% before taking your phone apart to reduce the risk of a thermal event if you accidentally damage the battery. If your battery is swollen, take necessary precautions. The Pixel 4a has a delicate display. Pay extra attention to the warnings in the opening procedure if you plan to reuse the screen. If you need help, you can always schedule a repair.


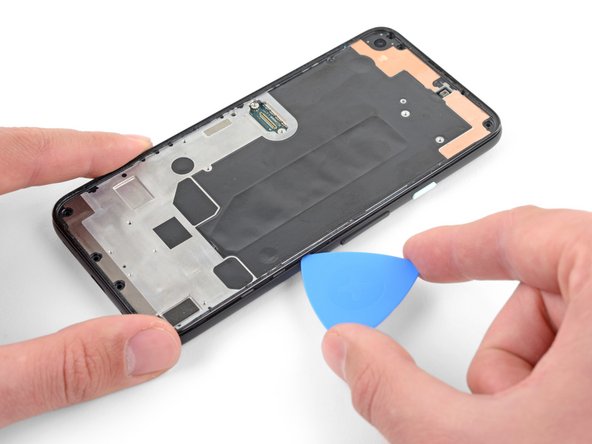
Step 2


Be careful not to damage the orange ribbon cable under the lower-right corner of the screen – it’s pretty fragile. When using your opening pick, only insert it as far as you need to separate the screen adhesive. If you’re not feeling confident, don’t worry – you can always schedule a repair and let the pros at Salvation Repair handle it for you.
– Keep an eye on the two seams along the phone’s edge:
– Before diving in, check out these areas on your screen:
– Screen seam: This is the boundary where the screen meets the rest of your phone. It’s your cue to start prying here.
– Frame seam: This is where the plastic frame hugs the back cover. It’s fastened with screws, so hold off on prying this one.
– Screen flex cable: Remember, don’t insert that opening pick too deep or you might just turn your repair adventure into a cable disaster.
– Adhesive perimeter: Stay within this narrow zone while prying – miss the angle and you could give that OLED panel a bad day.
Step 3

You can use a hair dryer, heat gun, or hot plate, but watch out! Don’t let your phone get too toasty—both the display and internal battery are pretty sensitive to heat. If you need help, you can always schedule a repair.
– Warm up a trusty iOpener and place it on the right edge of the display for a minute. This will help loosen up that stubborn adhesive, making your repair journey a breeze!
Tools Used

Step 4


If your display is badly cracked, you can try covering it with clear packing tape to give that suction cup a fighting chance! If that doesn’t work, you can always use some super strong tape instead. And if all else fails, a little superglue might be your new best friend. Don’t worry, we’ve all been there! If you need help, you can always schedule a repair.
– Pop a suction cup right near the edge of the screen, where it loves to hang out.
– Give that suction cup a solid tug; we’re talking a steady lift here!
– Gently slide the point of an opening pick into the screen seam, just a smidge—no more than 1 mm or so.
Step 5


Be careful not to push too hard – if you feel the pick hitting a ridge, it’s probably pressing against the edge of the OLED panel. Try angling the pick and giving it another shot. If you need help, you can always schedule a repair
Slide the pick in here carefully to avoid scratching the OLED panel. Do this first before slicing the adhesive.
– Slip the pick 1 mm into the gap and rock it upward to a steep angle.
– With a steep angle, gently push the pick into the gap about 1/4 inch (6 mm). The pick should slide under the OLED panel. If you need help, you can always schedule a repair.
Step 6


Hey, be careful with that pick! Don’t go deeper than a quarter inch (6 mm) or you might accidentally damage the screen’s flex cable. If you need help, you can always schedule a repair
Step 7


Aww yiss, be extra careful with that tiny cable under the screen – we don’t want any mishaps! 🙌 Keep your pick skills sharp and only go a tiny bit deep, like what’s the big rush anyway? (2mm should do the trick!)
– Now it’s time to get a little more aggressive – insert another opening pick into the right edge of your phone at an angle, where you’ve already created some space. This will help you avoid damaging that fancy OLED panel.
– Gently slide the opening pick around the bottom of your phone to cut through the adhesive. Take your time, you’re doing great!
– Leave the pick in place along the bottom edge – this will prevent the adhesive from resealing and make the rest of the process a whole lot easier. If you need help, you can always schedule a repair
Step 8


If the screen is being stubborn, try heating the left edge for about a minute and then give it another shot. If you need help, you can always schedule a repair
– Slide another opening pick into the bottom edge of the phone at a fun angle where a gap has already popped up—this will help keep that OLED panel safe and sound.
– Use the pick to gently glide along the left edge of the phone, slicing through like a pro.
– Keep that pick in place along the left edge to stop the adhesive from getting all clingy again.
Step 9


There’s a mesh covering the earpiece speaker at the top of the screen. If you’re short on a replacement mesh, just be careful not to damage or misplace this little guy.
If you’re having a tough time slicing through, give the top edge a minute of gentle heat and then try again. You’ve got this!
– Slip another opening pick into the left side of the phone at a slight angle where there’s already a little gap – this will help keep that OLED panel safe and sound!
– Gently glide the pick around the top edge of the phone to slice through that adhesive like a pro.
Step 10


Hold your horses! The screen isn’t ready to make its grand exit just yet.
– Once you’ve traced the edges of the phone like a pro artist, gently lift the right side of the screen up, just like you’re flipping the pages of a good book.
– Take your trusty opening pick and slice through any stubborn adhesive that may be holding on for dear life.
Step 11


Hey, be gentle with that ribbon cable! Don’t put any pressure on it.
– Gently lift the screen from its top edge and swing it over the bottom edge until it can comfortably rest glass-side down.
Step 12

– Grab a trusty pair of tweezers and gently lift the black tape that’s keeping the screen connector bracket snug. It’s like unwrapping a present, but for your device!
– If the tape looks good as new, feel free to use it again when putting everything back together. If it’s seen better days, no worries—just swap it out for a piece of electrical tape.
Tools Used

Step 13

Stay organized during this repair by keeping track of each screw and making sure it ends up back in its original spot. If you need help, you can always schedule a repair
– Grab your trusty T3 Torx driver and get ready to tackle those two 2.1 mm screws holding the screen connector bracket in place. Let’s make this repair happen!
Step 14

– Grab your trusty tweezers and carefully remove the screen connector bracket – it’s a delicate part, so be gentle!
– Hang on to this little guy, you’ll need to put it back where it belongs when you’re reassembling everything. If you need help, you can always schedule a repair
Tools Used
Step 15


– Alrighty, buddy! Let’s get that screen flex cable disentangled. Just gently nudge it with a spudger, and then it’s back together time! Gently align and press down on either side of that pesky little press connector so it clicks into place. Remember, no middle pressing, or it might cause some permanent mischief. If it gets a bit wonky, breathe deep and dive right back in. If you ever feel like you might need a little extra help, don’t sweat it – you can always schedule a repair.
Tools Used

Step 16


As your device powers up after putting it back together, the screen will embark on a calibration adventure. Just sit back and resist the urge to poke the screen during this time—doing so might lead to some quirky touch responses down the line.
Check out the third photo to get your adhesives just right!
– Let’s get started by removing the screen.
– Now it’s time to install a new screen:
– Check if your replacement screen comes with speaker mesh and top edge adhesive already installed – it’s a nice bonus if it does!
– If not, no worries! Follow this guide to apply the custom-cut adhesive and get your screen looking brand new.
– If your new screen does come with the adhesive pre-installed, you can skip applying the top edge adhesive – one less step to worry about!
– But if it doesn’t, don’t stress! Just remove the larger clear liner from the top edge adhesive and apply it to the screen, making sure the larger cutout lines up with the speaker mesh. Easy peasy! If you need help, you can always schedule a repair.
Step 17


– Grab your T3 Torx driver and tackle those eight 4.3 mm screws holding the back cover firmly against the midframe. You’ve got this! Just remember, if you need help, you can always schedule a repair.
Step 18


– Gently slide an opening pick into the little gap between the midframe and the back cover. It’s like unlocking a hidden treasure!
– Carefully glide that opening pick along the bottom edge of your phone, popping those plastic clips loose and freeing the back cover from the midframe. You’re doing great!
Step 19


– Gently glide the opening pick along the left edge of your phone to pop out those sneaky plastic clips that are holding the back cover snugly to the midframe. You’re almost there!
Step 20


– Now, let’s get those clips released! Slide the opening pick around the top and right edges of the phone to get those clips to let go. If you need help, you can always schedule a repair
Step 21
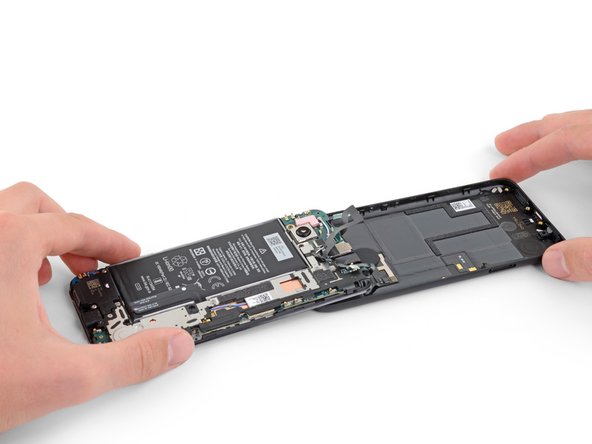


– Alright, time to give that back cover a little swing! Gently lift it from the bottom, working your way over the top and around the back. You’ve got this!
– Now, lay that back cover down like a comfy cushion for the midframe. Gently rest the midframe on top, making sure you’re not putting any pressure on those delicate ribbon cables. You’re almost there!
Step 22


– Grab your trusty T3 Torx driver and get ready to remove the seven screws that hold the motherboard bracket in place:
– Start by taking out the three 2.9 mm-long black screws – they’re the first to go
– Next, remove the three 2 mm-long screws – we’re making progress here
– Finally, take out the one 4.1 mm-long screw, and you’ll be one step closer to fixing your device. If you need help, you can always schedule a repair
Step 23


– Grab your trusty spudger and gently pop the motherboard bracket free from the upper-right and lower-right corners of the motherboard. You’ve got this!
Tools Used
Step 24


– Grab your trusty tweezers and gently lift off the motherboard bracket. You’ve got this!
Tools Used


Step 26


– Alright, time to give those flex cables a little nudge! Using the tip of your spudger, gently disconnect the two cables that hook up the fingerprint sensor and buttons to the motherboard. It’s like giving them a friendly ‘see ya later!’ before moving on. If you need help, you can always schedule a repair.
Tools Used


Step 28


– Turn the midframe over like it’s a pancake on a Sunday morning.
– Grab a pair of tweezers and gently peel away the two bits of black tape that are keeping those battery adhesive pull tabs under wraps.
– If the tape pieces are still in one piece, hang onto them for reassembly. If they’re looking worse for wear, no worries—just swap them out for some trusty electrical tape.
Tools Used
Step 29


Be gentle when handling the battery – avoid poking holes in the bottom with your tweezers. If you’re not feeling confident, you can always schedule a repair
– Grab a trusty pair of tweezers and give those battery adhesive pull tabs a gentle lift. This way, you can easily snag them with your fingers and keep moving forward with your repair journey!
Tools Used


