Google Pixel 4a Fingerprint Sensor Replacement Guide
Duration: 45 minutes
Steps: 29 Steps
This repair guide comes straight from the talented folks at Salvation Repair, and while it hasn’t received a thumbs up from Google, it’s packed with helpful tips! Want to dive deeper? Check out our repair guides here.
Heads up! The display panel on the Pixel 4a is a bit on the delicate side, so handle it with care!
Hey there, tech-savvy friend! Get ready to give your Google Pixel 4a a fingerprint sensor upgrade. This guide will walk you through the steps, but remember, the Pixel 4a’s screen is delicate, so be extra careful during the opening process. If you’re reusing the original screen, follow those warnings closely. After you’ve swapped out the sensor, make sure to recalibrate it so it’s ready to rock and roll. If you need help, you can always schedule a repair.
Step 1


– Let’s pop that SIM card out! Use a SIM eject tool, a tiny screwdriver, or even a straightened paperclip to gently push into the little hole next to the SIM card tray.
– Give it a little nudge and the tray should pop right out.
– Time to get that SIM card out of the tray. You’re doing great!
Step 2


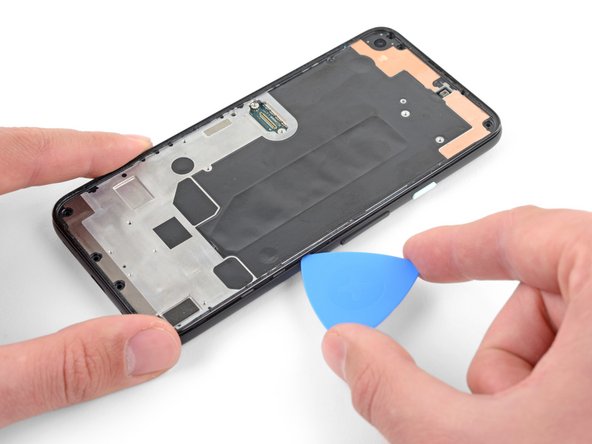
Hey there, be careful of that orange ribbon cable under the screen’s lower right corner! It’s kinda delicate, so don’t get too rough with your opening pick. Just give the screen a little nudge to separate the adhesive. If you need a little help, you can always schedule a repair.
Time to get this screen up! Give it a little pry and you’ll be on your way. Make sure to read the notes below before you go too crazy. If you need help, you can always schedule a repair
– Let’s keep our eyes peeled for those two seams on the edge of your phone!
– Before diving in, take a moment to check out these areas on the screen:
– Screen seam: This is the magic line that separates the screen from the rest of the phone. This is where you’ll want to gently pry.
– Frame seam: Here’s where the plastic frame meets the back cover, snug as a bug! It’s held down by screws, so steer clear of prying here.
– Screen flex cable: Remember, don’t shove that opening pick in deeper than we say—this little cable is delicate and deserves some TLC.
– Adhesive perimeter: Keep your prying within this narrow zone, and make sure to angle the pick just right. Going too deep could put your OLED panel in jeopardy!
Step 3

Hey, you can also use a hairdryer, heat gun, or hot plate, but be careful not to get things too hot. We don’t want to fry your phone, the display and battery are super sensitive to heat. If you need help, you can always schedule a repair.
– Time to get this repair started! Apply a heated iOpener to the right edge of the display for about a minute. This will help loosen the adhesive, making the next steps a breeze. If you need help, you can always schedule a repair
Tools Used

Step 4


If your display is seriously cracked, a quick fix could be to cover it with some clear packing tape, which might just give that suction cup a better grip. Alternatively, you can use some super-strong tape as a replacement for the suction cup. And if you’re really in a bind, you can always superglue that suction cup right onto the shattered screen. Remember, if you need help, you can always schedule a repair.
– Yo, let’s get this screen party started! Keep it close to the edge, just like we’re painting a picture. Now lift with a strong and steady rhythm, and open up that door to a world of fixes! Pop in your opening pick like a secret agent, no more than a millimeter deep, and we’re in business. Need help? No worries, you can always schedule a repair to get those repair vibes flowing!
Step 5


Be careful not to push too hard – if you feel the pick hitting a ridge, it’s probably pressing against the edge of the OLED panel. Try angling the pick and giving it another shot. If you need help, you can always schedule a repair
Here’s the scoop on how to slide that pick in without putting the OLED panel in harm’s way. Make sure to do this before you start slicing through the adhesive. You’ve got this!
– Get ready to unlock your device’s secrets! With your trusty pick 1 mm into the gap, gently pivot it upwards to a steep angle – you’re making great progress!
– Now, carefully push the pick into the gap about 1/4 inch (6 mm) while keeping that steep angle. The pick should slide in smoothly below the OLED panel. If you need help, you can always schedule a repair with Salvation Repair.
Step 6


Keep your pick to a gentle depth—no more than 1/4 inch (6 mm)—to ensure you don’t accidentally give the screen’s flex cable a rough time!
– Gently slide the pick along the right edge of the screen to carefully cut through the adhesive – you’re making great progress!
– Leave the pick in the top right corner to keep the adhesive from re-sealing, and get ready for the next step. If you need help, you can always schedule a repair
Step 7


Hey, there’s a little cable hanging out under the screen, so be careful! If your tool gets stuck, just back it out a bit and try again. Make sure to keep that tool angled downwards, and don’t go too deep – just enough to loosen the glue. Think of it like a gentle nudge!
– Gently slide another opening pick into the right edge of your phone at a perfect angle where there’s already a gap—this keeps that OLED panel safe and sound!
– Now, glide that opening pick around the bottom of the phone to tackle that tricky adhesive.
– Keep the pick snugly in place along the bottom edge so the adhesive doesn’t decide to close the gap again.
Step 8


If the screen still gives you trouble, give the left edge a little warm-up session for one minute, then try to slice again! No worries, you’re doing great! 😊 If you need help, you can always schedule a repair.
– Whoa there, partner! Time for a little finesse. Carefully stick another pick under that bottom edge where the crack’s breached, so you don’t scratch our fancy display screen.
– Alrighty then, let’s slide that pick lefty-loo to split the adhesive grips on this side.
– Hold onto that pick, let’s not lose our rhythm here. It’ll make an encore appearance on the left edge, just in case the adhesive wants to make a reunion party.
Step 9


Hey there! There’s a nifty mesh covering the earpiece speaker at the top edge of your screen. Make sure to keep this little guy safe and sound—if you don’t have a spare, be gentle and don’t let it slip away!
If you’re finding it tough to slice through the screen, give the top edge a warm hug with some heat for about a minute—then take another crack at it!
– Now, let’s get that phone open! Slide another opening pick into the left edge, where you already made a little gap. Don’t worry, we’re careful around those fancy OLED panels. Gently slide the pick around the top of the phone to cut through the adhesive. You’re doing great!
Step 10


Hold your horses! We’re not quite ready to take the screen off just yet.
– Now that you’ve trimmed the edges, gently lift up the right side of the screen, and imagine you’re flipping open a book — but this one has all the secrets of your phone inside!
– Grab an opening pick and nimbly work through any stubborn bits of adhesive that are still hanging on. You’ve got this!
Step 11


Take it easy and make sure not to stress the attached ribbon cable too much.
– Gently lift the screen from the top edge and gracefully swing it over the bottom edge until it’s resting on the surface, glass-side down.
Step 12

– Grab your trusty tweezers and carefully lift up the black tape that’s guarding the screen connector bracket. No need to be rough, just a gentle nudge will do the trick.
– Check out the tape – if it’s lookin’ good, feel free to reuse it when you’re putting things back together. Otherwise, grab a piece of electrical tape and give it a new home.
Tools Used

Step 13

Remember to keep track of each screw and make sure it goes back in the exact same spot it came from. You got this! If you need a little help, you can always schedule a repair.
– Let’s loosen those screws! Grab your T3 Torx driver and give those two 2.1 mm screws securing the screen connector bracket a little twist. They’ll come right out.

Step 15


– Use the tip of a spudger to give that screen flex cable a little lift and disconnect it.
– To reconnect those press connectors, line them up carefully and press down on one side until you hear that satisfying click. Then repeat on the other side. Don’t press down on the middle. If the connector’s misaligned, those pins can bend and get grumpy. If you’re feeling lost, you can always schedule a repair.
Tools Used

Step 16


Alright, cool beans! During the boot-up process, you’ll see the screen doing its calibration thing. Hold your horses and let it do its thing. Don’t touch the screen. If you do, you might end up with a touch screen that’s a little bit… off. If you need help, you can always schedule a repair.
Refer to the third photo to get your adhesives in the right spot. You’ve got this!
– Let’s get started by taking off that screen!
– Ready for the new screen? Here’s how to make it happen:
– First, check if your replacement screen comes with the speaker mesh and top edge adhesive already on it.
– If you’re looking for the adhesive magic, follow this guide to apply the custom-cut adhesive just right.
– If your screen has those goodies, you’re all set—no need for extra top edge adhesive!
– But if it’s missing, peel off the larger clear liner from the top edge adhesive and stick it to the screen, not the frame. Just ensure the bigger cutout aligns perfectly with the speaker mesh.
Step 17


– Grab your trusty T3 Torx driver and get ready to work some magic! Start by loosening those eight 4.3 mm screws that are keeping the back cover snug against the midframe. You’ve got this!
Step 18


– Let’s pop that back cover off! Carefully insert an opening pick into the seam between the midframe and the back cover.
– Now slide that pick along the bottom edge of the phone. You’re releasing those plastic clips holding the back cover in place. You’re doing great!
Step 19


– Alright, time to loosen up those pesky clips! Gently slide the opening pick around the left edge of the phone to release the plastic clips holding the back cover to the midframe. It’s like giving the back cover a little massage, but with a tool. Don’t worry, it’s all part of the plan. If you need help, you can always schedule a repair.
Step 20


– Alright, time to free that phone! Slide your opening pick around the top and right edges of the phone to release the rest of the clips. You got this!
– If you need help, you can always schedule a repair.
Step 21
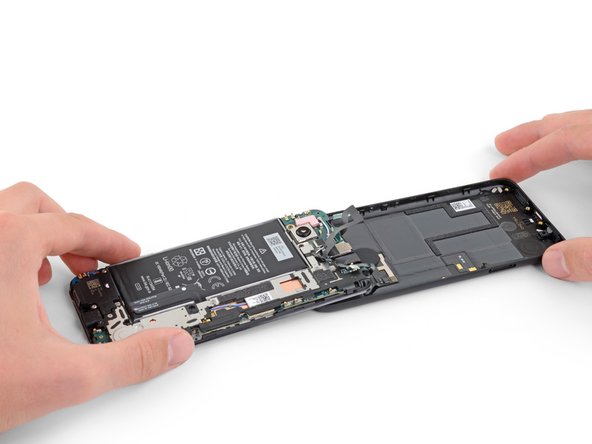


– Gently swing the back cover from the bottom of the phone over the top and around to the back like a pro.
– Place the back cover on your work surface and carefully rest the midframe on it, making sure to treat those attached ribbon cables with the utmost care—no stress allowed!
Step 22


– Grab your trusty T3 Torx driver and let’s tackle those seven screws holding the motherboard bracket in place. Here’s what you’re looking for:
– Three black screws that are 2.9 mm long
– Three screws that are 2 mm long
– One screw that’s 4.1 mm long
Step 23


– Alright, time to give that motherboard bracket a little nudge! Use the tip of your spudger to gently unclip it from the upper-right and lower-right corners of the motherboard. Don’t worry, it’s just a little dance.
Tools Used
Step 24


– Time to get up close and personal with your device’s internals! Use a trusty pair of tweezers to carefully remove the motherboard bracket. If you need help, you can always schedule a repair
Tools Used


Step 26


– Now, it’s time to give those flex cables a little wiggle room! Use the tip of your spudger to gently disconnect the two flex cables that connect the fingerprint sensor and buttons to the motherboard. Don’t worry, it’s easier than it sounds! If you need help, you can always schedule a repair.
Tools Used


Step 28


If the adhesive is being a little too clingy, warm up that fingerprint sensor with an iOpener for a minute through the back cover, then give it another go!
– Gently nudge the fingerprint sensor with the tip of your finger to pop it through the back cover and let go of that stubborn adhesive.
Tools Used
Step 29


If the adhesive is being stubborn, try using an iOpener to heat up the back cover for about a minute – this should help loosen things up. If you’re still having trouble, don’t worry, you’re not alone! If you need help, you can always schedule a repair
– Grab your trusty spudger and gently lift those fingerprint sensor cables away from the back cover – they’ve been stuck on there for too long!
– Now, go ahead and take out the fingerprint sensor. You’ve got this!

