Google Pixel 6a Vibration Motor Replacement
Duration: 45 minutes
Steps: 28 Steps
This repair guide is brought to you by the Salvation Repair team—clear, straightforward, and ready to help you get your device back in action.
For your own safety, make sure to drain the battery below 25% before taking your phone apart.
Ready to replace the vibrator in your Pixel 6a? This guide will walk you through it step by step. Before you dive in, make sure your battery is below 25% to reduce any fire risk if things go awry. If your battery looks swollen, be extra cautious and take the necessary safety measures. Oh, and don’t forget to grab some replacement adhesive to finish up the job. If you need help, you can always schedule a repair.
Step 1


Let your battery dip below 25% before you jump in. Damaged batteries with a lot of charge can be a fire hazard!
– Shut down your phone completely and unplug any cables. It’s time for a little break before the real fun begins!
Step 2


Before diving into your repair, make sure you check out these important things to keep in mind.
– Screen seam: This is where the screen parts ways with the rest of your phone. Avoid prying here—trust me, nothing good comes from that.
– Bezel seam: Here’s your spot! The plastic bezel meets the frame, and it’s held tight by some snappy little clips. This is the edge you want to pry open.
Step 3


The next three steps show off the Anti-Clamp—a handy gadget that makes popping your device open a breeze. If you’re not rolling with the Anti-Clamp, skip ahead three steps for another way to get inside.
If your screen’s seen better days and is cracked, slap some clear packing tape over it so the suction cup sticks like a pro.
Need a deep dive on using the Anti-Clamp? Check out the full guide.
If your phone’s surface is slipperier than a banana peel, a bit of tape can help give the Anti-Clamp some extra grip.
– Give the blue handle a little tug backwards to release the Anti-Clamp’s arms.
– Slide those arms right over the edge of your phone on the right side.
– Place the suction cups carefully near the middle of that right edge—one on the front, and the other on the back.
– Now, give the cups a gentle squeeze to create that sweet suction.
Step 4


– Grab the blue handle and pull it forward to lock those arms in place.
– Next, spin the handle clockwise a full 360 degrees or until you see the suction cups start to stretch out.
– Keep an eye on the suction cups—they need to stay perfectly lined up. If they start to drift apart, just loosen them a bit, realign the arms, and you’re good to go.
Step 5


Just give it a gentle half turn at most, then take a minute to chill. Let the Anti-Clamp and time handle the heavy lifting.
A hair dryer or heat gun works too—just don’t go wild with the heat, or you might end up roasting your screen or battery.
If the Anti-Clamp isn’t giving you enough space, hit the spot with a bit more heat and twist the handle another half turn.
– Let’s get this repair started! Heat up your iOpener and carefully thread it through the arms of the Anti-Clamp, positioning it along the right edge of the phone.
– Now, be patient for just a minute – this will give the adhesive a chance to loosen up and create a gap for you to work with.
– As soon as the Anti-Clamp creates a big enough gap, it’s time to bring in the opening pick! Carefully insert it under the screen frame to start making progress.
– Go ahead and skip the next two steps – you’re making great progress so far!
Tools Used

Step 6

You can use a hair dryer, heat gun, or hot plate to warm things up, but take it easy—overheating can mess with the display and battery, so keep it cool and controlled.
– Let’s get this repair started! Heat an iOpener and apply it to the right edge of the screen for about two minutes. This will help loosen things up and make the process smoother.
Tools Used
Step 7


If your screen is really cracked, try covering it with clear packing tape. It might help the suction cup stick better. If the suction cup still isn’t working, you can also use super strong tape to give it a go. In the worst case, just glue the suction cup right onto the cracked screen to get that grip you need!
Depending on how old your phone is, this might be a little tricky. If you’re hitting a wall, try applying more heat to the edges and give it another shot.
– Stick a suction cup onto the screen, aiming for the center of the right edge.
– Give the suction cup a firm, steady pull to pop open a little gap between the bezel and the frame.
– Slide an opening pick into that gap to get things moving.
Step 8


Be sure to only insert the pick up to 3.5mm—going any further could harm the delicate internals!
– Keep up the suction and tilt the pick upwards, aiming for that steep angle.
– Gently work the pick in as you pry, sliding it right into the bezel seam.
Step 9


– Slide the pick along the right edge to release the plastic clips that hold the bezel in place to the frame. This will help you get started on the repair process.
– Position the pick at the top-right edge before you move on to the next step, this will make the process a lot smoother.
Step 10


Be gentle with the pick—only go up to 4 mm deep to avoid any accidental damage to the internals. It’s like a little surgical precision—keep it light!
– Gently work the opening pick around the top-right corner of the phone to release the clips. A little twist goes a long way!
– Leave the pick in place at the top-right corner so the clips don’t snap back into place. It’s like holding the door open – don’t let them lock again!
Step 11


When you’re slicing around the front camera, keep the pick to a max of 3mm in, so you don’t accidentally mess with the lens. Stay sharp and take it slow!
– Now it’s time to get this repair started – insert a new opening pick into the gap you’ve just created and get ready to make some progress!
– Gently slide the pick along the top edge to release those clips and you’ll be one step closer to fixing your device.
Step 12


– Gently work the opening pick around the top-left corner of your device to release those pesky clips.
– Keep the opening pick in place at the top-left corner to stop those clips from snapping back into place.
Step 13


Be careful not to insert the pick more than 3 mm to avoid messing with the delicate internals. Keep it shallow, and you’re golden!
By now, the screen should pop right off the frame. If it’s still hanging on around the edges, gently slide an opening pick to free any stubborn clips holding it in place.
– Slip a fresh opening pick into the gap you just made.
– Gently slide that pick along the left edge to pop those clips free.
– Keep the groove going by repeating the twist-and-slide move on the rest of the edge.
Step 14


Hold up! The screen’s still tethered to the frame by a flex cable—don’t yank it off just yet.
Keep the screen close to the frame and avoid twisting it, or that flex cable might have a very bad day.
– Flip up the right edge of the screen, swinging it over to the left like you’re opening a book.
– Set the screen down so it’s upside down and lying parallel to the frame—nice and steady before you move on.
Step 15


The display cable bracket is held in place by some snug little metal clips.
– Grab your tweezers and gently lift the bottom edge of the bracket until the metal clip pops free.
– Take out the display cable bracket and set it aside.
– When putting things back together, remember: start by sliding the top edge of the bracket in first, then press down the other side. Skipping this could lead to sparks or even damage your logic board, so keep it smooth!
Tools Used

Step 16


Take it slow here—tiny parts are packed in tight, so give them some space and keep your moves gentle.
– Slip the tip of your opening pick under the bottom right edge of the display cable press connector—it’s hanging out just above that nearby screw hole.
– Gently pop up the display cable press connector to disconnect it.
– When it’s time to reconnect, line up one side and press until you feel that click, then do the same on the other side. Steer clear of pushing down in the middle—misaligned pins can bend and cause trouble, so double-check your alignment before snapping it back in.
Step 17

The back of the Pixel’s screen is super delicate. A tiny scratch or dent could lead to some serious damage, so handle with care.
To keep your screen or replacement screen in tip-top shape, handle with care! A little extra caution goes a long way in preventing damage during the repair process.
– When you’re handling your screen, be sure to hold it by the edges—those are the safest spots!
– When you’re setting your screen down, make sure nothing is touching the underside. A soft, lint-free cloth is a great choice to keep things safe and scratch-free.
Step 18


Don’t forget to pop that display cable bracket back in place before you finish up!
– Start by carefully removing the screen.
– Now, time to reassemble! Take a moment to check the front-facing camera hole and the sensor cutout on your replacement screen. If there are any liners still hanging around, remove them.
– If your proximity sensor’s rubber gasket is missing, don’t panic! It might still be stuck to the back of your old screen. Make sure to put it back if needed.
– Before sealing everything up, it’s a good idea to give your phone a quick test run. Temporarily connect the screen, power on your phone, and make sure everything’s working smoothly. Just don’t forget to turn off your phone again before moving forward.
– Now, follow this guide to put on the screen adhesive and make it stick.
– If you’re setting up a new screen, be sure to follow the guide for calibrating the fingerprint sensor to get it just right.
Step 19


Leave the majority of the tape intact, just carefully remove the section connecting the midframe to the top speaker.
– Gently grab your tweezers and peel away the silver tape holding the midframe and top speaker together. Take your time and be careful—it’s a small but important step.
Tools Used
Step 20


– Grab your trusty tweezers and gently lift the tape that’s hiding the two screws on each side of the USB-C port.
Tools Used
Step 21


– Let’s get started by removing the 16 screws that hold the midframe in place – grab your trusty T3 Torx screwdriver and get to work!
– You’ll find eight 4.3 mm screws, so take your time and make sure to remove them all.
– Next up, remove the five 2.9 mm screws – they might be a bit smaller, but they’re just as important.
– Now, take out the two 4.9 mm screws, and don’t forget the single 4.6 mm screw hiding in there.
– If you’re feeling stuck or need a little extra help, don’t worry – you can always schedule a repair with the experts at Salvation Repair.
Tools Used

Step 22


– Slip your spudger between the top edge of the midframe and the frame, right by the front camera.
– Gently lever the spudger upward to pop the top of the midframe free from its clips.
Tools Used

Step 23


– Let’s get started by carefully inserting a spudger between the bottom left of the midframe and the frame – this is where the magic happens!
– Now, gently pry up with the spudger to release the bottom of the midframe from its clips. Take your time, and it’ll come loose in no time!
Tools Used
Step 24


Don’t worry if you feel a bit of resistance – it’s totally normal. The midframe is slightly stuck to the heat sink with thermal paste, so just take your time and gently work through it.
– Take off the midframe carefully. It’s a simple step, but a crucial one.
– Before you seal everything back up, it’s a great idea to power up your device and check if everything is working as expected. Once you’re sure, remember to power it down completely before moving on to the next step.
Step 25


– Gently lift the tape that connects the midframe to the loudspeaker—think of it as unwrapping a tiny present.
Step 26

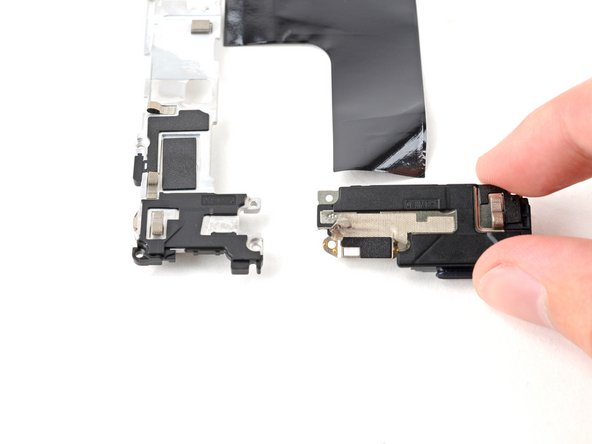
– Grab your tweezers or just use your fingers, and gently pop the loudspeaker away from the midframe.
Tools Used
Step 27


– Slide an opening pick in between the midframe and the vibrator to gently pry them apart.
Step 28


– Before you wrap things up, give your new part a side-by-side look with the old one—there might be bits or sticky stuff you need to move over.
– To put your device back together, just walk through these steps in reverse. Easy does it!
– Want to check if everything’s working? Run a diagnostics test using the built-in Pixel Diagnostic tool—just click here.
– If things didn’t go quite as planned, try some basic troubleshooting, or tap into our Pixel 6a Answers community for extra help.
– Still stuck? You can always schedule a repair with Salvation Repair.
Success!
