
Google Pixel 7a Ultrawide Camera Replacement Guide: Easy DIY Repair Tutorial
Duration: 45 minutes
Steps: 54 Steps
Hey, this repair guide is put together by the Salvation Repair crew, but we’re not officially endorsed by Google. Need help with your device? You can always schedule a repair.
Get ready to breathe new life into your Pixel 7a’s ultrawide camera. If it’s having trouble focusing, stabilizing, or has suffered some physical damage, this step-by-step guide is here to help. Please note that the Verizon model (G0DZQ) has a 5G mmWave antenna, which might make some photos look a bit different, but the process remains the same. If your battery is swollen, be sure to take the necessary precautions. You’ll need some replacement adhesive to complete this repair. Keep in mind that any repair can affect your phone’s water resistance, so it’s all about reapplying that adhesive just right. If you need help, you can always schedule a repair

Step 2


– Time to get started! Insert a SIM eject tool, or a trusty paper clip, into the SIM card tray hole – it’s like a little key to unlock your SIM card.
– Gently press the tool into the hole until the SIM card tray pops out – easy does it!
– Now, carefully remove the SIM card tray and you’re one step closer to getting your device up and running.
Step 3

Just give it a little warmth—enough to feel cozy, but not enough to turn your device into a hot potato! Too much heat can make your screen, back cover, or battery grumpy.
Want to loosen up that rear cover? Try warming it up with a hair dryer, heat gun, or hot plate – it’s like a mini spa day for your device!
– Grab your trusty heat source, the iOpener, and let it work its magic on the bottom edge of the rear cover for a cozy three minutes. It’s like giving your device a warm hug before we dive into the repair!
Tools Used


Step 4


Next up, we’ll walk you through the Anti-Clamp. It’s like a little helper to make things easier when you’re opening things up. Don’t worry, if you’re not using the Anti-Clamp, just skip ahead three steps and we’ll show you another way.
Want to see the full scoop on the Anti-Clamp? Check out this guide schedule a repair
– First, let’s get this repair started! Pull that blue handle backward to unlock the Anti-Clamp’s arms – it’s like a little secret door.
– Now, carefully slide the arms over the bottom edge of your phone. Make sure one suction cup is on the rear cover and the other is on the screen – you’re getting the hang of this!
– Almost there! Squeeze those cups together to create some serious suction. You’re doing great, keep it up!
Step 5


– Gently pull the blue handle towards you to securely lock those arms in place.
– Now, give the handle a cheerful clockwise twist—a full turn (that’s 360 degrees!) should do the trick, or until those suction cups start to stretch out a bit.
– As you watch those cups stretch, keep an eye on their alignment. If they start to wobble and slip, no worries! Just take off the Anti-Clamp and grab some tape to help those cups stick like a charm.
Step 6

While the heat from an iOpener is enough to loosen the rear cover, it might cool down while you’re getting the Anti-Clamp ready. Just reheat the cover if you need more time to set it up.
If the adhesive doesn’t budge, twist the handle clockwise a quarter turn and give it another minute. Add more heat with a hair dryer or heat gun if the rear cover cools down.
– Get creative and place something sturdy under your phone so it sits nice and level between the arms of the Anti-Clamp.
– Now, take a breather for about a minute, or until you see that adhesive loosening up and a little gap forming at the bottom edge of your phone.
– Slide an opening pick into that newfound gap between the rear cover and the frame—you’re doing great!
– Gently peel off the suction cups from your phone using their handy pull-tabs and then set the Anti-Clamp aside. You’re almost there!
Tools Used
Step 7


If you’ve already popped in an opening pick with the Anti-Clamp, feel free to breeze right past this step.
– 1. Grab your suctions like a boss and stick it right on the middle of the bottom edge of your device’s back cover. Suction it’s amazing! 2. Pull as strong as you can, but be steady, like a pro. You’ll know it’s working when a gap appears between the cover and your friend, the frame. 3. Time for the opening pick to shine! Slide it into that gap like a puzzle piece. 4. Peels off the suction tool and say goodbye! You’re doing great!
Tools Used


Step 9


As you continue, make sure to keep those opening picks tilted upward while you slice away until the rear cover pops off completely. You’re doing great!
– Give that opening pick a little angle so it’s pointing away from the frame, like it’s giving a thumbs up to your awesome repair skills.
– Now, gently slide your pick to the bottom left corner of the rear cover, making sure it’s nice and snug.
– Leave that pick in place, like a little guardian angel, to keep the adhesive from sealing itself back up. You’ve got this!
Step 10


– Pop in a second opening pick at the bottom left corner, like you’re giving your device a little hug!
– Gently glide that new pick over to the bottom right corner of the rear cover to break free the bottom edge adhesive—it’s like a dance move for your gadget!
– Keep that pick in place to stop the adhesive from getting all clingy again. You’ve got this!
Step 11

Feeling a little chilly? No problem! You can warm up the rear cover with a hairdryer, heat gun, or hot plate. Just be careful not to overheat things. It’s like a warm hug for your phone. Remember, if you need help, you can always schedule a repair.
– Grab your trusty iOpener and give the right edge of the rear cover a nice, warm hug for a couple of minutes. You’re making friends with the adhesive, not trying to fight it!
Tools Used
Step 12


Don’t go too crazy with your pick on the right side! Keep it to 5mm or less to avoid messing with the wireless charging coil. You got this!
For a cool visual guide, measure 5 mm from the tip and mark your pick with a permanent marker.
– Pop in a third opening pick down at the bottom right corner of the rear cover.
– Gently glide your pick along the right edge of the rear cover to break free that sticky adhesive. Stop when you hit the camera bar.
– Keep that pick in place to avoid the adhesive from sticking back together. You’re doing great!
Step 13

You can totally grab a hair dryer, heat gun, or even a hot plate to give that rear cover a nice warm hug! Just be careful not to turn the phone into a hot potato.
– Alrighty, tech wizards! Time for some magic – apply a toasty iOpener to the left edge of the rear cover and let it work its charm for two blissful minutes. You’re doing great, just keep that warming wonder in place! 💪🔥
Tools Used
Step 14


Hey, just be careful not to go too crazy with your pick – keep it within 3mm along the left edge. That’ll keep the wireless charging coil and the rear cover foam pad from getting all messed up. 😉
To help you visualize, take your pick and measure 3 mm from the tip, then draw a little mark with a permanent marker. You got this!
– Slide a fourth opening pick into the bottom left corner of the back cover—let’s get in there.
– Gently glide your pick up along the left edge of the rear cover to loosen that adhesive. Stop right when you hit the camera bar; it knows how to play nice.
– Keep that pick right where it is to stop the adhesive from throwing a party and resealing.
Step 15

If you’re feeling a bit chilly, grab a hair dryer, heat gun, or even a hot plate to gently warm up that rear cover. Just be careful not to turn your phone into a hot potato!
– Warm up that rear cover! Use a heated iOpener and give the top edge a nice two-minute hug.
Tools Used
Step 16


You’ll find a nice, thick strip of adhesive along the antenna housing. No worries, it’s designed to be there!
If you’re having trouble getting the pick in, start with the small gap near the camera bar from the previous pick. Just a little wiggle room is all you need.
– Grab that fifth opening pick and gently slide it into the top left corner of the rear cover, aiming for a depth between 8 mm and 10 mm (that’s about 0.3–0.4 in). You’re looking to go just over halfway between the tip of the pick and the logo. Easy peasy!
– Now, take that pick and glide it halfway across the top edge to break free the antenna bracket adhesive. Just remember to stop right at the halfway mark along the top edge. You’re doing great!
Step 17


Keep it chill! Don’t poke your pick in more than 3mm, or you might mess up the antenna housing’s graphite tape.
– Gently pull your opening pick out to about 3 mm deep.
– Now, slide that pick over to the top right corner to separate the remaining adhesive along the top edge.
Step 18


Just a friendly reminder: tilt your picks upwards and away from the frame when you’re working on this step. You’ve got this!
– Tilt the top edge pick so its flat side slides right underneath the rear cover.
– Position the picks on either side of the camera bar so their flat edges fit snugly beneath it.
Step 19


Be gentle when handling the rear cover – you don’t want to bend it. Just pry enough to loosen the adhesive near the camera bar. If it’s being stubborn, try rocking the rear cover from side to side to help loosen things up.
Alright, so there’s this sticky strip holding the back cover in place, you know, just below the camera. Let’s get this party started!
– Slide those opening picks under the camera bar and gently pry at the top edge of the rear cover away from the frame.
– Give it a little wiggle back and forth until the camera bar starts to come loose. You’re doing great!
Step 20


– Now it’s time to get that rear cover off. Slide the opening picks from the camera bar down the long edges to break any adhesive that might have formed again. This will help you separate the cover safely and easily.
Step 21


– Start by gently taking off the rear cover. Easy peasy!
– Now that we’ve got it apart, here’s your chance during reassembly:
– Before sealing it up tight, give your phone a quick test! Power it on to make sure everything is running smoothly. Once you’re satisfied, power it down before diving back into reassembly.
– Follow the guide to apply some fresh adhesive and pop that rear cover back on. You’ve got this!
Step 22


Just a little warmth is all it needs! Make sure the flash is just warm to the touch. Too much heat can make the battery and other parts a little cranky. If you need help, you can always schedule a repair
Alternatively, you can grab a hair dryer or heat gun to warm up the flash.
– Time to get this repair started! Apply some heat to the flash unit using a heated iOpener for about a minute. This will help loosen the adhesive that’s keeping it stuck to the logic board cover, making it easier to remove.
Tools Used
Step 23


Hey there, champ! This flash cable is like a delicate little dancer, so be careful not to trip it up and cause a tear. We wouldn’t want to make this repair any more complicated than it needs to be, right?
– Now it’s time to carefully slide your pick under the right edge of the flash. This will help you loosen the adhesive that’s holding it in place, making it easier to separate from the cover. Take your time and be gentle, you got this!
Step 24


– If that copper tape decided to take a little vacation with the flash, don’t sweat it! Just grab your trusty tweezers or fingers and gently remove that black foam residue from the logic board cover. It’s like a little spring cleaning for your device!
Tools Used

Step 25


Be sure to respect your battery and avoid any mishaps while you’re rockin’ and rollin’ with this step. If you need help, you can always schedule a repair
If the copper tape is still stuck to the logic board cover and you have a new one, let’s get that old tape off. You’ll be a pro in no time!
– Heat up that flash with a heated iOpener for a minute. It’s like a little spa treatment for your phone!
– Hold the flash cable’s neck steady and use tweezers to carefully peel off the copper tape from the flash unit. You got this!
Step 26


While the Pixel 7a uses Torx Plus screws, your standard Torx drivers can still get the job done. Use the T2 bit to remove those 1IP Torx Plus screws and the T3 Torx bit for the 3IP ones. Just remember to apply some steady, downward pressure to avoid stripping those screws. If you need help, you can always schedule a repair
– Alrighty! Time to get our repair on! Use a 3IP Torx Plus driver to remove those teeny tiny 4.3mm screws that hold the logic board cover in place—thirteen of ’em. Crazy, huh? And then, when you’re ready, employ a 1IP Torx Plus driver to extract a 1.5mm screw on the right edge of the cover. You’re doing great so far! If you’re all jibbed out at this point, no sweat, just remember you can always schedule a repair with our awesome repair squad! schedule a repair
Step 27


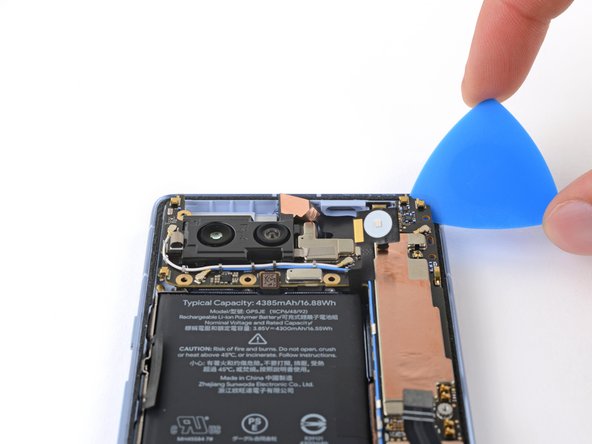
– Slide an opening pick into the bottom right corner of the logic board cover and the frame.
– Pop the clip to lift off the cover.
Step 28


– Gently lift the top edge of the logic board cover and guide the flash unit through its nifty cutout.
– As you bring everything back together, make sure to thread the flash through its cutout while lowering the logic board into position.
Step 29


– Alright, time to get this charging assembly outta there! Let’s gently remove it. It’s just a little dance, and we don’t want any drama. 😉
Step 30

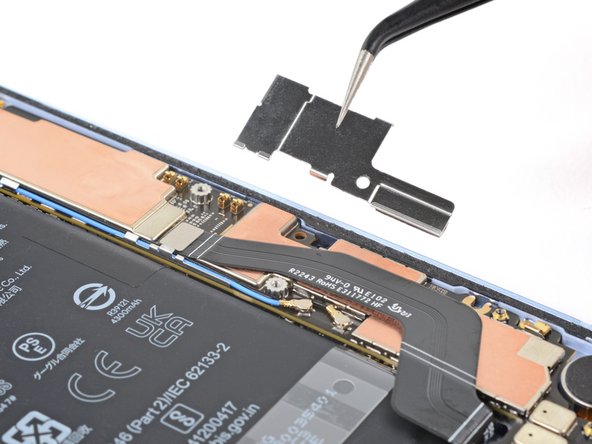
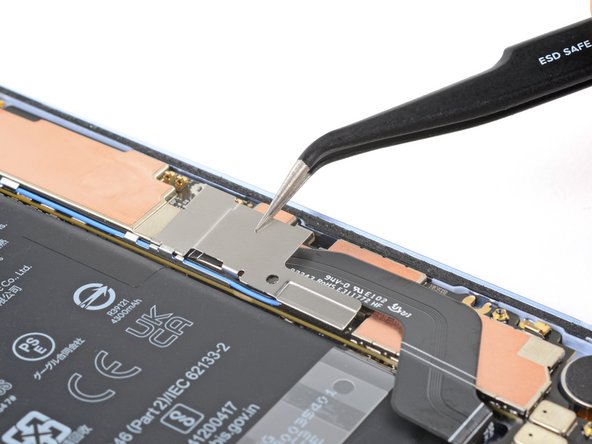
– Let’s get started! Use your trusty 1IP Torx Plus driver to remove the 1.5mm screw that’s holding the connector cover in place.
– Now it’s time to get a little hands-on – use tweezers or your fingers to carefully remove the cover.
– When you’re putting everything back together, make sure to slide the upper left corner of the cover under the hook on the logic board before securing it with its screw.
Tools Used
Step 31

The Verizon model (G0DZQ) Google Pixel 7a has an extra cable and connector for the 5G mmWave antenna. Don’t worry, though! The rest of this guide is the same for both types of phones. Let’s keep on rockin’ and rollin’!
Step 32


To reconnect a press connector, just line it up with the socket and gently press down on one side until you hear a satisfying click. Then, do the same on the other side. It might take a couple tries to get it just right. Don’t worry, it’s all part of the fun!
– Slide the flat end of a spudger under the top edge of the battery connector with determination.
– Lever it up to pop off the battery connector – just like opening a surprise gift!
Tools Used

Step 33

– Grab your trusty 3IP Torx Plus driver and get ready to unscrew! Carefully remove the 4.3 mm screw that’s keeping the earpiece speaker snugly attached to the frame. You’ve got this!
Step 34


– Time to get this earpiece speaker out – gently lift the bottom edge upward, you got this!
– Now, carefully pull the speaker towards the bottom of the phone, freeing that red gasket from its frame cutout.
– The final step: remove the speaker, and you’re one step closer to a fully functional device. If you need help, you can always schedule a repair
Step 35

– Grab your trusty 3IP Torx Plus driver and give those two 4.3 mm screws securing the antenna housing to the frame a little love tap. You’re gonna want to gently loosen them up.
– Now, when you’re putting everything back together, give that housing a little hug while you tighten those screws. Just make sure it’s all snug and secure.
Step 36


– Slide an opening pick right into the top left corner where the antenna housing meets the frame.
– Gently pry upward to pop those clips loose and free the housing.
– When putting it all back together, just remember to keep the graphite film out of the way before sliding the housing in.
Step 37


– Gently lift the bottom leg of the antenna housing and wiggle the top edge out from the frame. Voila!
– Carefully remove the housing.
Step 38


– Verizon models : Use the point of your spudger to gently pry up and disconnect the 5G mmWave press connector. This connector is a little sensitive so be extra careful when disconnecting it! If you need help with this step, you can always schedule a repair
Tools Used
Step 39

If you’re feelin’ brave, try warming up that sticky stuff with a hair dryer or magic heat wand. Just make sure it’s not too hot to touch, you don’t want any boo-boos now, do ya? Fear not, if you get stuck, you can always hit us up and schedule a repair.
– Grab your trusty iOpener and give the front-facing camera a nice, warm hug for about a minute. This will help loosen up that sticky copper tape adhesive.
Tools Used
Step 40


Watch out for those rear camera lenses! They’re like sensitive little eyes, so give them some space.
If the tape seems to be giving you a hard time, grab a sharp tool like angled tweezers and gently lift the edge until you can slide a pick underneath it. You’ve got this!
– Gently slide the tip of your trusty opening pick beneath the front-facing camera’s shiny copper tape.
– Carefully lift the tape away from the logic board, taking it slow and steady—don’t rush the magic!
Tools Used
Step 41


Okay, listen up! That front-facing camera lens is super delicate. You’re gonna want to be extra careful and make sure your tool doesn’t go anywhere near it. You got this!
If your pick is having a tough time slipping under that cable, give it a gentle warm-up with a hair dryer or heat gun. This will help soften the adhesive beneath and make things a whole lot easier!
– Carefully slip the tip of your trusty opening pick between the right edge of the front-facing camera cable and the frame – it’s a tight spot, but you’ve got this!
– Now, gently slide your pick underneath the cable to loosen the adhesive that’s holding it in place. You’re making great progress!
Tools Used
Step 42

Watch out for those rear camera lenses! They’re delicate little gems, so give them some space.
This connector takes care of your power button, volume controls, flash unit, and that handy upper microphone. It’s quite the multitasker, making sure you’re always connected and ready to go!
– Gently use the tip of a spudger or your trusty fingernail to lift up and disconnect the press connector located just above the battery. You’ve got this!
Tools Used
Step 43

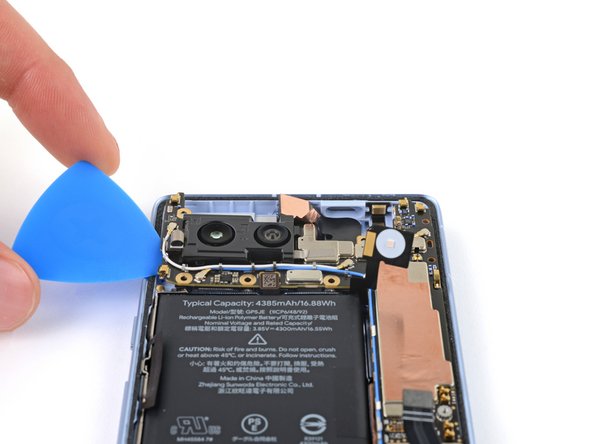
– Slide your trusty opening pick between the top right edge of the logic board and the frame—let’s get in there!
– Gently pry upwards to release the logic board from its snug little spot.
– Now, find that gap near the white antenna cable and insert your pick to nudge up the top left edge of the logic board.
Step 44


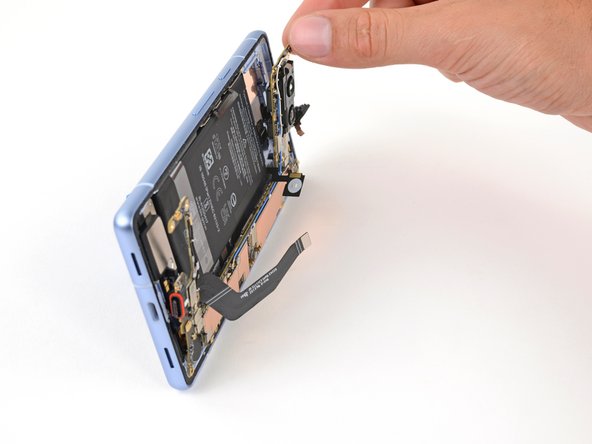
The logic board is pretty sensitive, so handle it with care as you gently release the bottom edge from the frame.
Don’t detach the logic board completely just yet, because it’s still hooked up to the frame by the screen cable.
Be careful not to let the flash, front-facing camera, and press connector get stuck under the frame as you work on your device. If you need help, you can always schedule a repair
– Alright, let’s get this board lifted and looking fabulous! Lift the top edge of the logic board from the frame, then pull it to the right, oh so gently. As you do this, guide the charging port out of its little home. Once you’ve got it out, don’t forget to push the logic board down and make sure that charging port is sitting pretty and flush with its frame on reassembly. If you find any of these steps tricky, just give us a shout – we’re here to help you crush this repair, friend!
Step 45

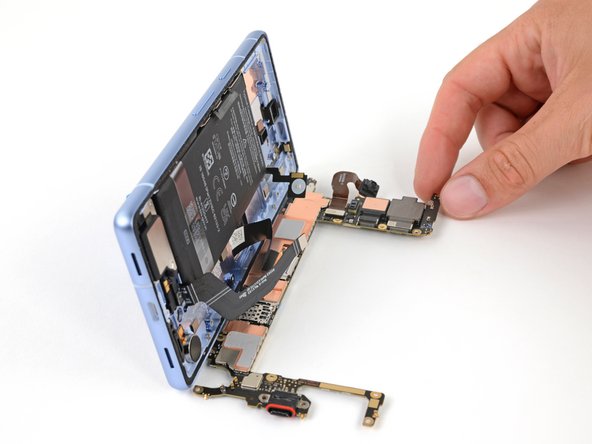
Heads up! The logic board could slip out of place during this part. Keep it steady, but don’t grab it by any of the camera lenses or connectors.
Watch out and don’t touch the thermal pads on the underside of the logic board.
Don’t have a suction handle handy? No sweat! Just lean your phone against something solid, like a hefty box or a good old thick book. You’ve got this!
– Grab your trusty suction handle and stick it to the left side of the screen, making sure the handle is facing down.
– Stand your phone up tall like a champion, keeping it nice and upright.
– Gently tilt the logic board down and lay it flat. If any pesky cables are in the way, just move them aside!
Tools Used
Step 46


– Grab your trusty 3IP Torx Plus driver and carefully remove the 2mm screw that’s holding the screen connector cover in place.
– Now it’s time to take off the cover – easy does it!
– When you’re putting everything back together, make sure to hook the bottom edge of the cover into its slot on the logic board before screwing it back in.
Step 47


– Grab your trusty spudger and use its flat end to gently pry up and disconnect that screen press connector. You’re on the right track!
– Reconnecting this cable can be a bit of a puzzle due to its tension. If it gets a bit tricky, no worries! Just hold the neck of the cable steady with tweezers, align it perfectly over the socket, and then press down to lock it in place. You’ve got this!
Step 48


– Time to give that logic board a little vacation! Gently lift it out of its frame. Don’t worry, we’ll give it a warm welcome back later.
Step 49

Keep those digits and tools away from the sensor!
– If that rubber gasket for the front sensor decided to stick around on the frame or got a bit out of whack, just pop it off and put it somewhere safe for now.
– When you’re putting things back together, make sure to lay the gasket over the front sensor on the logic board, with the smaller cutout pointing upward. You got this!
Step 50

– During reassembly, let’s get this thing back together like a boss!
– If you’re rocking your original logic board and that thermal pad looks like it’s seen better days, ditch the old one, give the surface a good scrub, and slap on a fresh thermal pad. You know, like a new pair of socks for your techie heart.
– If your logic board is brand new and it’s not sporting a thermal pad, go ahead and give it a thermal pad hug. It’ll thank you later!
Step 51

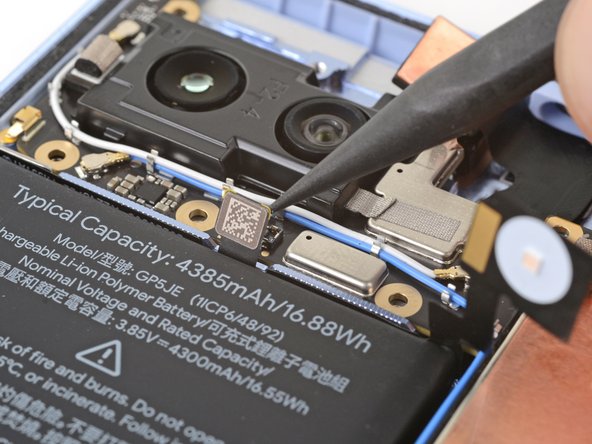
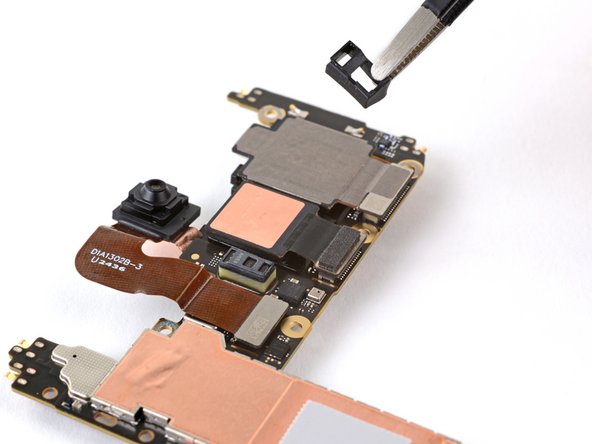
– Gently slide the flat end of your spudger under those rear camera press connectors and give them a little lift to disconnect them from the logic board. You’ve got this!
Tools Used
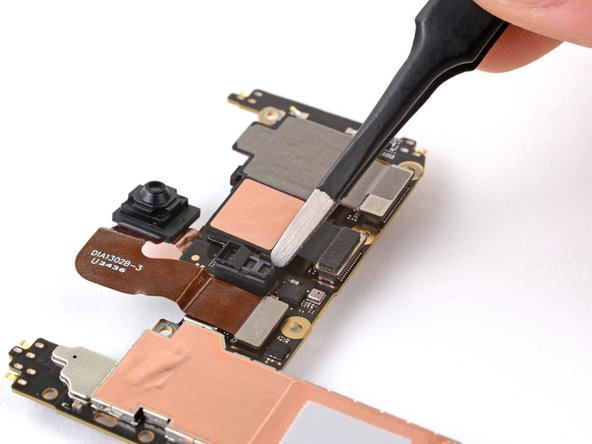
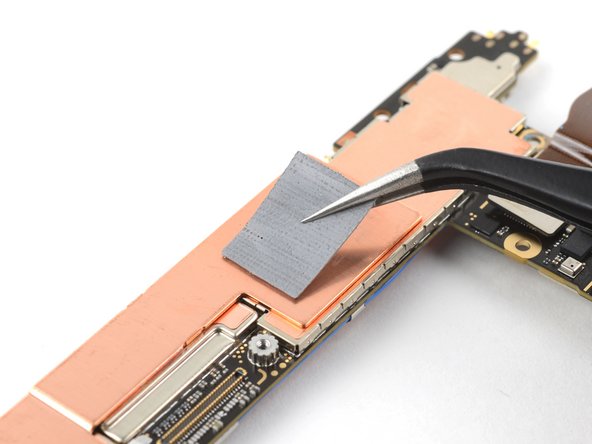
Step 52

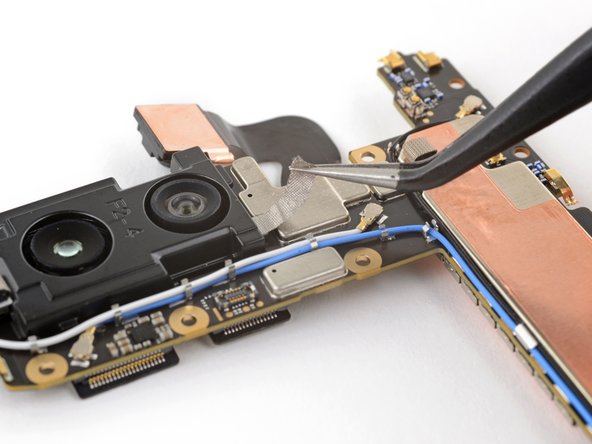
If your workspace is looking a bit messy or feels like it’s on a rollercoaster, give your logic board a cozy spot on a towel or a lint-free cloth to keep it safe and sound.
– Go ahead and flip that logic board over like a pro!
– Now, grab your trusty tweezers and gently peel away the shiny silver conductive fabric that’s connecting the rear camera bracket to the logic board. You’re doing great!
Tools Used
Step 53
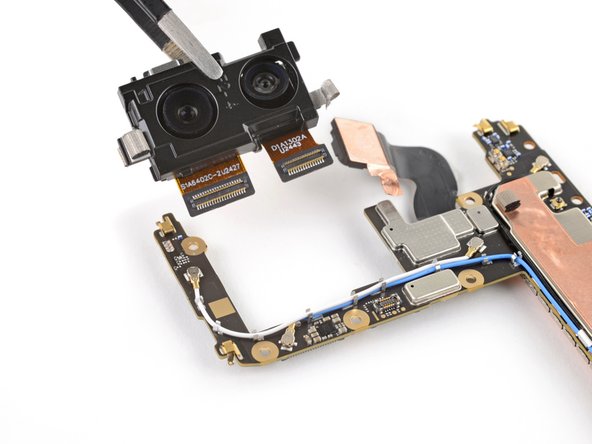

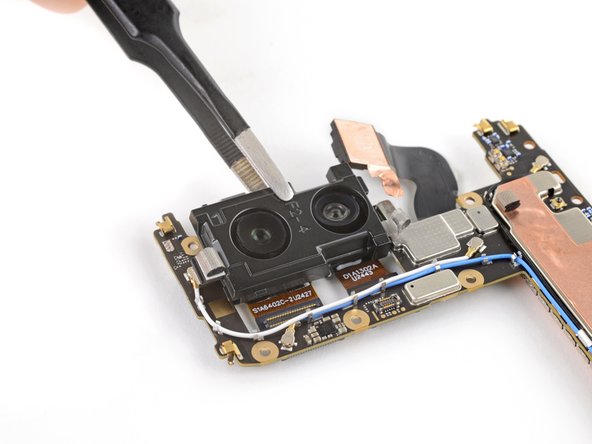
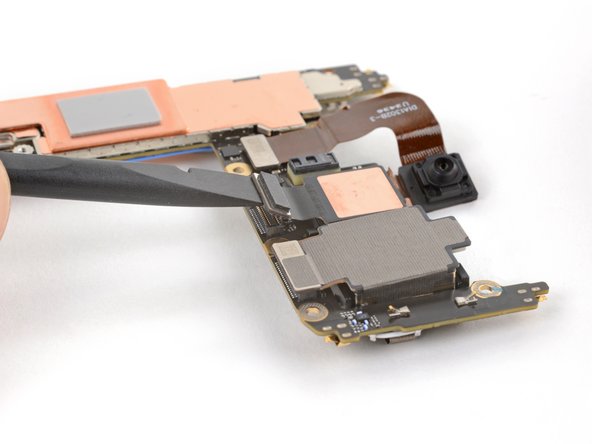
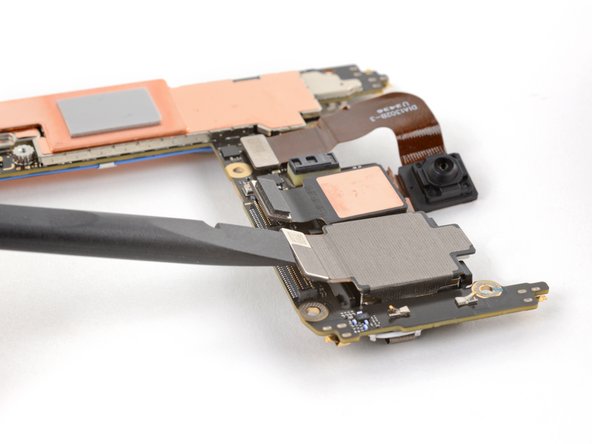
– Gently take out the rear camera assembly—just be careful not to give those camera lenses a surprise hug!
– When putting things back together, tilt the assembly down a bit so those press connectors can slip under the logic board, and make sure that little tab on the left of the bracket stays perched above the logic board.
Step 54

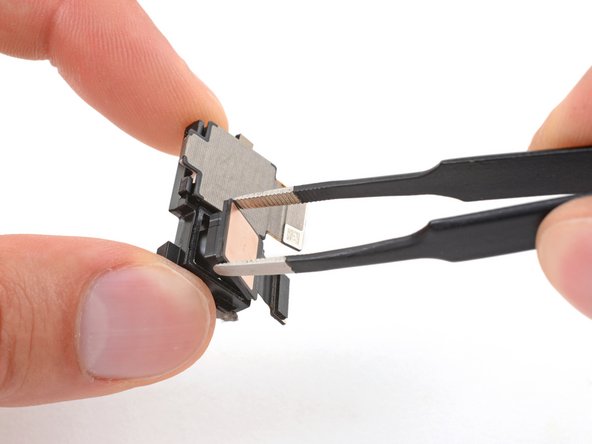
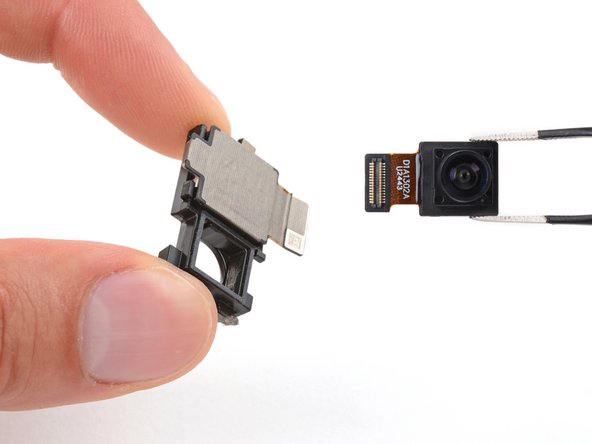
The ultrawide camera is snugly attached to the rear camera bracket.
– Ready to put things back together? Just retrace your steps and reassemble your device like a pro.
– Need to run a quick check-up? Get your hands on the handy Pixel Diagnostic tool by clicking right here.
– Thinking about giving your old tech a second chance? Make sure to recycle it at an R2 or e-Stewards certified facility.
– If things didn’t go quite as planned, don’t sweat it! Dive into some basic troubleshooting or swing by our Answers community for a helping hand.
– Decided to take a break? No problem, just let us know you didn’t finish this guide.
– Oh, and by the way, you’re not alone in your repair journey!
Tools Used
Success!


