Google Pixel 8 Logic Board Replacement Guide
Duration: 45 minutes
Steps: 64 Steps
This repair guide comes from the talented folks at Salvation Repair and isn’t officially backed by anyone else. Check out our repair guides to discover more tips and tricks!
Hey there! We’ve put together this handy guide to help you swap out the logic board in your Pixel 8. Just a heads up, make sure you’ve got some replacement adhesive handy to wrap things up nicely. Oh, and if you’re working with the 5G mmWave antenna version of the Pixel 8, you’re all set! If you have the non-mmWave version, don’t worry—simply glide past the steps related to that 5G mmWave antenna. For more tips and tricks, feel free to schedule a repair!
Step 1


Before diving into this repair adventure, let your Pixel’s battery drop below 25%. A fully charged lithium-ion battery can be a bit of a drama queen if it gets damaged and might just decide to throw a fiery tantrum.
Hold down the power and volume up buttons simultaneously to reveal the shutdown menu. Keep it up, you’re doing great!
– Give your phone a break and unplug all the cables.
– Power it down completely. Let’s get this show on the road!
Step 2


– Time to get started! Insert a SIM eject tool, a small pin, or even a straightened paper clip into the tiny hole on the left side of your phone. Gently push it in until the SIM card tray pops out – it’s like a little surprise!
– Now, carefully pull out the SIM card tray. You’re making great progress!
Step 3


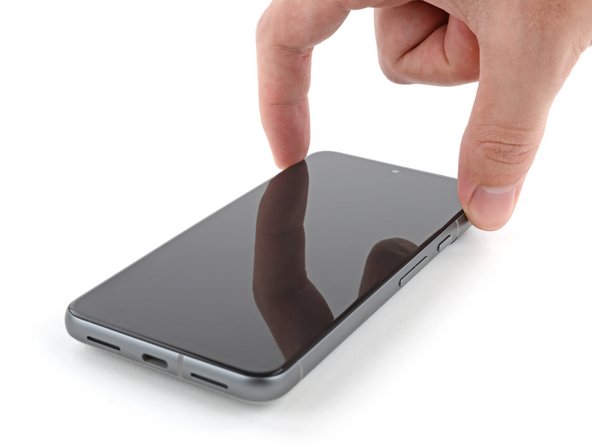
– Take a moment to measure 3 mm from the tip and give your opening pick a little mark with a permanent marker. It’s like giving it a badge of honor for the task ahead!
With a dash of humor and all the fun, let’s put a little pop in that pick! Just imagine: tape with a coin on it, super 3 mm from the tip. Like a tiny, friendly umbrella. This way, we won’t poke our phone hole too deep. Stay cool and let’s remove that screen gently. We’re on a fun repair adventure! Ready, set, go!
For extra assistance, you know what to do: Buddy up with our experts!
Step 4

The screen is held in place by some sneaky adhesive and clips. To make it easier to pop that baby off, give it a little heat! Warming the screen relaxes the adhesive, helping you separate it with ease.
For your heating needs, feel free to use a hair dryer, heat gun, or hot plate, but remember to keep it cool—seriously, too much heat can cause damage to the screen or even the battery. Stay safe and keep it classy!
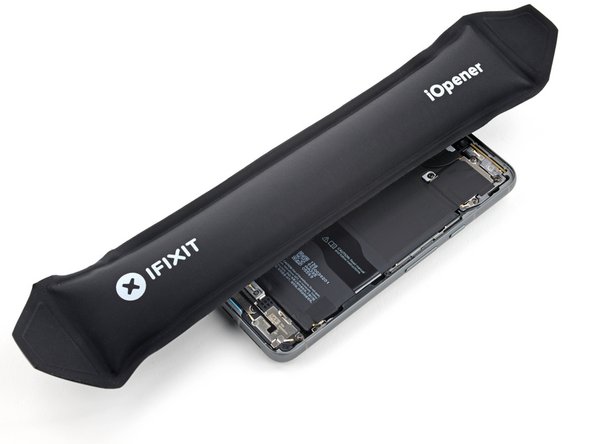
– Let’s get this repair started! Heat an iOpener and place it on the bottom edge of the screen for about two minutes. This will help loosen the adhesive, making the next steps a breeze.
Tools Used


Step 5


In the next three steps, we’ll be using the Anti-Clamp, our nifty tool designed to help you breeze through the opening process. If you don’t have the Anti-Clamp on hand, no worries! Just jump ahead three steps for a different approach.
For detailed tips on how to make the most of the Anti-Clamp, feel free to check out this handy guide.
– Pull that blue handle backwards to release the Anti-Clamp’s arms – it’s like unlocking a secret compartment!
– Place your phone screen side up on a flat surface, so it’s nice and level between the Anti-Clamp’s arms. Make sure the bottom edge is hanging off, ready for the next step.
– Slide the arms over the left edge of your phone, giving you easy access to the bottom edge. You’re making great progress!
– Position the suction cups as close to the center of the bottom edge as possible. This is where the magic happens!
– Squeeze those cups together to create suction. You’re almost there! If you’re feeling stuck, don’t worry – you can always schedule a repair with Salvation Repair.
Step 6


– Give the handle a gentle tug forward to secure those arms in place!
– Now, twist that handle clockwise all the way around (that’s a full 360 degrees!), or until those suction cups start to stretch out.
– As the cups stretch, keep an eye on their alignment! If they start to slide around, feel free to take off the Anti-Clamp and stick some tape on there to help them hold tight.
Step 7


Be careful not to insert your opening pick more than 3 mm, or you might accidentally damage those delicate spring contacts. Let’s keep things safe and intact!
If the sticky stuff isn’t budging, give that handle a twist to the right for a quarter turn and hang tight for another minute. If your screen starts to chill out, feel free to add a little more heat.
– Chill for about a minute to let a little gap appear between the screen and the frame.
– Slide in an opening pick right into that gap.
– Gently pull the blue handle back to release the arms and easily take off the Anti-Clamp using the pull tabs on the suction cups.
– Feel free to skip the next two steps!
Step 8


– Time to get a grip – literally! Apply a suction handle to the center of the screen’s bottom edge to get started on this repair journey.
Tools Used

Step 9


If you’re having a tough time getting a gap, give it some more heat and try again!
– Gently tug on the suction handle with a steady pull until you see a little opening between the screen and the frame. You got this!
– Slide an opening pick into that gap and keep moving forward!
Tools Used
Step 10


– The screen cable is just a little shy of halfway up the left edge of the phone, so keep a close eye on it! Don’t worry, you got this. Just be careful not to tear it. We’re all about smooth sailing here, and you’re doing great!
– You’ll see a whole bunch of spring contacts around the edge of the phone. Be gentle with these guys, you don’t want to bend them. Keep going, you’re almost there!
Step 11


– Gently glide that opening pick along the bottom edge to break free the sticky stuff holding it down.
– Keep the pick in the bottom right corner to stop that adhesive from sealing back up.
Step 12

Alternatively, feel free to grab a hair dryer, heat gun, or hot plate for some warmth—but tread lightly! Too much heat can play tricks on your screen and battery, so keep it chill.
– Get ready to rock and roll with this screen side party! Heat up your iOpener for a two-minute dance-off with the right edge of the screen. Let’s give those screen sides a little love!
Tools Used
Step 13


– Slide a trusty second opening pick into the bottom right corner of the screen and get ready for action!
– Gently glide that pick all the way up to the top right corner to break free the sticky adhesive holding the right edge of the screen.
– Keep that pick in place at the top right corner, so the adhesive doesn’t play tricks and reseal itself!
Step 14


– Time to get this screen open – insert a third opening pick under the bottom edge of the screen, nice and easy.
– Now, slide that new pick all the way to the bottom left corner, you’re making great progress.
– Leave the pick right where it is, in the bottom left corner, to keep the adhesive from resealing – you’re doing fantastic!
Step 15

If you’re feeling adventurous, grab a hair dryer, a heat gun, or even a hot plate! Just a friendly reminder: too much heat can be a screen’s worst enemy, and we definitely don’t want to toast that battery. Keep it cool, and if you need help, you can always schedule a repair.
– Alrighty, let’s warm up that left edge of the screen with our magical iOpener friend for about two minutes. You’ve got this, and if you need a hand, don’t hesitate to schedule a repair!
Tools Used
Step 16


– Time to get this screen loose! Insert a fourth opening pick under the bottom left corner of the screen to start separating it from the rest of the device.
– Now, gently slide the new pick all the way to the top left corner. This will help break the adhesive that’s holding the screen’s left edge in place.
– Leave that pick right where it is, at the top left corner, to keep the adhesive from resealing itself. You’re making great progress!
Step 17

Be careful when applying heat – a hair dryer, heat gun, or hot plate can get the job done, but extreme temperatures can damage your screen or battery, so proceed with caution.
– Let’s get this repair started! Apply a heated iOpener to the top edge of the screen for about two minutes to loosen things up.
Tools Used
Step 18


– Slide a fifth opening pick under the top edge of the screen, right by the left corner. You’ve got this!
– Now, gently glide that opening pick over to the top right corner to break free the adhesive holding the screen’s top edge in place. Keep it steady!
Step 19

Handle that screen cable with care; you don’t want to pull it too hard and bring on a major fix-it headache!
If your screen is feeling a bit stubborn, gently glide that opening pick around the edges to free any leftover adhesive. You’re doing great!
– Grab a little box or a few books and stack them to the left of your phone. This will be your trusty support for propping up the screen while you get ready to disconnect the cable.
– Now, gently swing up the right edge of the screen like you’re opening a book. Easy peasy!
– Prop up that screen so you can easily reach the cable underneath. You’ve got this!
Step 20


– Grab your trusty opening pick and gently lift the top edge of that screen cable cover. It’s like giving it a little nudge to say, ‘Hey, let’s get this party started!’
– Now, go ahead and take off the cover. You’re one step closer to repairing your device!
Step 21


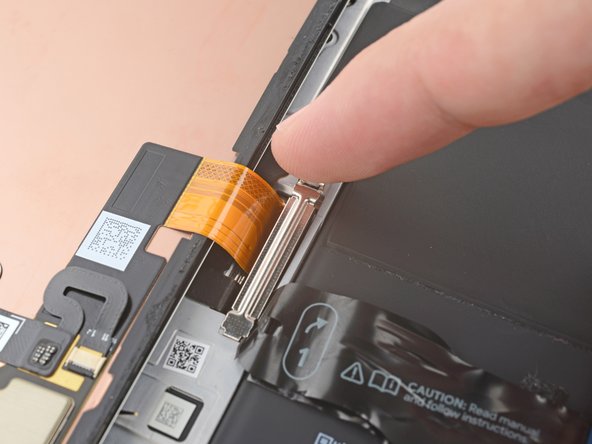
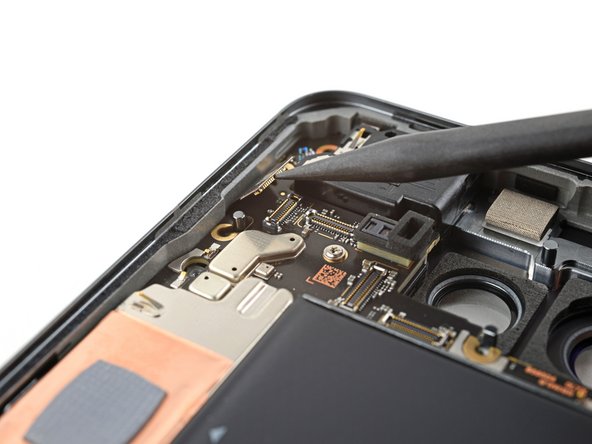
– Slide the tip of your trusty spudger under the top left corner of the screen’s press connector—like a gentle ninja.
– Carefully lift up and disconnect that cable—no need to rush, take it slow and steady.
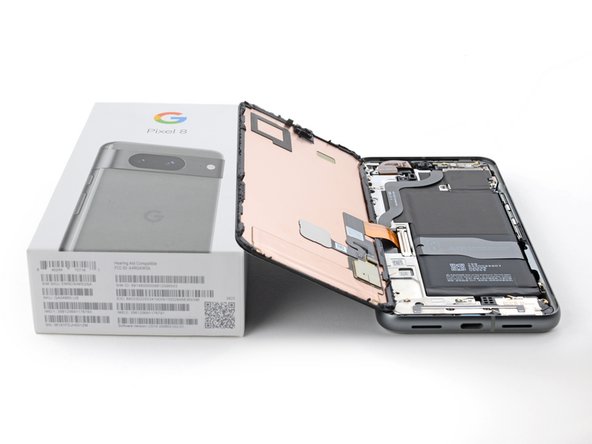
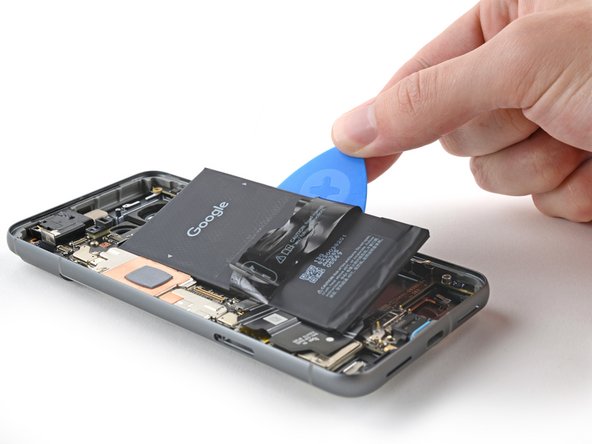
– Time to say goodbye to the screen—remove it with care.
– When it’s time to reconnect the press connector, line it up with its socket and give one side a gentle press until you hear that satisfying click. Then do the same for the other side. Remember, avoid pressing in the center! If things seem off, misalignment can lead to bent pins, and nobody wants that!
Tools Used

Step 22

Installing a new screen with pre-installed adhesive? Great! Just make sure to follow this step during reassembly. If you’re sticking with your old screen, don’t worry—we’ve got a handy guide for applying adhesive right here.
Want to make that adhesive bond even stronger? Give your phone some gentle, even pressure—it’s like a warm hug for your device!
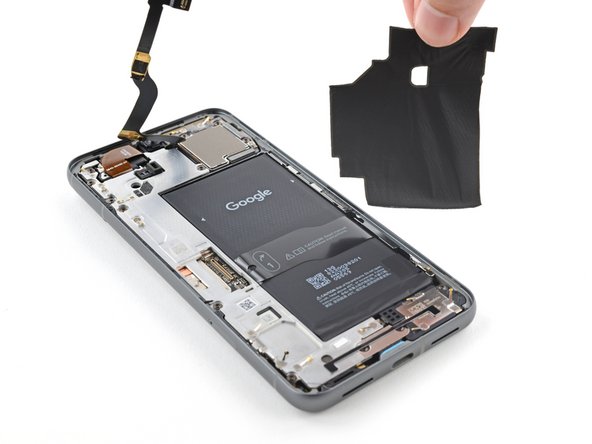
– Use the pull tabs to yank off the liners covering the front camera cutout, the rear camera pad, the back of the screen, and the perimeter adhesive.
– Hook up the screen cable and slap its cover back on.
– Perfect time for a test run! Power on your phone and check if it’s all good. Don’t forget to power it down before moving on.
– Give the screen a firm push into the frame. You’ll feel those clips pop right into place.
– Press all around the screen’s edges to secure it with the new adhesive.
– Follow this guide to get your fingerprint sensor all calibrated.
Step 23


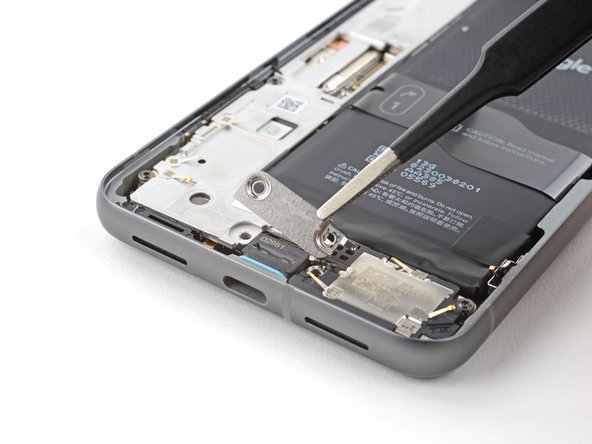
A plastic buffer is gently stuck to the midframe and the bottom speaker, just waiting for your skilled hands to set it free!
– Gently slide the tip of an opening pick underneath the plastic buffer until you can grab it with your fingers or tweezers. Remember, you’re on your way to a successful repair!


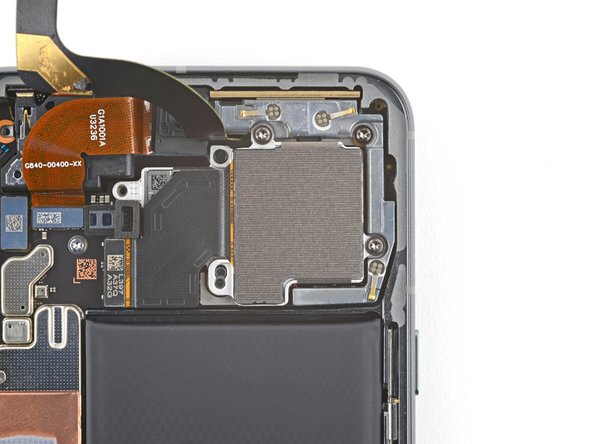
Step 25


As you dive into this repair adventure, remember to keep an eye on each screw and make sure it finds its way back to its original home.
The Pixel 8 may rock Torx Plus screws, but don’t worry—standard Torx bits are also your friends! Just be sure to apply steady, downward pressure to keep everything in check and prevent those pesky strips.
– Let’s get started! Use a T3 Torx driver to carefully remove the two 5mm-long 3IP Torx Plus screws that hold the USB-C port bracket in place. If you’re not feeling confident, don’t worry – it’s easier than it sounds!
Step 26

– Time to get a little handy! Use tweezers or your fingers to carefully remove the USB-C port bracket.
Step 27
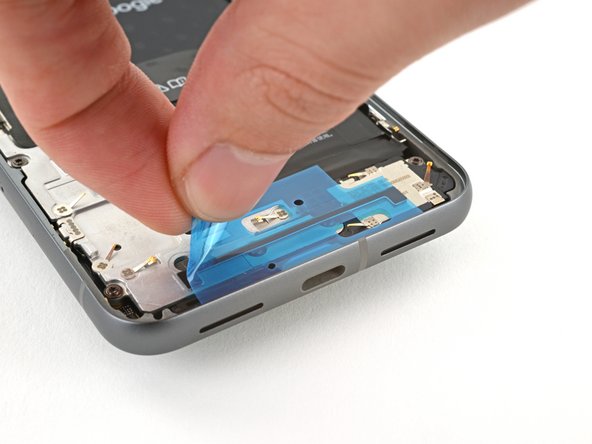

– Alright, it’s reassembly time! Let’s replace that plastic shim snugly tucked beneath the midframe and loudspeaker. If you’re short on a replacement, just push the old one back into its cozy spot.
– Peel off that clear liner from the shim – we want it ready to shine!
– Using the handy markings on the midframe, align the left side of the shim and give it a little press – it’s like a high-five!
– Grab your flat-end spudger and gently but firmly press down along the entire shim for a snug fit. Let’s make sure it knows it’s in for the long haul.
– Now, take off the blue liner. Voila!
Tools Used
Step 28

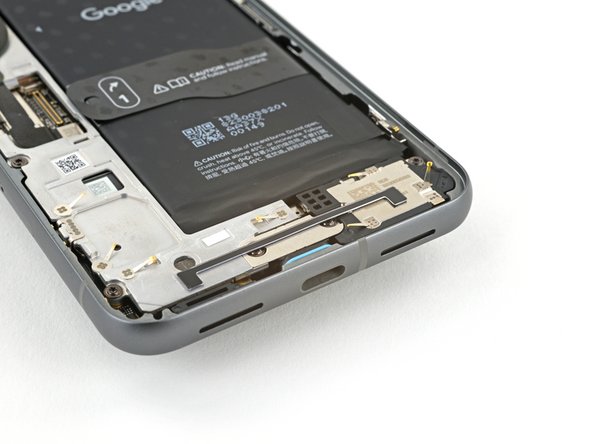
– Grab your trusty T3 Torx driver and let’s tackle that 5 mm-long screw holding the bottom speaker in place. You’ve got this!
Step 29

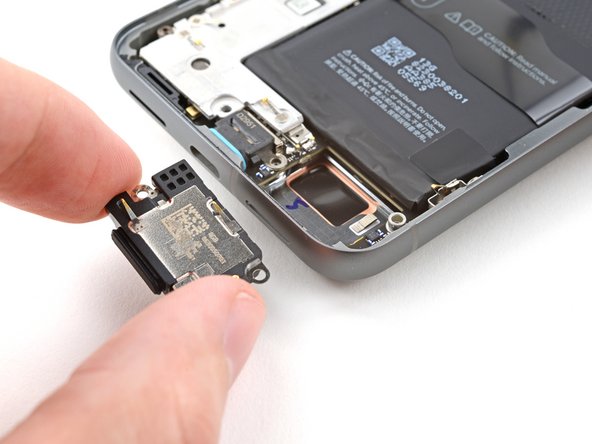
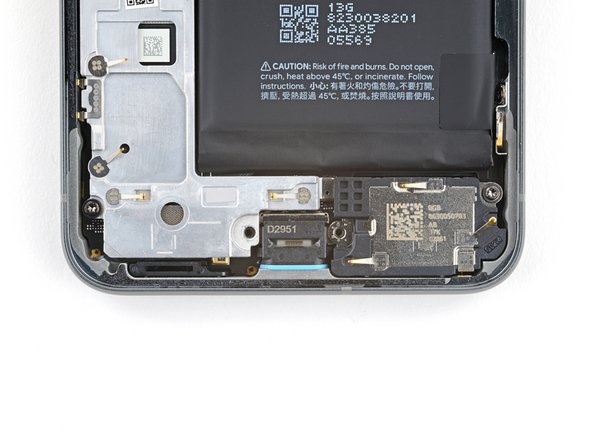
– Slide the tip of your trusty spudger into the top right corner of the bottom speaker, right where it meets the frame. You’re doing great!
– Give that bottom speaker a gentle nudge with the spudger to help it pop out of its cozy spot. You’ve got this!
– Now, it’s time to set the bottom speaker free! Just lift it out carefully.
– When putting it back together, angle the edge of the speaker with the black gasket down into its home. Then, give it a nice firm press to secure it in place. You’re almost there!
Tools Used
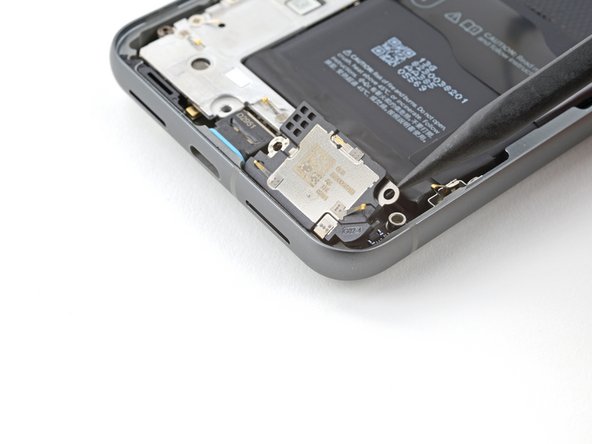
Step 30

– Time to get that 5G mmWave antenna cable disconnected from the logic board! Use the pointy end of your trusty spudger to carefully pry it up and set it free.
Tools Used
Step 31

Heads up! If you don’t have the right tools, you can get creative with a hair dryer, heat gun, or hot plate. Just remember, too much heat can be bad news for your battery, so proceed with caution.
– The 5G mmWave antenna cable is stuck to the midframe in two spots with some pretty strong adhesive. Don’t worry, we’ve got this!
– Let’s get that adhesive to loosen up – heat an iOpener and place it on the left edge of your phone for a couple of minutes. This will help soften things up and make the cable easier to remove.
Tools Used
Step 32


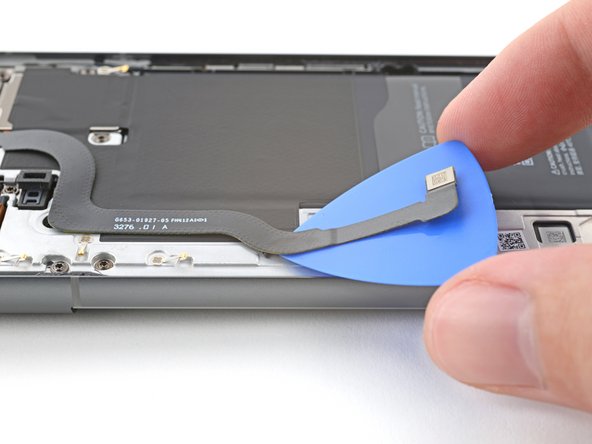
– Let’s get this adhesive outta here! Slide an opening pick under the bottom part of the 5G mmWave antenna cable’s adhesive.
– Now, gently slide that pick towards the top of the phone. We’re gonna loosen up that adhesive and get this thing open!
Step 33
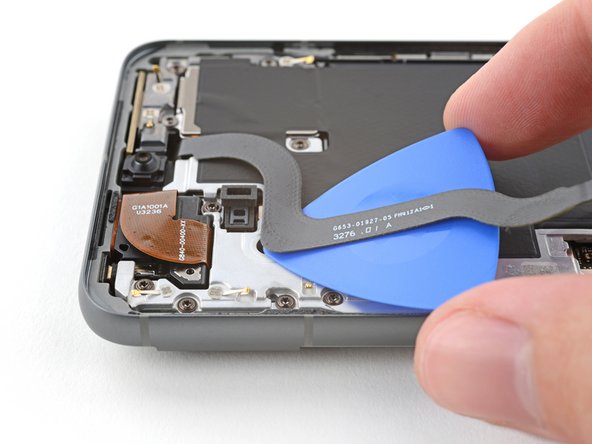

– Tackle the upper section of adhesive just like you did before! It’s all about that consistency, so keep going strong!
Step 34

Keep that cable nice and flat—just wiggle it a bit so it doesn’t get in the way while you’re disassembling!
– Gently reposition the 5G mmWave antenna cable to the top of the phone, keeping it tidy and out of the way as you work.
Step 35
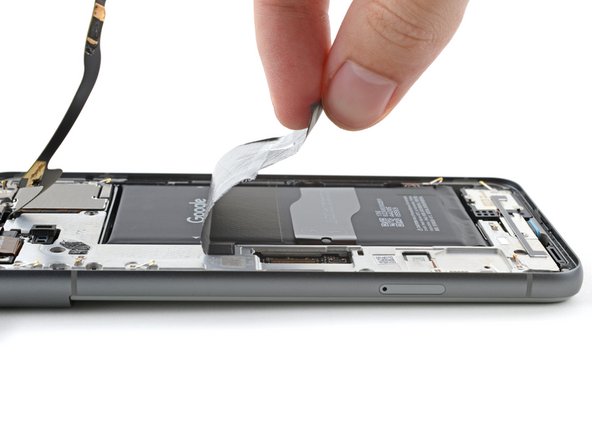

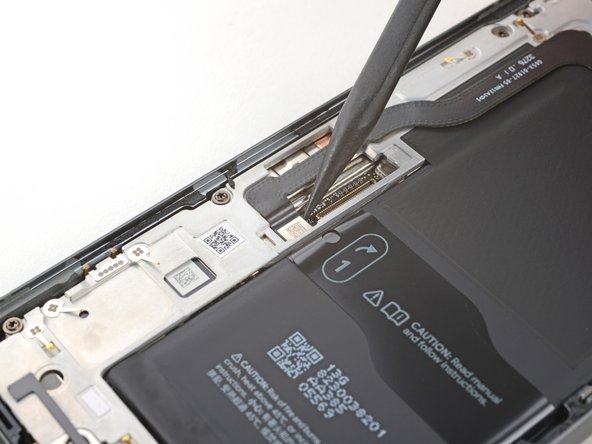
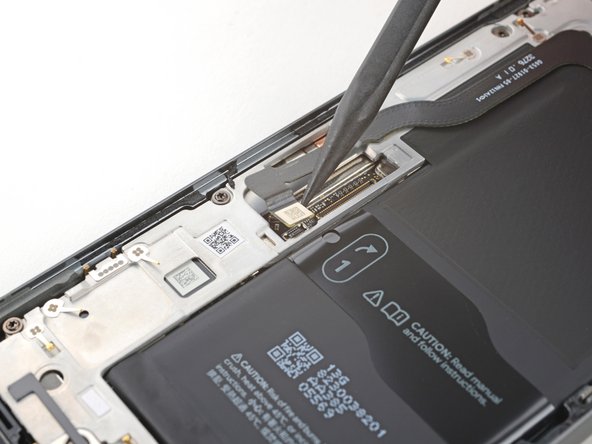
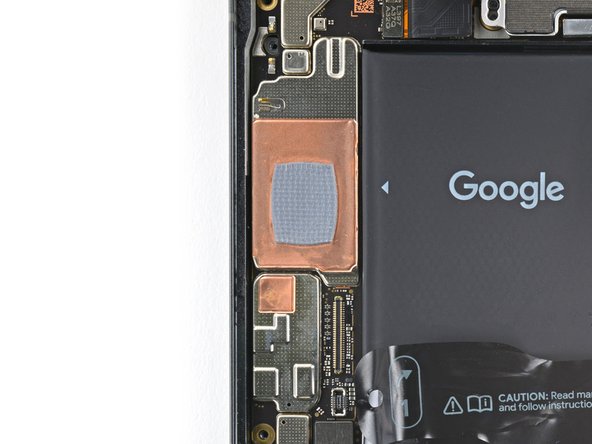
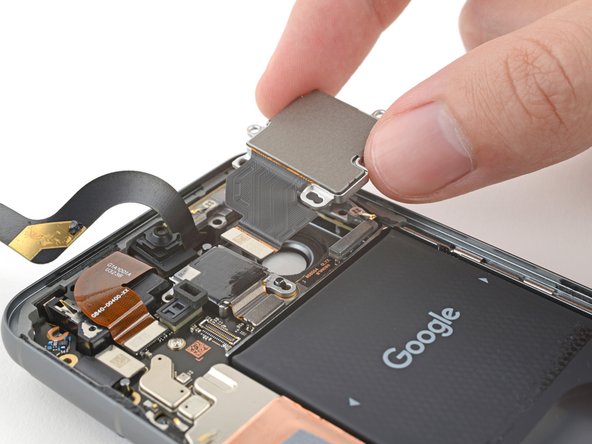
To get things back in action, you’ll need to take out the big graphite sheet and pop in a fresh one. This piece helps connect the upper battery, midframe, and rear cameras – kind of like a party planner for your device!
And hey, if you happen to create a tear while removing it, no sweat! Just grab those torn edges and peel it off in smaller bits. You’ve got this!
– Whoa! We’re about to embark on a crazy-cool adventure! First, find that little stubborn graphite sheet. It’s hiding under there somewhere, so don’t get discouraged. Once you spot it, wiggle in a trusty spudger and give it a gentle nudge. Voila! You’ve got that sheet all wiggled out. But wait, don’t throw it away just yet – we’ve got a replacement plan in mind here! After you’ve replaced it with a brand-spanking-new one, high five yourself for rockin’ an awesome repair job! 🙌
Tools Used
Step 36

– Grab your trusty T3 Torx screwdriver and gently unscrew the eight 5.1 mm-long 3IP Torx Plus screws that are holding the midframe in place. You’ve got this!
Tools Used

Step 37

The midframe’s center is just a little snug against a thermal pad, so don’t fret!
Once it has totally let go, you’ll notice the midframe getting a bit wobbly. You’re doing great!
– Alright, time to pry that midframe loose! Slide the flat end of your spudger under the bottom right corner of the midframe. Gently lift to separate it from the thermal pad. If you’re struggling, you can always schedule a repair.
Tools Used
Step 38

– Gently lift the midframe off the main frame and set it aside.
– As you put things back together, take a moment to inspect the thermal pad. If it looks worse for wear, go ahead and carefully remove it. Clean the area with some high-concentration (over 90%) isopropyl alcohol and a microfiber or lint-free cloth. Once it’s nice and clean, it’s time to apply a fresh thermal pad!

Step 40

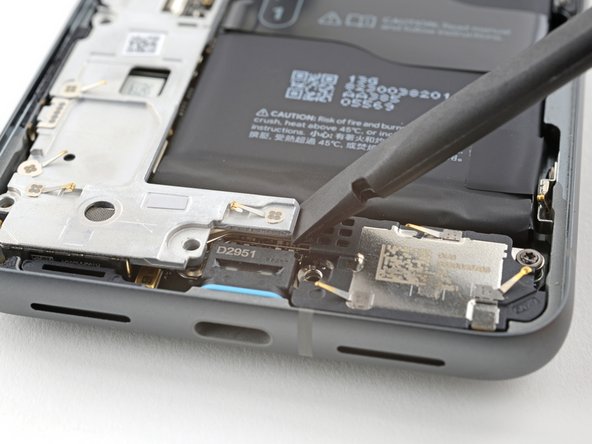
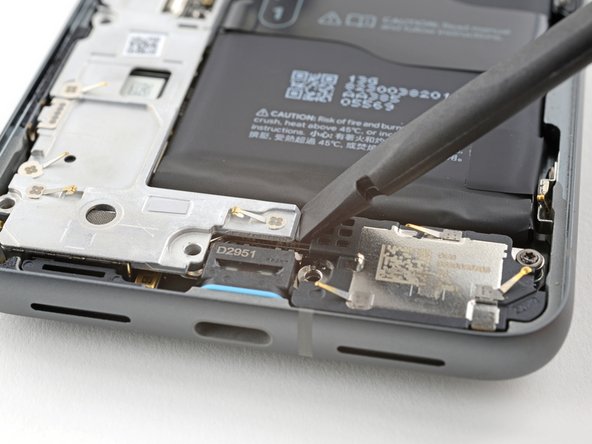
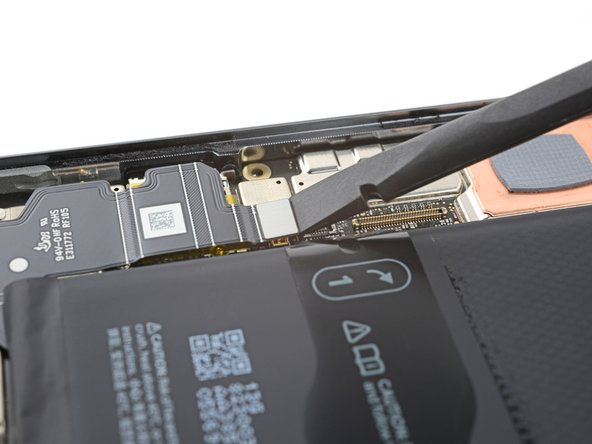
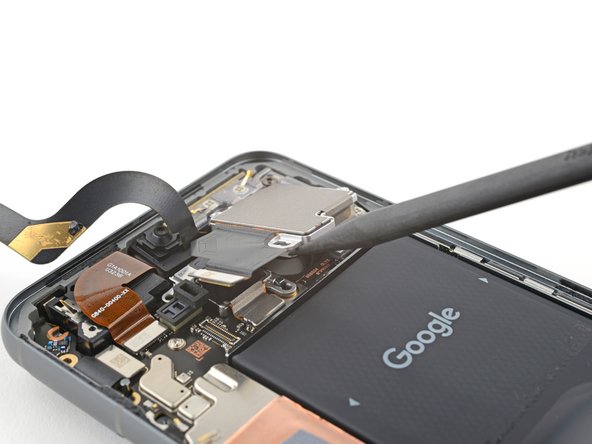
Keep your pick in the right spot! Straying elsewhere might lead to a logic board boo-boo.
– Gently slide the spudger’s tip under the lower section of the wide rear camera press connector, finding that sweet spot nestled between the surface-mounted components.
– Carefully pry upwards to release the connection for the wide rear camera and free it up!
Tools Used
Step 41

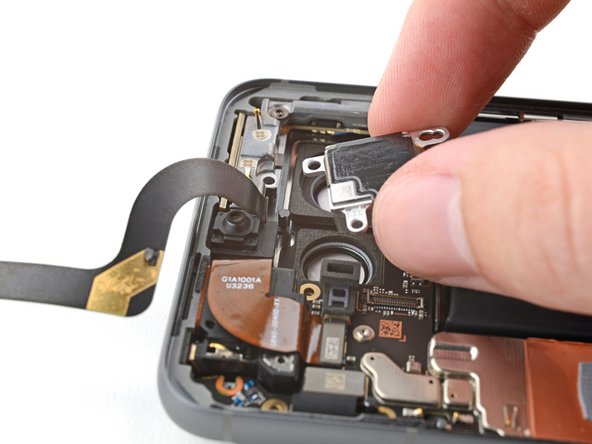
– Alright, let’s get this party started! Grab your trusty T3 Torx screwdriver and give those two 5.1 mm-long 3IP Torx Plus screws holding down the wide rear camera a little love tap. You’ve got this!
Tools Used
Step 42

– Gently slide the spudger tip beneath one of the openings for the wide rear camera screw holes.
– Carefully use the spudger to lift the camera out of its cozy spot.
– Now, go ahead and remove the camera with ease.
Tools Used
Step 43


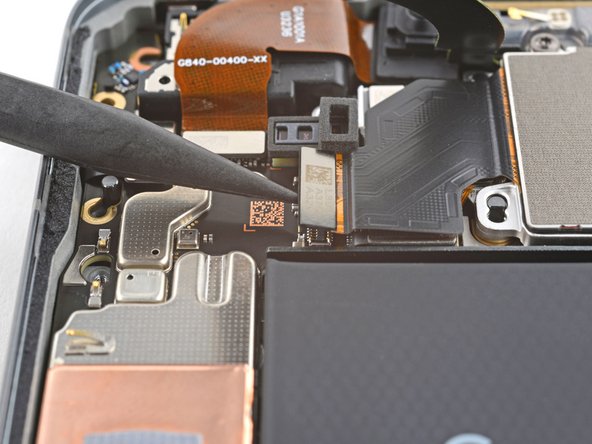
– Grab your trusty spudger and carefully wiggle it in to pop up the ultrawide rear camera press connector from the logic board. It’s a delicate dance, so take your time and be gentle!
Tools Used
Step 44


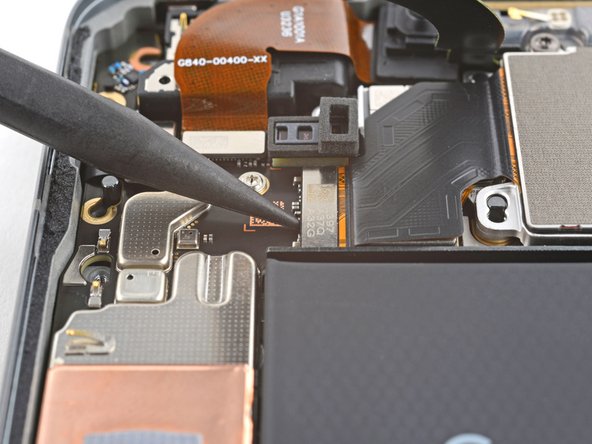
– Time to get started! Insert the tip of a spudger under the top screw cutout on the ultrawide rear camera – it’s the perfect place to begin.
– Now, use that trusty spudger to gently lift the camera out of its cozy little recess.
– The final step: remove the camera and you’re one step closer to a fully functional device. If you’re feeling stuck, remember that you can always schedule a repair
Tools Used
Step 45

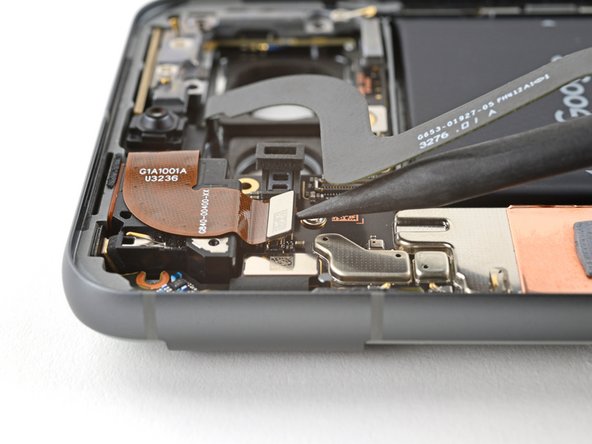
– Grab that trusty spudger and gently nudge it to lift and disconnect the front camera press connector from the logic board. You’ve got this!
Tools Used
Step 46


The front camera cable is gently stuck to the earpiece speaker.
– Slide an opening pick under the front camera cable to gently loosen the adhesive.
– When you’re putting things back together, try to reuse the original adhesive if it’s still sticky. If not, use a double-sided tape like Tesa Tape to secure the front camera back in place.
Step 47

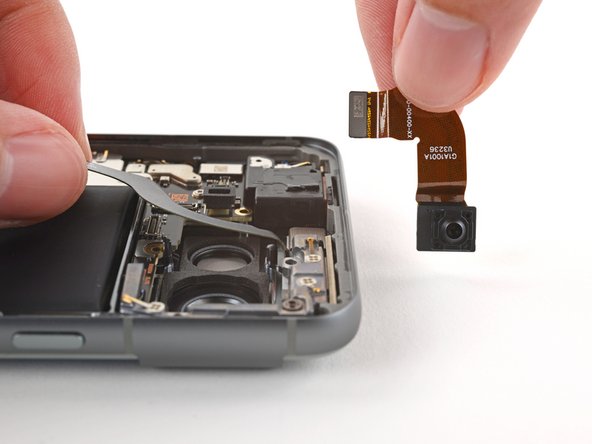
The 5G mmWave antenna cable is giving the front camera a little hug at the bottom edge.
– Gently nudge the antenna cable towards the right edge of the phone to give a warm welcome to the front camera!
– Say goodbye to the front camera as you remove it from its cozy spot.
– When you’re putting everything back together, double-check that the front camera finds its perfect little home under the antenna cable. It’s all about those snug fits!
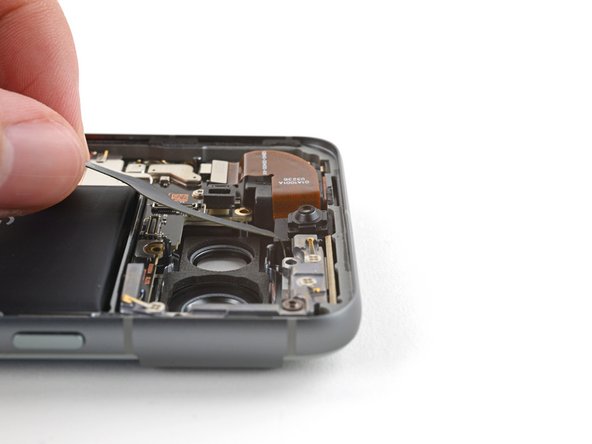
Step 48

– Grab your T3 Torx screwdriver and twist out that 5.1 mm-long 3IP Torx Plus screw holding the 5G mmWave antenna bracket in place.
Tools Used
Step 49
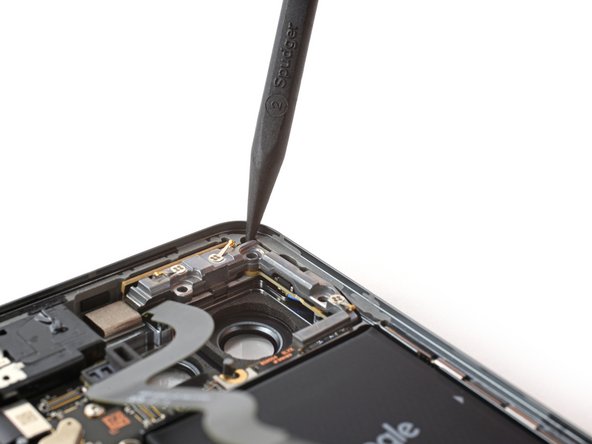

– Pop the pointy end of your spudger into that little notch at the top right of the 5G mmWave antenna bracket. You’ve got this!
– Gently pry up with the spudger to free the bracket from its cozy spot in the frame. Be assertive but friendly!
– Take out the bracket and give yourself a pat on the back.
– When you’re putting everything back together, make sure to slide the top edge of the bracket in first at a slight downward angle. This way, its foam pad will rest just right before you secure it again. Easy peasy!
Tools Used
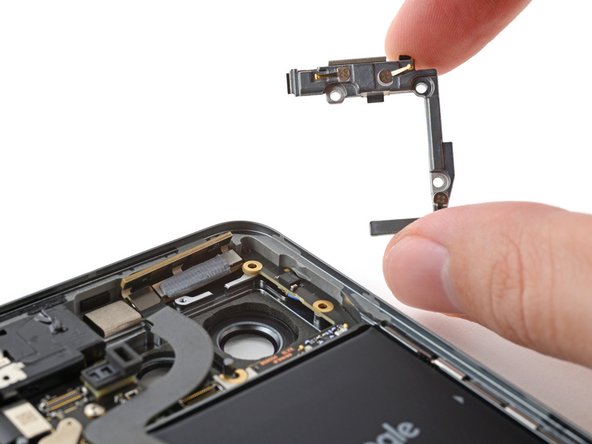
Step 50
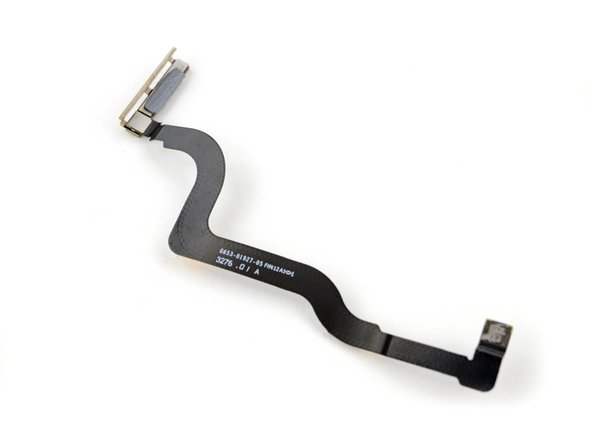

– Gently pull the antenna and its cable out of the frame, and then set them free.
– If your cable decides to take a little vacation from the antenna, no sweat! Just line up that cable press connector over its socket and give it a friendly press with your fingers until you hear that satisfying snap!

Step 52

Keep the heat within limits—overheating can be a battery’s worst nightmare!
The adhesive holds the battery snugly at the top and bottom edges to the frame. A little heat on the back cover will loosen that adhesive up, making it a breeze to peel away!
– Gently flip your phone over and place it down on your workspace like a pro.
– Grab a hairdryer or heat gun and warm up the left side of the back cover, especially around the top and bottom edges of the battery. It should feel pleasantly toasty – just right for getting that cover off!
Tools Used
Step 53

– Now it’s time to flip your phone back over and get it settled on your workspace.
– Next, apply a few drops of highly-concentrated isopropyl alcohol (>90%) along the right edge of the battery. This will help loosen things up.

Step 55

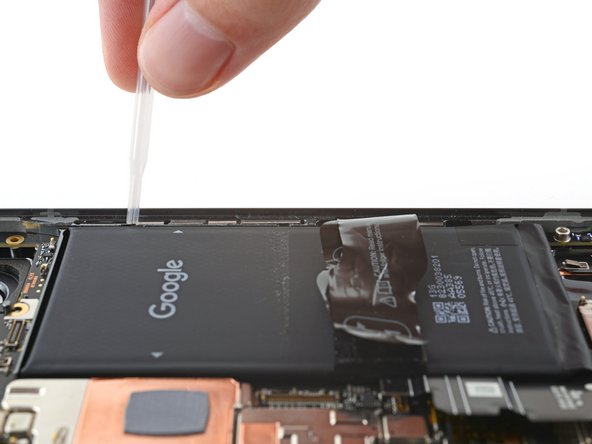
– Time to get this repair started! Insert the flat side of an opening pick between the right edge of the battery and the frame, and let’s get that battery out.
Step 56


Handle the battery with care—no bending or creasing, please! It could leak harmful stuff or even spark a fire. Let’s keep things safe and sound!
The adhesive holding that battery in place is quite tenacious! You’ll need some patience and a steady hand to separate it. Expect to go through a few rounds of heat and a splash of isopropyl alcohol to get it done right.
If after two minutes of consistent pressure the battery remains stubborn, don’t hesitate to add some more heat and isopropyl alcohol, then give it another go!
Step 57

Hey, if your battery is looking a bit squished, bent, or like it’s been in a wrestling match, don’t try to use it! It’s not safe and could cause a fire. Time to get a fresh battery in there. If you need help, you can always schedule a repair.
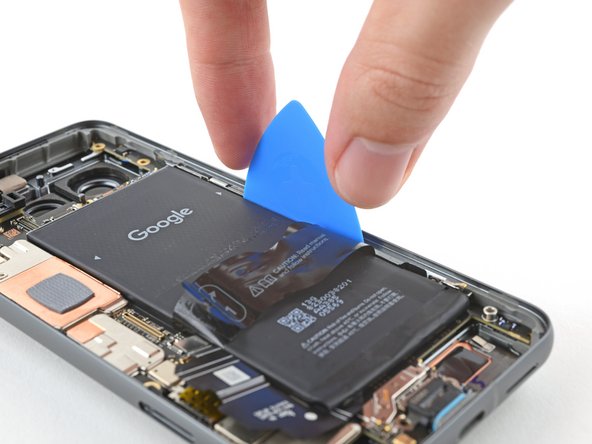
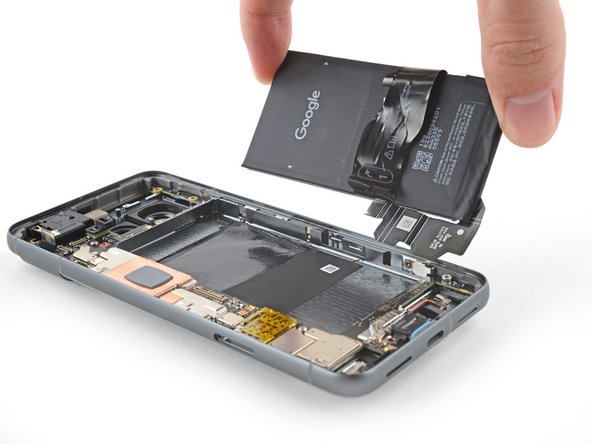
– Time to get that battery out – use your trusty opening pick to gently pry it loose and break free from the remaining adhesive.
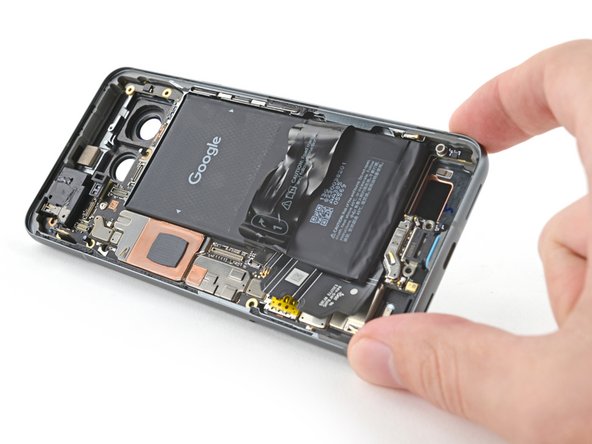
– Now it’s time to remove the battery completely.
– When you’re putting everything back together, be sure to check out our tips on removing old adhesive and installing your new battery for a seamless repair. If you need help, you can always schedule a repair
Step 58

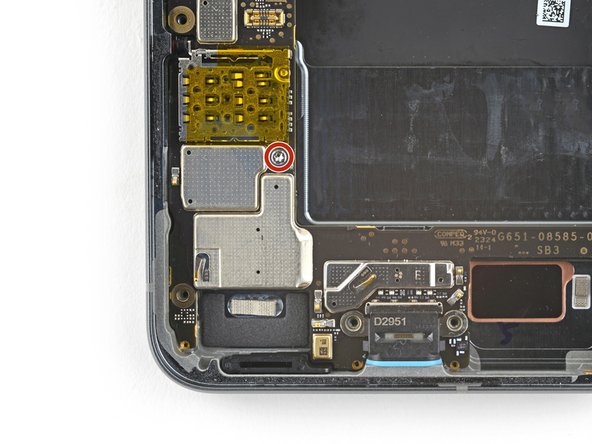
– Grab your trusty T3 Torx screwdriver and give those two little 2.5mm 3IP Torx Plus screws holding the grounding bracket on the bottom right of your phone a little twist to say goodbye!
Tools Used
Step 59


– Let’s get that grounding bracket out of the way!
Step 60

– Get ready to rally, you brave hero! Time to take on those 3 little screws with your mighty T3 Torx screwdriver. With one epic twist, victory will be yours as you remove those 3.5 mm-LONG 3IP Torx Plus hexagonal stalwarts! It’s like going up against a horde of tiny fortresses. Once they’re down, you’ll have conquered the logic board! You’re doing amazing, champ! If you need help, you can always schedule a repair.
Tools Used
Step 61
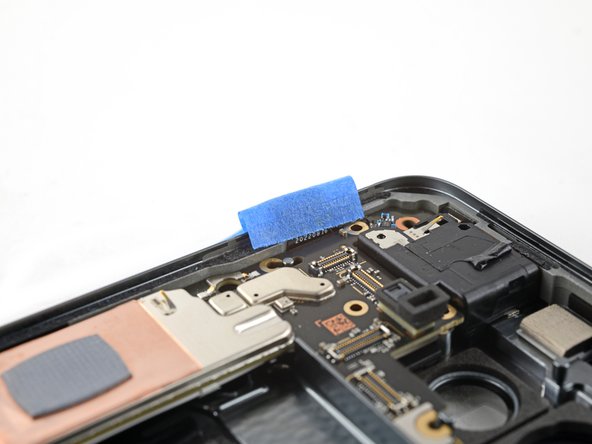

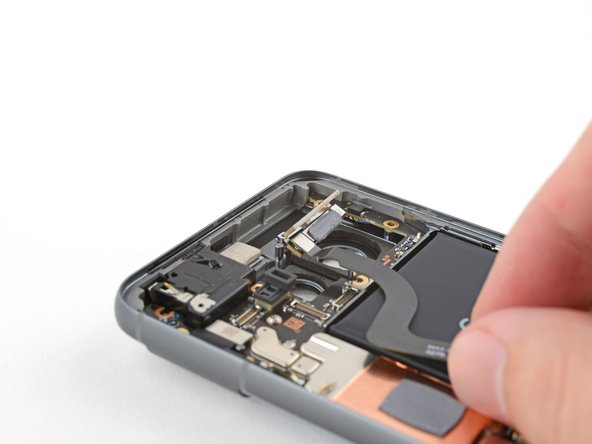
– Give that interconnect cable some breathing room! Move it away from the frame so it doesn’t get tangled up with the logic board.
– Feeling fancy? You can tape the cable to the left edge of the phone. It’s like giving it a little hug.
Step 62


Hey there! Just a quick reminder: before you dive into removing that logic board, don’t forget to pop out the SIM card tray first. Trust us, your device will thank you!
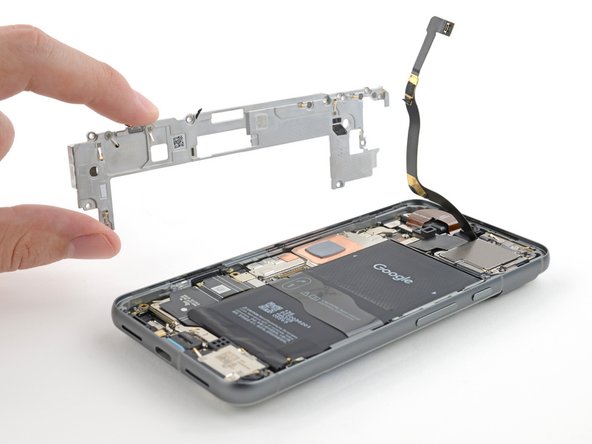
– Gently use the flat end of a spudger to lift the top edge of the logic board until you can easily grab it with your fingers.
Tools Used
Step 63
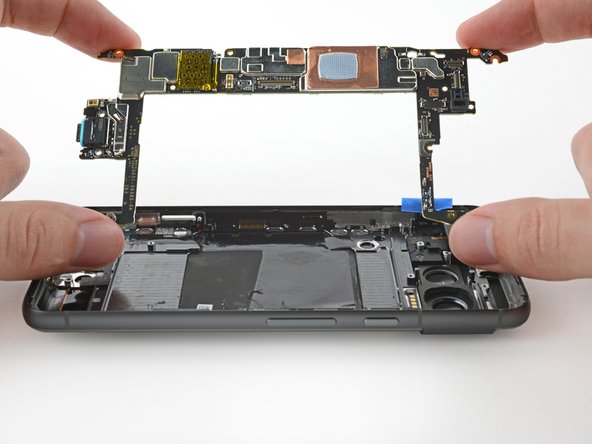

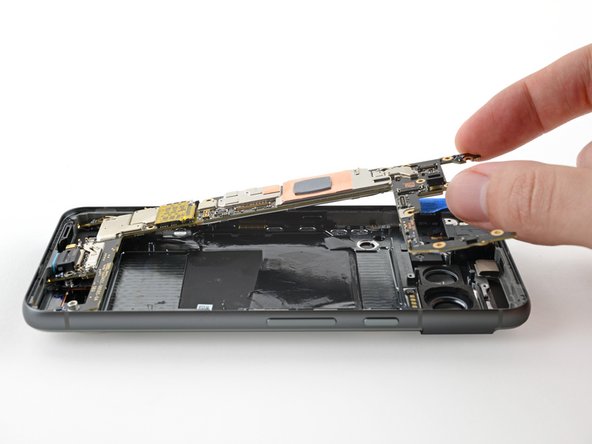
– Time to give that logic board a little lift! Gently pry up the top of the board to release its bottom clip.
– Now you can remove the logic board. It’s like saying goodbye to an old friend, but don’t worry, we’ll be reuniting soon!
– Alright, time to put things back together. When you reinsert the USB-C port, make sure you tilt it downwards and align the rubber gasket before you press the logic board back in. It’s like a puzzle, but a much cooler one!
Step 64

– Time to put your device back together! Just retrace your steps and you’ll be rocking and rolling in no time.
– Want to check how your device is doing? Give the Pixel Diagnostic tool a whirl; just click here.
– Got some e-waste? Make sure it finds a new home at an R2 or e-Stewards certified recycler. It’s good for the planet!
– If things didn’t go as planned, don’t sweat it! Try some basic troubleshooting, or swing by our community for a little extra help.
– Changed your mind? No problem, just hit cancel.
–
Success!