Google Pixel Display Replacement Guide
Duration: 45 minutes
Steps: 10 Steps
This handy guide was put together by the skilled team at Salvation Repair, and it’s not officially given the thumbs up by Google.
Heads up!
This repair guide comes from the awesome folks at Salvation Repair, and while it hasn’t received a thumbs up from Google, it’s packed with helpful info! Ready to tackle that Pixel screen? Whether you’re swapping it out or just need to get it out of the way for other repairs, we’ve got your back. Just a heads up: the display is held on pretty tightly with some strong adhesive, and you’ll need to use some heat to get it off. So, there’s a chance you might accidentally damage the display during this process. If you’re replacing a broken screen, no worries there! But for other repairs, take it slow and steady, and be ready to replace the display if needed. If you need help, you can always schedule a repair.
Step 1

– Start by switching off your device – it’s time to get started on this repair journey!
– Now, let’s get your iOpener ready to gently heat the edges of the display and loosen the adhesive underneath. If you don’t have an iOpener, a heat gun or hair dryer will do the trick. Remember, if you need help, you can always schedule a repair
Tools Used

Step 2


Pushing an opening tool more than 1.5 mm into the sides of your device, or over 9 mm into the top and bottom, could seriously hurt your display. Let’s keep that screen safe and sound! If you need help, you can always schedule a repair.
Step 3


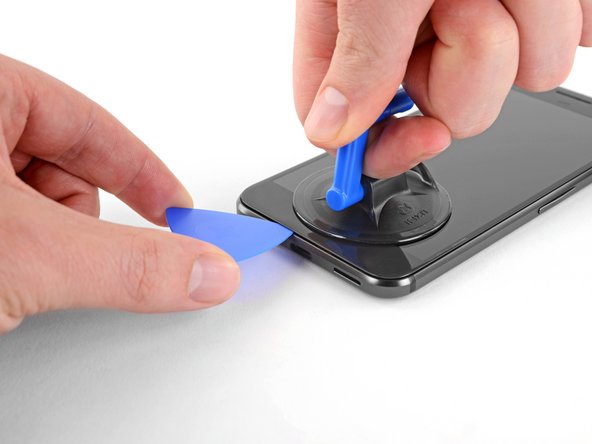
Got a cracked display? No worries! Just slap some packing tape on it to help the suction cup stick better and keep those pesky glass shards from escaping. You’ve got this!
– Grab a suction handle and pull up on the display to make a slight gap between the display and the phone’s chassis.
– If it doesn’t budge, just add some more heat. Patience is key here; this takes time. Once you can slide a tool into the gap, you’re ready for the next step. If you need help, you can always schedule a repair
Tools Used

Step 4


– Slide an opening pick or a trusty playing card into the little gap between the chassis and the display assembly.
– Now, gently glide that pick around the edge of the display, slicing through the adhesive that’s holding it in place.
Step 5


Hey there! Just a heads up: there’s a mesh covering the earpiece speaker at the top edge of the screen. If you don’t have a replacement mesh handy, be super careful not to damage or misplace this little guy.
And remember, those side bezels are only 1.5 mm deep, so handle them with a gentle touch!
– Keep gently working your way around the device, separating the adhesive with care.
Step 6


Hold your horses! Don’t yank off the display just yet; it’s still hanging on by a delicate ribbon cable. Be gentle and make sure not to put any strain on that little buddy while you’re adjusting the display.
Heads up! Sticky adhesive galore around here. Try resting an opening pick between the screen and display to avoid spreading the gunk. If you need help, you can always schedule a repair
Step 7

As you tackle this repair adventure, be sure to keep an eye on each screw and return it to its original home. You’ve got this!
– Grab your trusty T5 Torx driver and take out the two black 3.5 mm T5 screws that are holding the display cable connector bracket. If you need help, you can always schedule a repair
Step 8

– Time to get a little handy – use tweezers to gently lift out the bracket that’s holding the display connector in place. It’s just a small metal piece, so it should come out easily.
– Don’t worry, this part is a breeze. The bracket is just a simple metal piece, and it should pop out without much fuss. (We’ll take care of the cable in the next step.) If you need help, you can always schedule a repair
Tools Used

Step 9

Hey there! Just a friendly reminder: don’t try to shove that connector in. It could cause some serious damage. You’ll want to feel a gentle snap, but pushing it too hard? That’s a one-way ticket to connector heartbreak!
– Time to set that display cable connector free – use a spudger to gently pry it up, and you’ll be one step closer to a fully functioning display.
– When you’re putting everything back together, just snap one side of the connector in, followed by the other – easy does it. If you need help, you can always schedule a repair
Tools Used

Step 10

– Pop off the display.
– If your new screen doesn’t come with an earpiece speaker grille, grab the one from your old display and pop it onto the new one.
– While putting things back together, take a quick break to test your new part and swap out the display adhesive.
– When booting up after reassembly, your screen will run a calibration sequence. Keep your fingers off the screen during this time to avoid touch issues. If you need help, you can always schedule a repair.