Google Pixel Fingerprint Scanner Replacement Guide: DIY Tutorial
Duration: 45 minutes
Steps: 25 Steps
A rockstar from the Salvation Repair squad crafted this guide and it hasn’t been given the Google thumbs up. Learn more about our repair guides here. If you need help, you can always schedule a repair.
Get ready to give your Pixel a brand new fingerprint scanner. If your device is having trouble recognizing fingers, this step-by-step guide from Salvation Repair is here to help. Our community-authored guide hasn’t been endorsed by Google, but we’ve got you covered. Learn more about our repair guides and how we can help you fix your device. If you’re not feeling confident, don’t worry – you can always schedule a repair and let the pros handle it. This guide will walk you through replacing a broken Pixel fingerprint scanner, so let’s get started and get your device working smoothly again.
Step 1

The areas around the speaker (top) and microphone (bottom) have more adhesive. You might need a bit more heat here. Warm the display until it’s almost too hot to handle, roughly two minutes. If you need help, you can always schedule a repair.
– First things first, let’s power down your device and give it a little break. Next up, grab an iOpener to warm up the edges of the display and help loosen that pesky adhesive below. If you don’t have an iOpener handy, feel free to use a heat gun or a hair dryer—whatever gets the job done!
Tools Used

Step 2


Be careful when inserting an opening tool! Going deeper than 1.5 mm on the sides or 9 mm on the top and bottom could lead to some serious damage to your display. If you need help, you can always schedule a repair.
Let’s get started by separating the display panel from the Pixel’s chassis. We’ll do this by carefully slicing through the adhesive that’s holding it in place. If you need help, you can always schedule a repair
Step 3


If your screen is sporting a crack, don’t fret! Just grab some packing tape and give that repair a little boost. It’ll help the suction cup stick better and keep those pesky glass shards from getting loose. You’ve got this!
– Grab a suction handle and give that display a gentle pull to create a little gap between it and the phone’s chassis. You’re doing great!
– If it’s being stubborn, don’t worry—just add a bit more heat and take your time. Patience is key! Once you can slide a tool into that gap, you’re ready to roll on to the next step.
Tools Used

Step 4


Hey there! Instead of trying to lift or pry the screen with that pick, just slide it around gently to break the adhesive seal. You’re doing great!
The display panel is super delicate! If you’re thinking about reusing your display, be sure to gently slide your tool in just enough to break the adhesive. Pushing it in too far could lead to some unfortunate damage to the OLED panel hiding beneath the glass. Remember, if you need help, you can always schedule a repair.
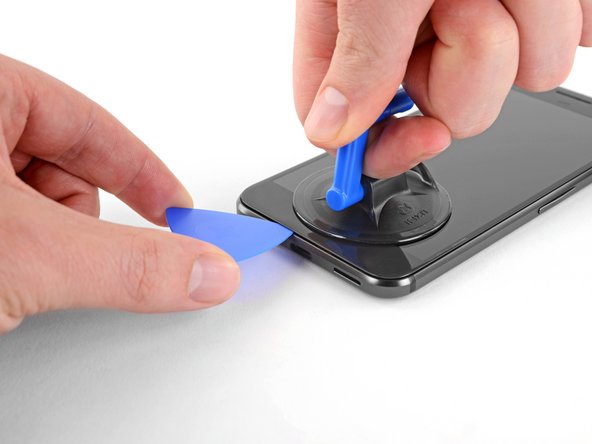
– Grab an opening pick or a trusty playing card and gently slide it into the little gap between the chassis and the display assembly.
– Now, start gliding that pick around the display’s edge, carefully slicing through the adhesive that’s been holding everything together.
Step 5


Hey there! Just a heads up, there’s a mesh covering the earpiece speaker at the top edge of the screen. If you don’t have a replacement mesh handy, be super careful not to damage or misplace this little guy.
Also, keep an eye on those side bezels! They’re only 1.5 mm deep, so treat them with the love and care they deserve!
– Keep on gently separating that adhesive all around the device, taking it slow and steady!
Step 6


Hold your horses! Don’t try to yank off the display just yet; it’s still hanging on by a delicate ribbon cable. Make sure to handle it with care and avoid putting any stress on that cable while you adjust the display.
Be careful when handling the screen and display, as there’s sticky adhesive all over the place. To avoid making a mess, try placing an opening pick between them to contain the gunk. If you need help, you can always schedule a repair
Step 7

While you’re working on this repair, keep track of every screw and put it back exactly where it came from. If you need help, you can always schedule a repair.
– Grab your trusty T5 Torx driver and gently unscrew those two little black 3.5 mm T5 screws that are keeping the display cable connector bracket in place. You’ve got this! If you need help, you can always schedule a repair.


Step 9

Hey there! Don’t go trying to jam that connector into place. Trust us, it can lead to some serious damage. Just remember, a gentle little snap is all you need to feel—anything more than that, and you’re risking a permanent oopsie with your connector.
– Grab a spudger and pop up that display cable connector to free the display.
– When putting it back together, just snap one side in, then the other.
Tools Used

Step 10

– Pop off the display.
– Your new display might be missing the earpiece speaker grille. If that’s the case, remember to transfer it from your old display to the new one.
– While putting everything back together, take a moment to test your new part and replace the display adhesive.
– During boot-up after reassembly, the screen will go through a calibration sequence. Keep your hands off the screen during this to avoid any touch issues.
Step 11

– Grab your trusty T5 Torx driver and let’s get to work! Carefully unscrew the nine 3.5 mm screws that are holding the midframe in place. You’ve got this!
Step 12

– The midframe is secured snugly by five clips. To pop these clips free, just give a little inward push with your trusty opening tool, as illustrated in the steps that follow.
Step 13

– Let’s get started by carefully wedging an opening pick into the notch at the bottom right corner of your phone. If you need help, you can always schedule a repair
Step 14


Hold on there, repair champ! Before you dive in and try to wiggle that midframe free, remember there’s a delicate ribbon cable hanging out underneath, linking the earpiece speaker to the motherboard. Let’s keep it intact!
If the clasps are playing hard to get, give the edge you’re working on a gentle nudge inward with your hand, or grab a thicker tool like a spudger to help out.
Remember, those clips aren’t budging when you slide through them! It’s all about the inward pressure your opening pick makes as it slips into the gap around them.
– Gently slide the opening pick along both sides of the device, sneaking into the tiny gap between the midframe and the back cover to pop those clips loose. If you need help, you can always schedule a repair.
Tools Used
Step 15


– Grab your trusty spudger and gently lift the earpiece speaker cable connector straight up, freeing it from the motherboard.
– Go ahead and remove the mid-frame from the device like a pro.
– When it’s time to put everything back together, make sure to reconnect the earpiece speaker cable and slide in the top side of the mid-frame before clicking those clips back into place.
Tools Used
Step 16


– Grab your trusty SIM ejection tool and gently pop out the SIM card tray, which is chilling at the top left of your device. Easy peasy! If you need help, you can always schedule a repair.
Step 17

– Grab your trusty spudger and carefully detach the battery ribbon cable from the motherboard. You’re doing great—keep it up!
Tools Used
Step 18

– Grab your tweezers, gently lift up the adhesive strip at the top of the battery, and peel it back to reveal the connector beneath. If you need help, you can always schedule a repair.
Tools Used
Step 19

– Grab your trusty spudger and gently pry the charging port ribbon cable away from the motherboard. You’re on the right track!
Tools Used
Step 20

– Grab that trusty spudger and carefully unplug the sleek, black ribbon cable linking the power and volume buttons to the motherboard. If you need help, you can always schedule a repair.
Tools Used
Step 21

Hey there! Just a heads up, coaxial cable connectors and sockets can be a bit delicate. To keep them safe and sound, make sure to gently lift them straight up with your trusty spudger. You’ve got this! If you need help, you can always schedule a repair.
– Grab that trusty spudger and gently pop up the black and white coaxial cables on the upper right and left-hand sides of the motherboard.
– To get these cables back in place, use tweezers to carefully position each one over its socket on the board, then press it down until it clicks into place. If you need help, you can always schedule a repair.
Step 22


– Let’s get those two silver 2.5 mm T5 screws off the motherboard! It’s time to show them who’s boss.
Step 23

Hold up—don’t yank the motherboard just yet! There’s a delicate cable on the back that’s still hooked up to the fingerprint sensor.
– With tweezers, carefully lift the top (camera side) of the motherboard out of the device. If you need help, you can always schedule a repair.
Tools Used
Step 24

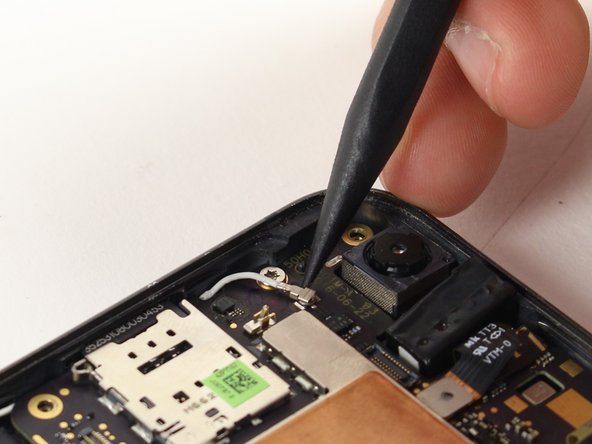
– With the motherboard delicately held in place by your trusty tweezers, grab a spudger and gently disconnect the fingerprint sensor cable from the motherboard. It’s like giving it a little break!
– Now it’s time to fully liberate the motherboard from its cozy home in the device. You’ve got this!
Step 25

– Gently pop that fingerprint scanner out of its cozy little home.