Google Pixel Fold Ultra Wideband Antenna Replacement
Duration: 45 minutes
Steps: 35 Steps
This repair guide has been crafted by our awesome team at Salvation Repair and hasn’t gotten a thumbs up from anyone else. If you’re curious about what we do, check out more of our delightful repair guides here.
Get ready for a little adventure! This guide will help you swap out the ultra wideband antenna in your Pixel Fold. Whether you’re a pro or just starting out, we’re here to make it smooth sailing. Want to dive deeper into all things repair? Check out more of our guides! And remember, if you run into any bumps along the way, don’t hesitate to schedule a repair.
Step 1

Let that battery chill and drop below 25% before diving into this repair adventure! A fully charged battery can get a bit fiery if it’s mishandled, and we definitely want to avoid that.
– Turn off your phone completely and disconnect any cables—show it who’s boss!
Step 2

Feel free to use a hair dryer, heat gun, or hot plate to add some warmth to your repair process—but be careful! Too much heat can play tricks on your display and internal batteries. So, keep it chill and proceed with caution.
– Get started by placing your phone on a flat surface, back side up – make sure it’s clean and smooth to avoid any scratches or damage.
– Now, grab your iOpener and heat it up. Apply it to the bottom edge of the back glass for about two minutes to loosen things up.
Tools Used

Step 3


Ready to get cracking? The next three steps showcase the Anti-Clamp, our handy dandy tool designed to make opening your device a breeze. Not using the Anti-Clamp? No worries! Just skip ahead three steps for another way to get in.
Want to master the Anti-Clamp? Check out this guide for all the tips and tricks.
Ensure that the suction cup on the inner screen is clear of the bezel—if it’s touching, it won’t stick like it should.
If your phone’s surface is feeling a bit too slick for the Anti-Clamp to grab on, a little tape can work wonders to add some grip. And if the glass is cracked, packing tape will help those suction cups stick like glue.
– Pull the blue handle back to loosen up the Anti-Clamp’s arms—easy does it!
– Open your phone completely and slide the Anti-Clamp arms snugly over the left edge of the back glass, just below the logo.
– Get those suction cups in position—place one near the bottom edge of the front and the other near the back. They’re a dream team!
– Give the cups a gentle squeeze to get them to suction onto the spot you’re aiming for. Nice and secure!
Step 4


– Pop a little something under your phone, like a box or a fun stack of books, to keep it steady while nestled between the Anti-Clamp’s arms.
– Give that blue handle a good pull forward to secure those arms like a pro.
– Twist the handle clockwise a whole 360 degrees or until those cups start to feel a nice stretch.
– Keep an eye on those suction cups! If they start to stray from their formation, just detach them and get those arms back in line.
Step 5

Take it easy and don’t go more than a quarter turn at a time, and remember to pause for a minute in between. Let the Anti-Clamp and a little patience do the heavy lifting for you.
If the Anti-Clamp isn’t making that lovely gap for you, just add a bit more heat to the area and give the handle a little twist—about a quarter turn will do the trick!
– Gently slide an opening pick into the space beneath the back glass.
– Skip ahead to the next step.
Step 6


If your back glass is looking like it’s been through a rough time with some serious cracks, slapping on a layer of clear packing tape might just do the trick to help the suction cup stick. Or, if you’re feeling adventurous, you can go for some super strong tape instead of the suction cup. And hey, if things get really tough, a little superglue on the suction cup might just save the day!
Now, depending on your phone’s vintage, this step might be a bit tricky. If you’re having a tough time, don’t hesitate to crank up the heat on the edge and give it another go!
– Get your trusty suction cup and stick it onto the back glass, aiming for the center of the bottom edge like a pro!
– Now, give that suction cup a nice, strong pull to open up a little gap between the back glass and the frame. You’ve got this!
– Slide an opening pick into that gap and keep going!
Step 7


Keep your opening pick to a max of 3.5 mm when working on that back glass adhesive – going deeper could lead to some unexpected internal component drama!
– Gently glide the opening pick back and forth along the bottom edge to break that adhesive seal like a pro.
– Keep the opening pick snugly in the bottom left corner before moving on to the next step.
Step 8

– Warm up that left edge of the back glass with a heated iOpener for a cozy two minutes. It’ll be like a mini spa day for your device!
Tools Used
Step 9


– Twist the opening pick around the bottom left corner to break free the adhesive like a pro!
Step 10


– Pop in a second opening pick at the bottom left corner.
– Gently glide that pick towards the top left corner to break free from the adhesive.
– Keep that pick in place at the top left corner while you move on to the next step.
Step 11

– Warm up that iOpener and give it a cozy spot on the top edge of the back glass for a solid two minutes. You’re doing great!
Tools Used
Step 12


– Time to get this repair started! Rotate the opening pick around the top left corner to loosen the adhesive and begin separating the parts. Take your time and be gentle, we’ve got this!
Step 13


– Pop a third opening pick into the top left corner like a pro.
– Gently slide that pick toward the top right corner to break loose the adhesive.
Step 14

– Warm up a heated iOpener and place it on the right edge of the back glass for about two minutes to loosen things up.
Tools Used
Step 15


Be extra careful around this sharp corner; it’s a bit delicate! Make sure to warm it up nicely and handle it with TLC during this step.
– Tilt your pick to lay it as flat as you can against the back glass.
– Twist that opening pick around the top right corner to break free the adhesive.
Step 16


– Pop in a fourth opening pick at the top right corner—you’re building your toolkit masterpiece.
– Glide that pick down to the bottom right corner like a pro, slicing through the adhesive with style.
Step 17


Be extra careful around this sharp corner; it’s a bit delicate! Make sure to warm it up nicely and handle it with TLC during this step.
– Get your pick in there and make sure it’s as flat as can be against the back glass – we’re talking super snug!
– Now, gently rotate the opening pick around the bottom right corner to loosen the adhesive. You’re making great progress!
Step 18


Hold your horses on removing that back glass completely! It’s still hangin’ on with a cable, so let’s keep it cozy for now.
Now, the back glass should be loosening up from the frame! If you’re still feeling some stubborn resistance around the edges, grab an opening pick and gently work on those last bits of adhesive. You’ve got this!
– Lift the left side of the back glass and carefully slide it over the right edge of the phone.
– Once that’s done, gently set the back glass down on the right side of the phone. You’re almost there!
Step 19

Stay organized and keep those screws in check! Make sure each one goes back to its original home.
When it comes to Torx Plus screws, don’t worry if you don’t have the exact match – standard Torx bits will do the trick. Just use the same size or one size larger (T3 or T4 Torx bits with 3IP Torx Plus screws), and apply some steady, downward pressure to avoid stripping those screws. Easy peasy!
– Grab your trusty Torx Plus 3IP driver and get ready to work that magic! Start by removing the two screws that are 2.8 mm long, which are keeping the middle bracket in place. You’ve got this!
Step 20


– Grab those tweezers or just use your nimble fingers to gently tug the middle bracket towards the left edge of the phone and let go of its clip. You’ve got this!
– Time to say goodbye to the middle bracket! Go ahead and remove it like a pro.
– When it’s time to put it all back together, make sure to slide the middle bracket clip right back into its cozy slot in the frame before lining up those screw holes like a puzzle. Easy peasy!
Tools Used

Step 21


When reattaching press connectors like this, line it up carefully and press down on one side until you hear that satisfying click, then do the same on the other side. Avoid pressing in the middle—that’s a no-go zone! Misaligned connectors can lead to bent pins, and trust me, that’s a headache you don’t want.
– Grab your trusty spudger and gently nudge up that back glass cable from the motherboard—it’s like giving it a little high five! Disconnect it with care and you’ll be one step closer to greatness.
Tools Used

Step 22

– Time to get cozy with your device! Carefully lift off the back glass like it’s the lid of a treasure chest. Remember, patience is key here!
Step 23


No custom-cut adhesive strips? No problem! Grab some double-sided tape, like Tesa Tape, to hold that back glass in place while you finish up the job.
– As you get ready to put everything back together, here’s a little tip: If you’re planning to reuse that back glass, grab your trusty tweezers and gently peel away any big chunks of adhesive hanging around the edges.
– Don’t forget to give the frame some love too—repeat the same for any adhesive that might be lingering there.
– To tackle any stubborn adhesive residue, whip out some isopropyl alcohol (at least 90%) and a lint-free cloth to wipe it all away.
– Finally, when you’re ready to seal the deal, check out this guide to replace the back glass adhesive with custom cut strips.
Tools Used
Step 24


The graphite sheet is delicate. Take your time and gently peel it off, especially if you plan to reuse it—no rush, steady hands win the day!
The graphite sheet is gently hanging on to the logic board—like it’s not ready to say goodbye just yet!
– Gently peel the bottom of the graphite sheet up towards the top of the phone until you can reach the bottom bracket.
– Use your hands, or some lightly sticky tape, to hold the graphite sheet out of the way while you work.
– During reassembly:
– If you took out your graphite sheet completely, just follow this guide to replace it.
– If you don’t have custom-cut adhesive strips for the antenna, you can use double-sided tape, like Tesa Tape, to secure that graphite sheet to the logic board.
Step 25


– Gently grab your tweezers or a clean fingernail, and give the black screw cover on the top screw of the bottom bracket a little tug to pop it off. You’ve got this!
Tools Used
Step 26

– Grab that trusty Torx Plus 3IP driver and get ready for action! It’s time to unscrew those five pesky 3.1 mm-long screws holding down the bottom bracket. You’ve got this!
Step 27


– Grab those tweezers or just your trusty fingers, and gently pull the bottom bracket towards the edge of the phone to pop that clip free. You’ve got this!
– Bye-bye, bottom bracket! It’s time for you to make your exit.
– When you’re putting everything back together, don’t forget to tuck that bottom bracket clip right back into its cozy home on the logic board before lining up those screw holes. You’ll nail it!
Tools Used
Step 28


Alright, it’s time to break this down—there are two batteries chilling inside this phone, one for each half. You’ll need to disconnect both. Let’s do this!
– Grab your trusty spudger and gently wiggle it under the base battery cable connector. Give it a little lift to disconnect that pesky press connector. You’re doing great!
Tools Used
Step 29


– Gently peel away that grey conductive tape from the bottom interconnect cable like it’s a sticker that’s overstayed its welcome!
Step 30


Be sure to unplug both cables to ensure the battery connector doesn’t accidentally make contact with the logic board. Stay safe and keep it cool!
– Time to get this repair started! Use the point of a spudger to carefully pry up and disconnect the flip battery and bottom interconnect press connectors. Take your time and be gentle, we’ve got this!
Tools Used
Step 31


– As we dive into reassembly, we’ve got two important steps ahead! First up, let’s tackle replacing that flip battery and the bottom interconnect cable’s conductive tape.
– Time to peel off that shiny new conductive tape from its liner! Make sure to stick the adhesive side onto the bottom interconnect connector, and don’t forget to bridge it over to the logic board.


Step 33
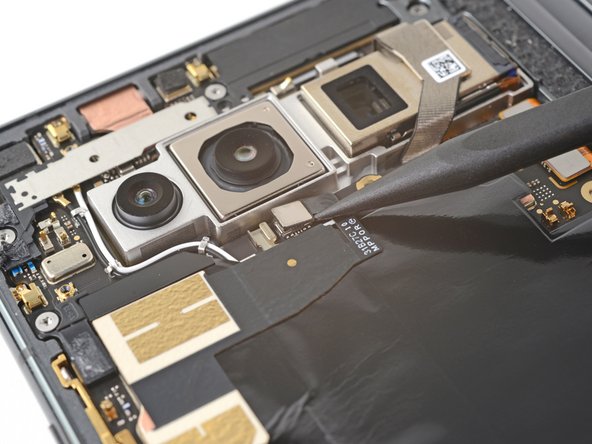

– Got a graphite sheet that’s taped down? Time to set it free! Go ahead and peel off that tape.
– Now, grab your trusty spudger and gently pry up the ultra wideband antenna press connector to disconnect it. You’ve got this!
Tools Used
Step 34


The ultra wideband antenna is stuck to the graphite sheet with a bit of adhesive, so be gentle when handling it.
– Gently slide an opening pick under the antenna—think of it like easing a guitar pick between tight strings—to loosen up that adhesive.
Step 35


– Ready to say goodbye to your e-waste? Swing by an R2 or e-Stewards certified recycler—it’s the responsible thing to do!
– Before you dive into installation, give your new part a side-by-side comparison with the original. You might need to swap out some components or peel off adhesive from the new buddy!
– To put your device back together, just retrace your steps like a pro—easy peasy!
– Want to check if everything’s running smoothly? Run a diagnostics test with the built-in Pixel Diagnostic tool by clicking here.
– Things didn’t go quite as planned? No worries! Try some basic troubleshooting, or if you’re feeling stuck, you can always reach out for help from our community.
–
Success!
