Google Pixel Tablet Screen Replacement
Duration: 45 minutes
Steps: 32 Steps
This repair guide has been crafted with care to help you tackle your tech troubles. For more details on our repair guides, check out schedule a repair.
Welcome to your go-to guide for swapping out that broken screen on your Pixel Tablet! This handy tutorial walks you through the process step-by-step. Just a heads up, this guide is tailored for a specific replacement screen that comes with adhesive already applied. If your new screen is adhesive-free, no worries! Just grab some thin, double-sided tape like Tesa 61395 Tape to get the job done. And remember, if you need help, you can always schedule a repair.
Step 1


Let that battery run down to zero before diving into this repair adventure. A battery that’s still charged can be a bit of a firestarter if things go sideways!
Press and hold the power button along with the volume up button simultaneously to pull up the power off menu.
– Disconnect all cables from your tablet and make sure it’s totally powered down. Let’s give it a little nap before we dive into the fix!
Step 2

– If your screen is looking like a jigsaw puzzle, don’t worry! Just grab some packing tape and lay down overlapping strips over the glass. This will keep you safe and make taking things apart a whole lot easier.
Step 3


For all the juicy details on mastering the Anti-Clamp, give this guide a whirl!
– Now it’s time to bring in the big guns – our trusty Anti-Clamp tool, designed to make this whole process a whole lot easier. If you’re not using the Anti-Clamp, don’t worry, we’ve got you covered. Just skip ahead three steps and we’ll show you an alternative method.
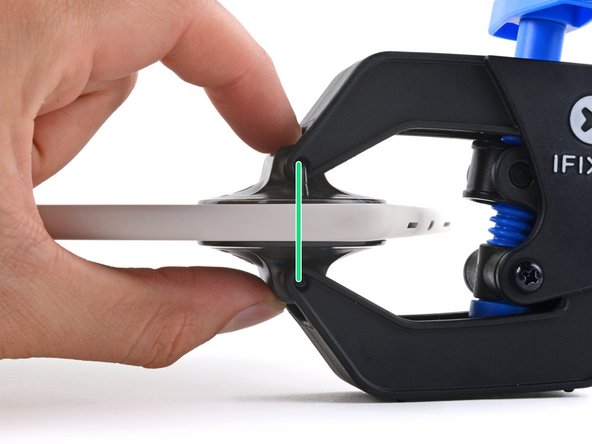
– Pull that blue handle back to unlock the Anti-Clamp’s arms. It’s like releasing a little robot into action.
– Slide those arms over the top left corner of your device, making sure one suction cup is on the back cover and the other is on the screen. It’s a delicate dance, but you’ve got this.
– Prop up your tablet so it’s level and comfortable between the Anti-Clamp’s arms. You’re getting close!
– Squeeze those cups together to create some serious suction power. You’re just a few steps away from fixing your device. If you need help, you can always schedule a repair
Step 4

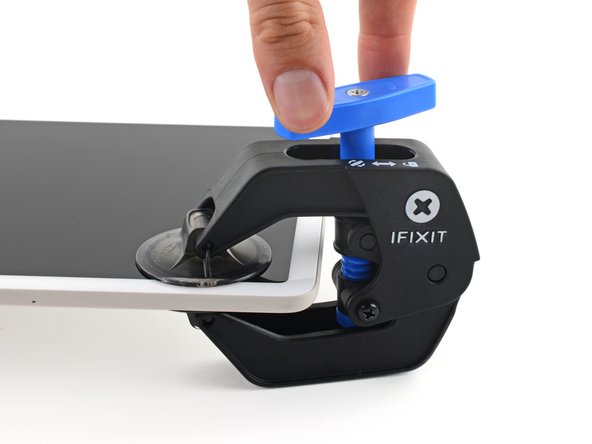
– Give the blue handle a gentle tug forward to secure those arms in place.
– Now, twist that handle clockwise a couple of times, or until you see those suction cups starting to stretch their little hearts out.
– As those cups stretch, keep an eye on their alignment—they should be standing tall and proud together. If they start to slip, don’t panic! Just remove the Anti-Clamp and slap on some tape to help them stick like best buddies.
Step 5


Watch out for the heat! Your tablet’s screen and battery aren’t fans of getting too hot. Keep things cool to avoid any damage.
– Time to get this repair started! Use a hair dryer or heat gun to warm up the top left corner of the screen until you see a gap forming between the glass and the frame – this is where the magic happens.
– Now it’s time to get a little more hands-on. Insert an opening pick into the gap you just created, and gently pry it open.
– Next, carefully remove the Anti-Clamp using the convenient pull tabs on the suction cups. If you’re feeling stuck, don’t worry – it’s all part of the process. You’re doing great!
Tools Used


Step 6

If you’ve already got an opening pick in place with the Anti-Clamp, feel free to skip ahead by two steps.
You can also give your trusty hair dryer, heat gun, or hot plate a whirl, but make sure to keep an eye on things! We don’t want to turn your screen or battery into a hot mess—just aim for it to be nice and warm to the touch.
– Flip your tablet around so the front camera is right in front of you, ready for action.
– Now, grab your trusty heated iOpener and gently place it on the top left corner of the screen (which is now on the bottom right since we’ve done a little flip) for a cozy three minutes.
Tools Used

Step 7


– Place a suction handle in the top left corner of the screen, as close to the edge as possible.
– Gently pull up on the suction handle with steady, even pressure until you see a gap start to form between the glass and the frame.
– Slip the tip of an opening pick into the gap.
– Remove the suction handle and move on to the next step.
Tools Used

Step 8


The screen is held in place by adhesive all around its edges. As you begin separating the adhesive, pay extra attention to the following areas:
– The top, bottom, and left edges are where the adhesive really packs a punch—it’s thick and ready to hold things down.
– Over on the right edge, the adhesive takes it a bit easier, so it’s a little thinner.
– Now, up top by the front camera, you’ve got some super delicate adhesive action going on. Be gentle, as the cables connecting the screen to the frame are quite fragile!
Step 9


Be careful not to push your pick deeper than 7 mm—that’s about halfway between the tip of your pick and the logo. Go slow and steady, and you’ll be just fine.
– Now it’s time to get this tablet opened up – slide your trusty opening pick all the way to the top left corner.
– Leave that pick right where it is, so the adhesive doesn’t get a chance to reseal and make your life more difficult.
Step 10

You can also grab a hair dryer, heat gun, or hot plate for some extra warmth, but watch out! We don’t want to roast your screen or battery.
– Warm up that iOpener and give the left side of your screen a cozy two-minute hug.
Tools Used
Step 11

Hey there! Just a friendly reminder: keep your pick no deeper than 7 mm, which is about halfway between the tip of the pick and that cool logo. Let’s keep everything safe and sound while we work on this repair!
– Time to get this screen open – insert a second opening pick in the top left corner, nice and easy.
– Slide that pick down to the bottom left corner to loosen the left edge adhesive. You’re making great progress!
– Leave this pick in place, it’ll help prevent the adhesive from sticking back together while you work on the next steps.
Step 12

Feel free to bring in a hair dryer, a heat gun, or even a hot plate to lend a helping hand! Just remember to keep an eye on it—nobody wants to cause a meltdown for the screen or the battery.
– Heat up your trusty iOpener and give it a cozy two-minute hug at the bottom edge of the screen. It’s like a warm embrace for your device!
Tools Used
Step 13


Be careful not to insert your pick too far – about 7 mm or halfway between the tip and the logo is the sweet spot. Anything deeper and you might run into trouble.
If your pick gets a little too cozy, just give it a twist while sliding to break that adhesive’s grip. You’re doing great!
– Time to bring in some extra help – insert a third opening pick into the bottom left corner of your device.
– Now, gently slide this pick all the way to the bottom right corner of the screen. This will help loosen the adhesive that’s holding everything together at the bottom edge.
– Leave this pick right where it is – it’s doing its job to keep that adhesive from sealing back up while you work on the next steps.
Step 14

Feel free to bring in a hair dryer, a heat gun, or even a hot plate to lend a helping hand! Just remember to keep an eye on it—nobody wants to cause a meltdown for the screen or the battery.
– Warm up that iOpener and give it a cozy two-minute hug on the right edge of the screen!
Tools Used
Step 15

Keep your pick chill and don’t go deeper than 5 mm along the right edge!
For a quick visual aid, measure out 5 mm from the tip and give your pick a little mark with a permanent marker.
– Pop in a fourth opening pick at the bottom right corner like a pro.
– Gently slide that pick up to the top right corner to break free the right edge adhesive.
– Keep that pick in place to stop the adhesive from playing tricks and resealing.
Step 16

If you don’t have the official tools on hand, a hair dryer, heat gun, or even a hot plate will do the trick. Just make sure not to go overboard—too much heat can mess with the screen or battery. Stay cool, and take it slow!
– Warm up that iOpener and give it a cozy two-minute hug on the top edge of the screen.
Tools Used
Step 17

The front camera and sensor are situated right in the center of the top edge. Just a friendly reminder: keep your opening pick at a safe distance and don’t go deeper than 3 mm (1/8 in) in this area.
To get a better visual, measure 3 mm from the tip of your pick and mark the spot with a permanent marker. This little trick will help you stay on track and ensure a smooth repair process.
– For a little guidance while slicing, consider placing a 6.3 cm (2.5 in) long piece of masking tape on the top edge, right over the front camera. It’ll help you keep things in check and avoid going too deep!
Step 18


– Place the fifth opening pick in the top right corner of your screen, nice and snug.
– Gently slide your pick toward the front camera, but stop once you’re about 3 cm (1.25 in) away from it.
– Pull your pick out a little—just 3 mm (1/8 inch)—and then slide it past the front camera with ease.
– Once you’ve passed the front camera by 3 cm, push your pick in about 6 mm deep—aim for halfway between the tip and the logo—then smoothly slide it over to meet the first pick you placed in the top left corner.
Step 19

Keep the screen opening to a max of 90 degrees, folks! The front camera and sensor cables are on the short side and could get a little too cozy if you go past that limit.
If your screen is feeling a bit stubborn, take a closer look around the edges for any spots where the adhesive might still be stuck, and gently slice through them with an opening pick.
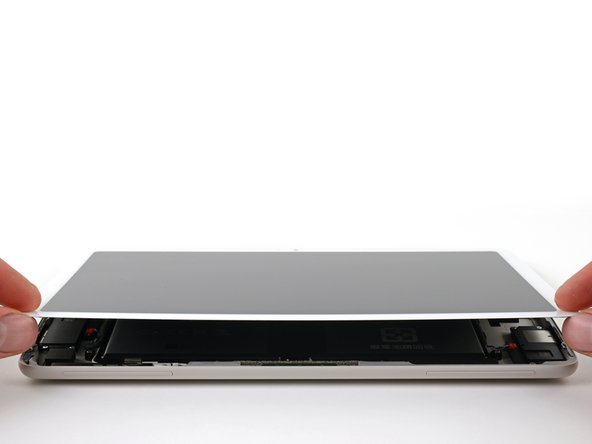
– Carefully grab and lift those bottom corners of the screen like you’re opening a treasure chest.
– Gently tilt the screen open just enough to peek at the cables connecting the screen to the frame—like a little surprise waiting for you!
– When it’s time to put things back together, remember to peel off those adhesive liners from around the screen’s edge before giving it a good press into place in the frame. You’ll be sealing the deal like a pro!
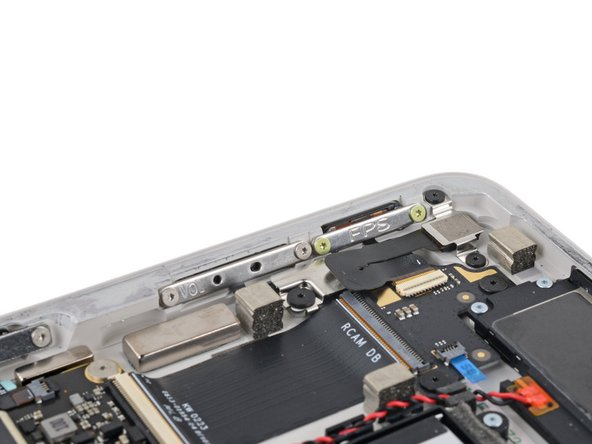
Step 20


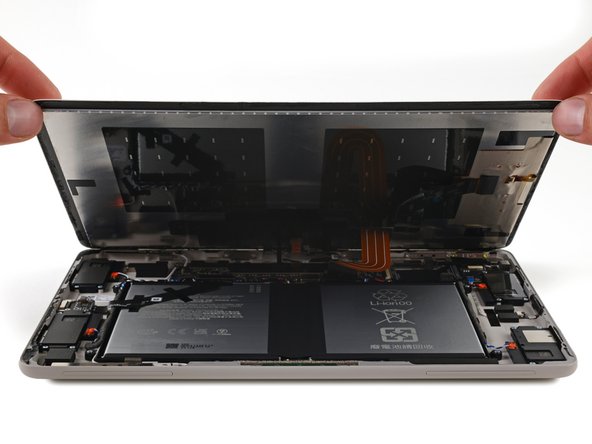
Having a tough time keeping the screen up? No worries! Just pop the tablet’s dock on the frame to give the screen a little boost, or you could get a buddy to help hold it while you work your magic.
– For the next three steps, keep that screen tilted open with one hand, while your other hand gets down to business.
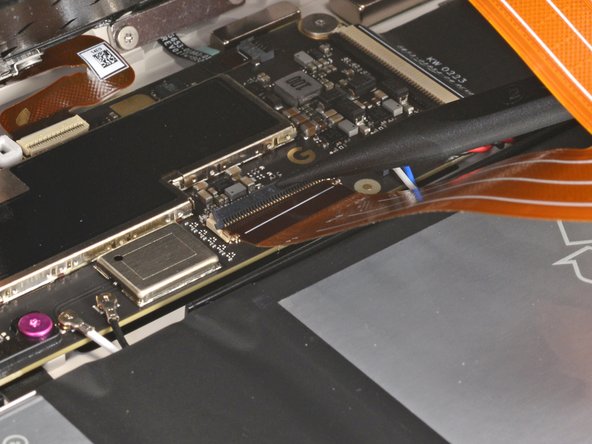
– Grab those tweezers and gently peel away the black tape from the screen cable connector. Easy does it!
– Now, as we get into reassembling mode:
– If the old tape is looking worse for wear, slap on some new tape if you’ve got a replacement in your repair kit.
– Before you seal everything up, take a moment to power on your tablet and make sure it’s working like a charm. Once you’ve given it a quick check, power it back down and let’s get back to reassembly!
Tools Used

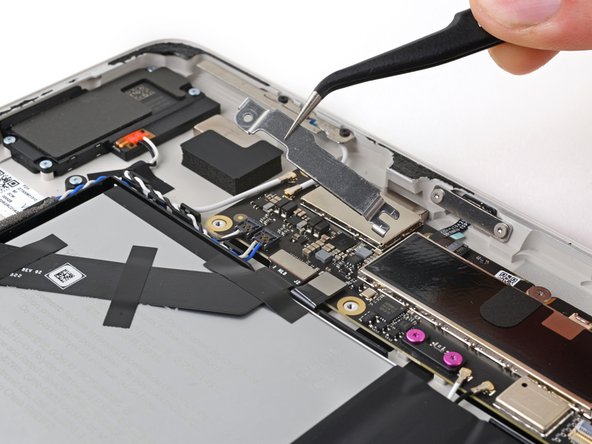
Step 21

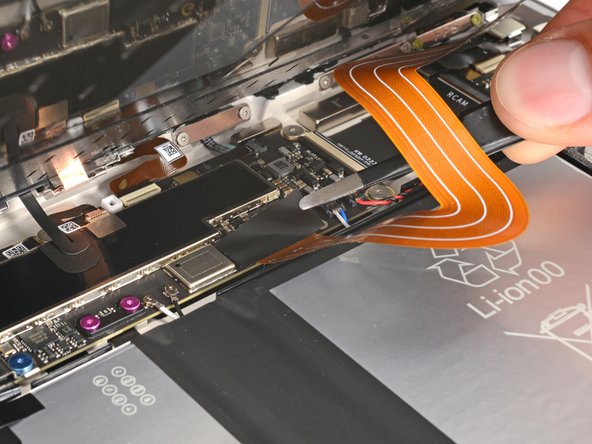
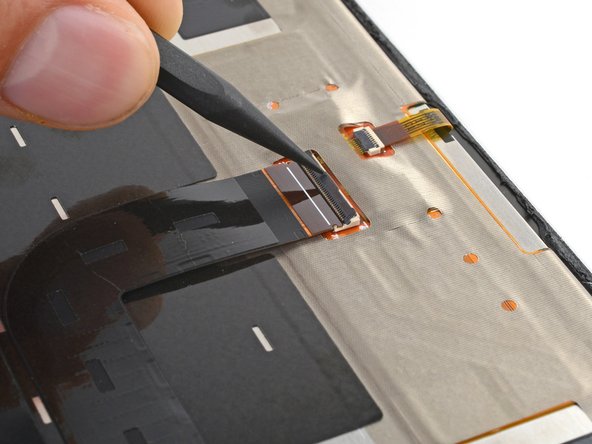
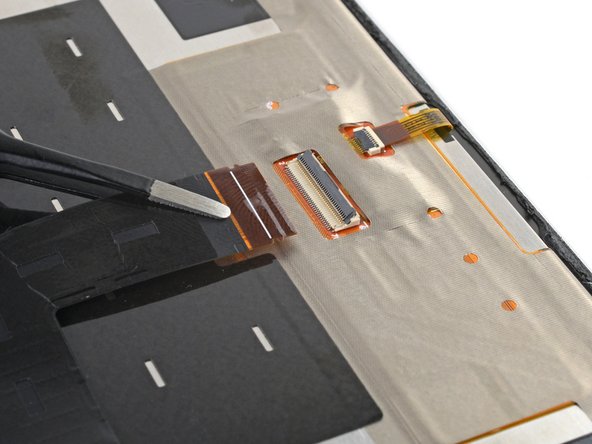
– Grab your trusty spudger or a clean fingernail and gently lift the tiny locking flap on the inside edge of the screen cable ZIF connector. It’s like flipping a tiny switch!
– Now, using tweezers or your fingers, carefully pull the screen cable straight out of its snug little home. Easy peasy!

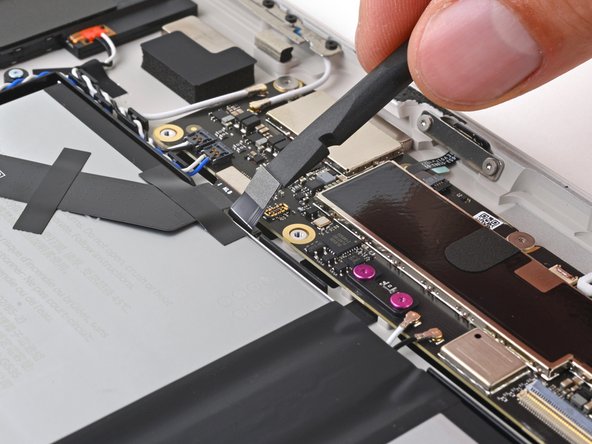
Step 22
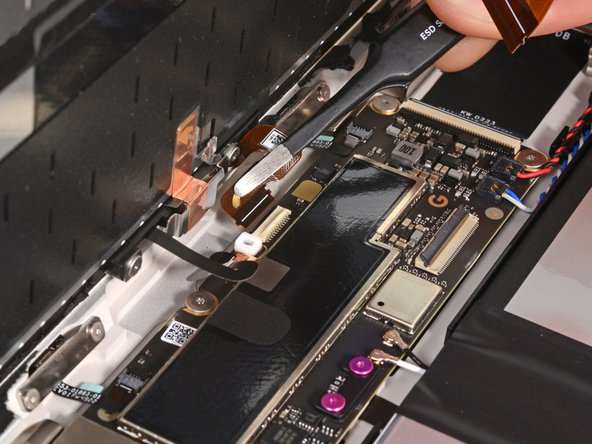


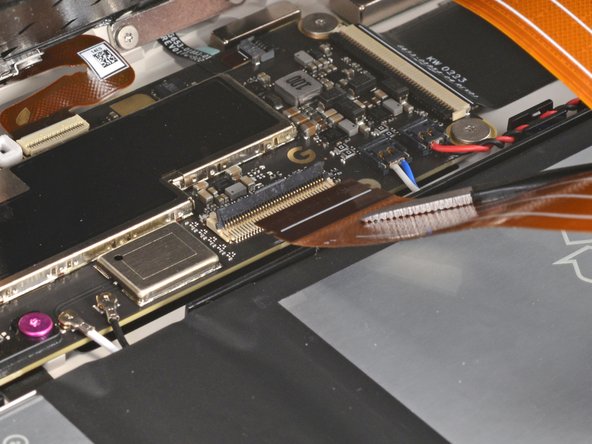
– Grab your trusty opening pick and gently flip up that tiny locking flap on the outer edge of the front camera ZIF connector—right opposite the cable. You’ve got this!
– With your tweezers in hand, carefully pull that cable straight out of its cozy socket. Easy peasy!
– As you’re putting everything back together, watch out for that sneaky cable; it doesn’t like to bend much. Use those tweezers to guide the connector back into its home while locking the ZIF connector flap at the same time. Teamwork makes the dream work!
Tools Used


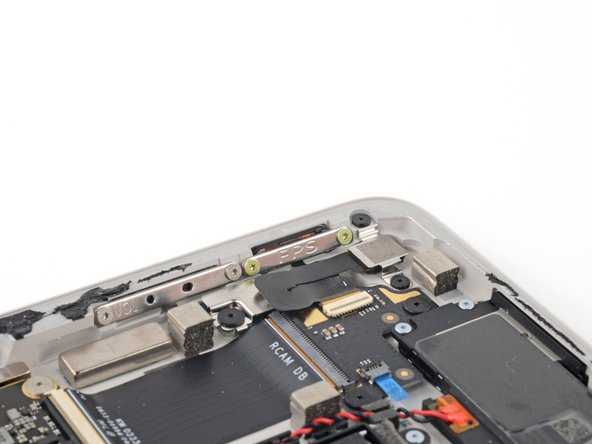
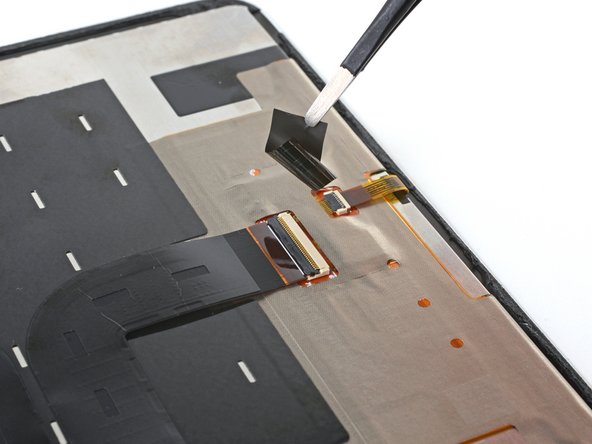
Step 24

– Take off the screen – it’s time to get started on this repair!
Step 25


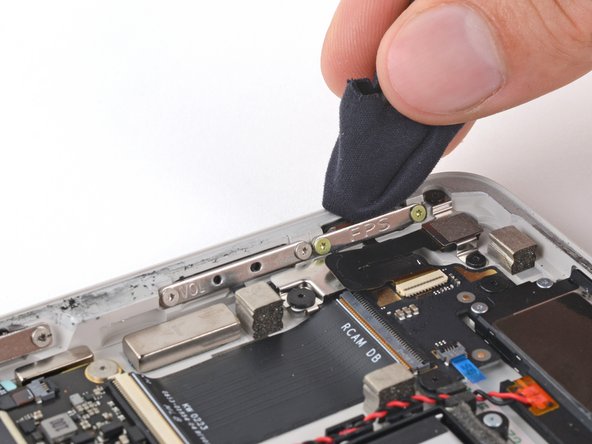
Time to get that screen ready for its new life! If you’re giving your old screen a second chance, make sure to remove the leftover adhesive from both the screen and the frame.
– Let’s clean up your frame and get it ready for reassembly with these next two steps.
– Grab your spudger’s flat end or even a clean fingernail and gently lift an edge of the leftover frame adhesive until you can get a good grip on it.
– Now, use your tweezers or fingers to peel away the big pieces of adhesive from the frame.
– Go around the whole perimeter, peeling off the remaining adhesive until the frame is nice and clean, with no big pieces left.
Step 26

Give your screen a little love by wiping down its edges and the frame. A clean surface makes all the difference!
– Grab a pipette or syringe and fill it up with some strong isopropyl alcohol (we’re talking over 90% here). Now, just a few drops on the edge of the frame should do the trick!
– Next, take a microfiber or lint-free cloth and wrap it around the flat end of your spudger. Give that frame a good scrub until it’s sparkling clean. Feel free to add a little more isopropyl alcohol as needed!
Tools Used
Step 27


The Pixel Tablet loves its Torx Plus screws, but don’t worry—standard Torx bits can save the day if you’re in a bind! Just remember to keep that steady downward pressure to avoid any stripping mishaps.
For standard Torx bits, grab a T3 for the best fit on these screws. If it feels a bit wobbly, a T4 might just do the trick!
– Grab your trusty Torx Plus 3IP driver and get ready to unscrew those two 2.6 mm screws holding down the battery, USB-C, and speakers connectors cover. You’ve got this!
– Now, gently lift off the cover and reveal the magic inside.
Step 28

To reconnect a press connector, line it up with its socket, then gently push down on one side until you hear that satisfying click. Next, press down on the other side to secure it in place.
– Grab your trusty spudger and gently slide the flat end under the battery press connector. Give it a little pry to disconnect it like a pro!
Tools Used
Step 29


Be careful when connecting the screen cable while the battery is still attached—doing so can cause a short and even lead to a fire hazard. Better safe than sorry!
– Time to get your device back in action! Start by carefully reconnecting the screen and battery when you’re putting everything back together.
– Prop up the bottom edge of the tablet on a box or something similar. Tilt that screen open and lean it against a sturdy object, angling it up to 90 degrees like a pro.
– Reconnect the small front sensor cable ZIF connector, making sure it’s snug.
– Now, let’s tackle the large screen cable ZIF connector. Get it reconnected and ready to roll.
– Don’t forget the battery press connector—give it a solid reconnect.
– Grab your Torx Plus 3IP driver and install those two 2.6 mm screws to fasten the connector cover like a champ.
– With those cables all set, you’re on the right track to continue the reassembly process!
Step 30

– Grab those tweezers and gently lift off the screen cable tape from that pesky screen ZIF connector. You’ve got this!
Tools Used
Step 31

– Grab your spudger or a clean fingernail and gently lift up the locking flap on the inside edge of the screen’s ZIF connector. It’s like giving it a little high-five!
– Now, using tweezers or your fingers, carefully pull the screen cable straight out of its cozy socket. Easy peasy!
Step 32

– Time to put your device back together! Just follow these steps in reverse, and you’ll be good to go.
– Got some old tech lying around? Make sure to drop it off at an R2 or e-Stewards certified recycler.
– If things didn’t quite work out, don’t sweat it! Give some basic troubleshooting a shot, or reach out to our awesome Answers community!
– Remember, if you ever feel stuck, you can always schedule a repair.
Success!
