Google Pixel XL Battery Replacement
Duration: 45 minutes
Steps: 26 Steps
This guide is brought to you with love and care, just a heads up though – it's not officially endorsed by any big names out there.
Before diving into the disassembly adventure, make sure to keep that battery below 25%. Safety first!
The Pixel XL’s display panel is a bit on the delicate side and is glued tightly to the frame, making repairs a bit tricky. Handle with care, as there's a solid chance you might break the display, especially if it’s already sporting some micro-fractures.
This guide walks you through opening up the Pixel XL to swap out its battery. If your battery's puffed up, make sure to take safety steps—discharging it below 25% helps reduce fire or explosion risks if punctured. The display on this model is delicate and glued to the frame with strong adhesive, so be gentle—heat your pry tools well and proceed carefully to avoid cracks, especially if your screen already has micro-fractures. The battery sticks in with tough adhesive, so using over 90% isopropyl alcohol can help loosen things up. Take your time, follow the steps, and if you need a hand, you can always schedule a repair.
Step 1


You can also use a hair dryer, heat gun, or hot plate, but watch out for overheating your phone! Remember, both the display and internal battery are sensitive to heat. Keep it cool and you'll be golden!
- Warm up that iOpener and let it work its magic on the top edge of the display for about two minutes.
- Before you dive in, keep an eye on these tricky spots:
- There's a thin strip of adhesive hugging the display panel.
- Watch out for some thicker adhesive lurking around.
- The OLED display panel is delicate, so handle it like you would a cupcake.
- Be careful of the display cable, as it might get a little cranky during prying.
Tools Used

Step 2


- When the edge is nice and toasty, pop on a suction cup near the edge.
- Give that suction cup a gentle lift, then slide an opening pick into the tiny gap.
- If you're struggling to create a gap, just reheat the edge and give it another go!
Keep that pick to a maximum of 13 mm (0.5 inches)! Going deeper than that could put a serious dent in your display assembly, and we don't want that!
Feeling stuck? Try swapping out your opening pick for a playing card—it can give you a little extra leverage and help you get that initial entry more smoothly. Sometimes a simple change like that makes all the difference. If you need a hand, just schedule a repair and we’ll help get you back on track.
Step 3


Be careful not to cut deeper than 13 mm (0.5 inches) or you might end up damaging the display. And there's a mesh covering the earpiece speaker on the top edge of the screen—if you don’t have a replacement mesh, handle it gently so you don't damage or lose this tiny component.
- Gently glide that opening clip along the top edge to cut through the sticky stuff.
- Pop an opening pick in there to keep that adhesive from getting cozy again.
Step 4


Hey there! Just a friendly reminder: keep that pick no deeper than 1 mm (1/32") along the edge. Going too deep can cause some serious damage to the display assembly. We believe in you, so take it slow and steady! If you need help, you can always schedule a repair.
- Warm up your iOpener and give some love to the right edge of your phone for a solid two minutes.
- Slide an opening pick into the top edge of the phone right where you’ve already made that adhesive slice.
- Gently guide the pick around the right corner like you’re tracing a secret path.
- Carefully run the pick down the right edge, slicing through that stubborn adhesive as you go.
- Now, let’s do the same dance on the left edge of the phone!
Tools Used
Step 5


Hey there, just a friendly reminder: don't slice deeper than 8.5 mm (1/3") or you might accidentally give the display cable a bad day!
- Warm up the bottom edge with an iOpener for a cozy two minutes.
- Gently slide a pick near the right edge where the adhesive is already feeling loose.
- Carefully maneuver the pick around the corner like a pro.
- Glide the pick along the bottom edge to slice through that pesky adhesive.
Tools Used
Step 6

Hey there! Just a quick heads up: don’t try to yank off that display assembly just yet. It's still cozy with a flex cable!
- After you've made a nice slice all around the edge of your phone, gently lift the display assembly a bit from the right corners. You've got this!
- Grab your trusty opening pick and carefully cut through any stubborn adhesive that's still hanging on.
Step 7


Watch out for that flex cable while you're swinging the assembly around—let's keep it safe and sound!
- Gently lift the display assembly from the top and give it a little swing so it can comfortably rest upside down on the frame. You've got this!
Step 8


As you dive into this repair adventure, remember to keep a close eye on those little screws! Make sure each one finds its way back to its original home.
- First, let's tackle those two tiny 4 mm T5 screws holding the display cable bracket in place. Go ahead and remove them with care!
- Now, gently lift off the display cable bracket. You're doing great!
Step 9


Alright, let’s get those connectors back in action! Start by aligning them carefully, then give one side a gentle press until you hear that satisfying click. Repeat the same magic on the other side. Just a friendly tip: avoid pushing down on the middle! If things get a little wonky and the connector is misaligned, those pins could bend, leading to some serious trouble. If you need help, you can always schedule a repair.
- Gently use the spudger's tip to lift and disconnect that display cable from its cozy connector. You're doing great!
Tools Used

Step 10


- First, let's get that display assembly off—remove it like a pro!
- If you're looking for all the juicy details on reinstalling the Pixel XL display, check out this handy guide.
- Got a replacement display that didn't bring its own speaker grille? No worries! Grab some tweezers and gently peel the adhesive grille from your old display, then transfer it over to the new one. Easy peasy!
- Before you pop in the new display, make sure to clean up any leftover adhesive from the frame. A spudger or an opening tool will do the trick for scraping it off, and high-concentration isopropyl alcohol will help you wipe away any stubborn residue.
- If you're reinstalling the same display assembly, don't forget to clear off any adhesive residue from both the panel and the frame before applying fresh adhesive.
- Once everything's in place, turn on your phone and give your repair a test run before sealing it all up with new adhesive. You got this!
- Heads up! During the boot-up after reassembly, the screen will go through a calibration sequence. Resist the urge to touch the screen during this phase—doing so could mess with the touch calibration and lead to some pesky touch issues.
Tools Used
Step 11

- Time to get those screws out and free the midframe from the back! Here’s what you need to remove:
- Seven sleek black 4 mm T5 screws
- Two shiny silver 3 mm T5 screws
Step 12

- The midframe is snugly secured by those clever little plastic clips that click right into the edge of the back case. You're doing great!
Step 13


- Spot that tiny notch in the bottom left corner of the frame? Great! Now, gently slide in an opening pick.
- Now, glide that opening pick along the bottom edge of your device, heading towards the bottom right corner, and just let it chill there for a moment.
Step 14


The snug fit can make this a bit tricky, and you might need to put in a bit of muscle. If things get tough, don't hesitate to grab a playing card and slide it in for some assistance!
- Grab a thin opening pick and gently slide it into the right edge of the phone, just above the bottom corner.
- Carefully work the pick upward along the seam, easing apart the clips one by one until the first one pops free.
- After releasing the clip, leave the pick in place to keep the midframe from snapping back together prematurely.
Step 15


Be careful not to push the pick in more than 2 mm, or you might accidentally damage those delicate flex cables. Better safe than sorry!
At this point, the right edge of the midframe should be detached from the case. If it's still stuck, try sliding an opening clip up and down along the right edge to coax it loose.
- Let's get this repair started! Insert an opening pick into the right edge of the phone and gently slide it upwards towards the top right clip - you're making great progress already!
- Now, carefully slide the pick past the clip to disengage it from the frame. Take your time, you're doing fantastic!
Step 16


- Grab the right edge of the midframe by the corners and gently lift it up like you're unveiling a surprise.
- When the left edge starts to feel a bit wobbly, stop right there, and carefully lift the midframe upwards.
- Time to say goodbye to the midframe! Go ahead and remove it.
- To put the midframe back, align it with the case, and give a little squeeze around the edges until all those clips snap back into their happy places. If done right, the midframe should sit nice and flat.
Step 17


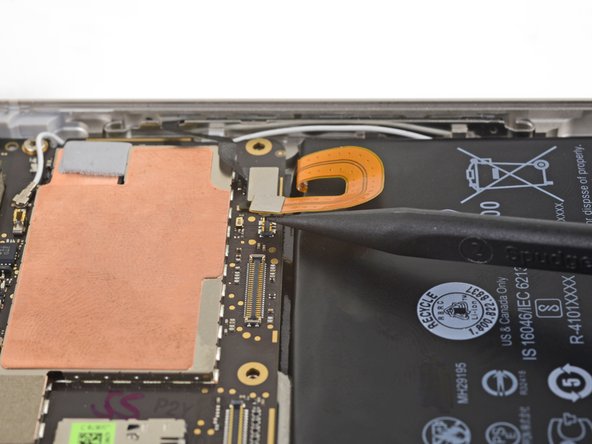
- Grab your trusty spudger and gently lift up the battery connector to disconnect it. You've got this!
- Give the battery flex cable a small bend so it stays clear of the motherboard. Let's keep everything safe and sound!
Tools Used
Step 18


- Time to get a little tricky! Use your trusty tweezers to carefully peel up the tape at the top of the interconnect cable. Take your time and be gentle, we've got this!
Step 19


- Grab your trusty spudger and gently lift up the interconnect cable from the motherboard to disconnect it. Easy peasy!
- When you're ready to reconnect, simply line up the cable with the socket. Give it a little press down on one side, then the other. If you nailed it, the cable will be snug as a bug in that socket!
Tools Used
Step 20


Feel free to keep the interconnect cable cozy with the daughterboard thanks to the adhesive, or if you're feeling adventurous, you can take it off completely!
- Grab your trusty spudger and gently nudge it under the interconnect cable at the bottom daughterboard. A little lift and voilà, you're disconnecting like a pro!
Tools Used
Step 21

- First, let's talk about the battery - it's stuck in place with two strips of double-sided tape, so we'll need to carefully remove it.
- To loosen things up, heat an iOpener and apply it to the back of the phone's left edge for about two minutes. If the tape is still being stubborn, you may need to reheat and reapply the iOpener.
Tools Used
Step 22


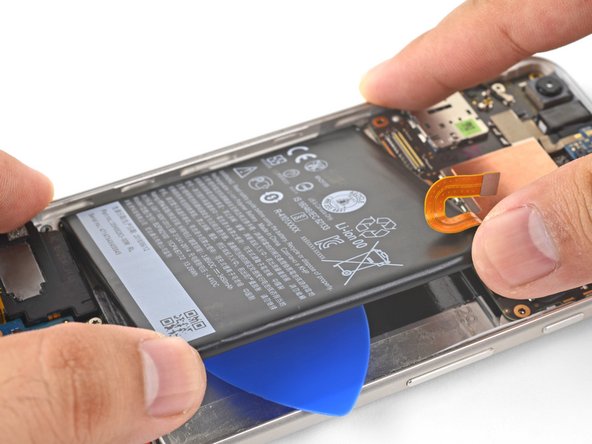
Watch out for that sneaky white antenna cable hiding along the edge of the battery! As you gently press down on the pick, make sure it doesn’t get caught. You've got this!
Having trouble getting the opening pick under the battery? Don't sweat it! Just heat it up and reapply the iOpener as we went over in the previous step.
Another trick to help loosen things up is to apply some high concentration isopropyl alcohol to the edge. This should help weaken the adhesive and make it easier to get in there.
- First things first, flip that phone over like a pancake!
- Now, grab your trusty opening pick and gently press it down the right edge of the battery (it should feel nice and cozy). Wiggle it a bit to cut through the sticky stuff holding it down.
- After you've freed the right side of the battery, keep that pick in place to stop the adhesive from getting all clingy again.
Tools Used
Step 23

Alternatively, grab a plastic dropper or syringe and fill it up with some potent isopropyl alcohol. Now, just dribble a few drops of that magic liquid under both edges of the battery. Give it a little minute to work its charm and loosen that pesky battery adhesive.
- Heat up an iOpener and stick it to the back of the phone's right edge for two minutes - you might need to give it a reheat and reapply to get the job done.
Tools Used
Step 24

If you notice your battery looking a bit wonky, it's time to hit the pause button! Take a breather, then warm up that iOpener or apply a little more alcohol, just like we talked about in the previous step.
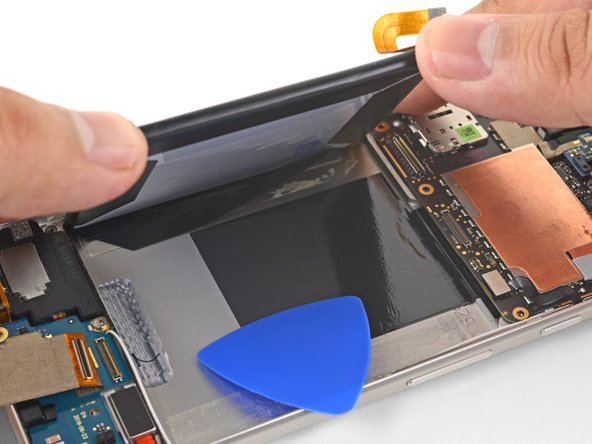
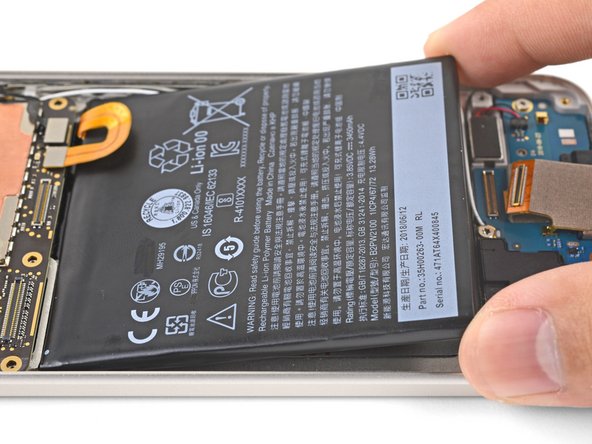
- Grab the corners of the battery's right edge and gently lift it upwards like you're raising a flag of victory.
- Once the battery is free from its sticky situation, carefully peel it away from the frame, as if you're unwrapping a surprise.
- Now, go ahead and remove the battery with a sense of accomplishment!
Tools Used
Step 25


To keep things safe and sound, skip the idea of reusing an old battery. Let's avoid any fire or chemical mishaps, shall we?
- Ready to give your device some fresh power? Start by sticking on those new adhesive strips and make sure the battery connector is lined up just right.
- Next up, grab those stretch release adhesive strips, double-sided tape, or pre-cut adhesive strips—whichever suits your fancy!
- Now, gently place that shiny new battery snugly into its cozy spot.
- Finally, take the flat end of a spudger or your finger and give that battery connector a little nudge to connect it to the motherboard. You're almost there!
Tools Used
Step 26

- If your device is still playing hard to get after reconnecting the screen, it might have actually powered on quietly when you plugged the battery back in. Just give that power button a good long press until it vibrates off. Then, reconnect the screen and give it another shot!
- To put everything back together, simply reverse the steps you took earlier.
- Once you've wrapped up this guide, don't forget to calibrate your shiny new battery!
- When it’s time to part with your e-waste, make sure to drop it off at an R2 or e-Stewards certified recycler.
- If things didn’t quite go as planned, don’t worry! You can always find some troubleshooting help or advice.
- Remember, if you need help, you can always schedule a repair.