Google Pixel XL Camera Replacement Guide
Duration: 45 minutes
Steps: 22 Steps
This repair guide comes straight from the talented folks at Salvation Repair, and while it’s packed with great info, it hasn’t received the official thumbs-up from Google.
Just a heads up: the Pixel XL’s display panel is a bit of a delicate flower, so handle it with care!
This repair guide comes from the talented folks at Salvation Repair, and while it’s not officially backed by Google, we’re here to help you out! Ready to swap out the front-facing camera module on your Google Pixel XL? Just a heads up: the Pixel XL’s display panel is a bit delicate and is glued down pretty well, so repairs can be a bit tricky. If your display has any micro-fractures, be extra cautious—there’s a chance it could break during the process. Remember to use plenty of heat and take your time when prying things apart. If you need help, you can always schedule a repair.
Step 1


You can use a hair dryer, heat gun, or hot plate to help out, but remember to keep it cool! Overheating your phone can lead to some serious heat damage for the display and internal battery. So, let’s keep things chill while we work on this repair! If you need help, you can always schedule a repair.
– Warm up that iOpener and let it chill on the top edge of the display for a cozy two minutes.
– Before diving into this adventure, keep these areas in mind:
– There’s a sneaky thin adhesive hugging the display panel.
– Watch out for the thicker adhesive—it likes to stick around!
– The OLED display panel is delicate, so handle it with care!
– Don’t forget about the display cable; it needs some love during prying.
Tools Used

Step 2


Be careful not to insert the pick more than 13 mm (0.5 inches) into your device, as this can cause damage to the display assembly. If you’re unsure or need help, you can always schedule a repair
Feel free to grab a playing card instead of an opening pick for your initial entry—sometimes a little creativity goes a long way!
– When the edge feels pleasantly warm, grab a suction cup and place it near the edge.
– Gently pull on the suction cup while sliding an opening pick into the tiny gap you’ve created.
– If you’re having a tough time making that gap, just reheat the edge and give it another go!
Step 3


Remember, you don’t want to go deeper than 13 mm (0.5 inches) – let’s keep that display safe and sound!
There’s a nifty mesh over the earpiece speaker at the top edge of the screen. If you don’t have a spare mesh, just be careful not to damage or misplace this little guy!
– Gently glide the opening clip along the top edge to cut through that sticky adhesive.
– Pop an opening pick in the edge to keep that adhesive from sealing back up.
Step 4


Hey there, keep that pick no more than 1 mm (1/32″) from the edge, or you’ll mess up the display assembly! If you need help, you can always schedule a repair.
– Warm up an iOpener and place it on the right side of your phone for about two minutes. It’s almost showtime!
– Gently slip an opening pick near the top side, where you’ve already loosened the adhesive.
– Trace the right corner with your pick with smooth and careful motions.
– Carefully slide your pick along the right edge to fully detach the adhesive.
– Repeat the process on the left edge of your phone. Great job so far! If you need help, you can always schedule a repair.
Tools Used
Step 5


Keep your slice shallow—no deeper than 8.5 mm (1/3″)—or you might accidentally snip the display cable. Yikes! If you need help, you can always schedule a repair.
– Warm up the bottom edge with an iOpener for about two minutes—think of it as giving your device a cozy little spa treatment.
– Gently slide a pick near the right edge where you’ve already lifted the adhesive. It’s like getting the opening act ready for the main show!
– Carefully maneuver the pick around the corner—imagine guiding a friend around a dance floor.
– Sweep the pick along the bottom edge to neatly slice through the adhesive, just like cutting through butter. You’re doing great!
Tools Used
Step 6

Hey there! Just a friendly reminder: please avoid trying to take off the display assembly. It’s still connected by a flex cable, and we wouldn’t want you to accidentally cause any issues! If you need help, you can always schedule a repair.
– After you’ve made your way around the edge of the phone, gently lift the display assembly just a tad from the right corners.
– Grab an opening pick and glide it through any leftover adhesive like a pro.
Step 7


Hey, keep it chill—make sure not to stress the flex cable when you swing the assembly around!
Step 8


As you work on this repair, remember to track each screw and return it to its original spot. If you need help, you can always schedule a repair.
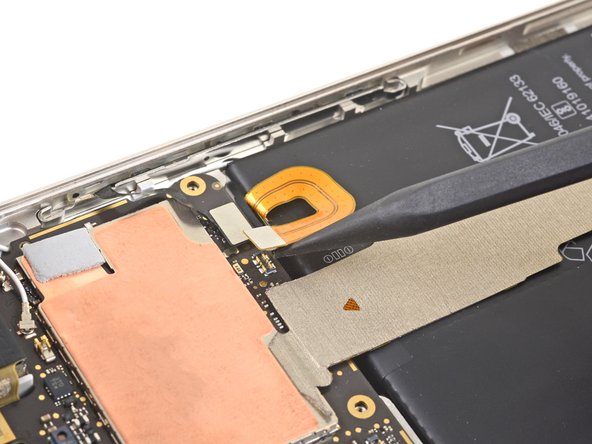
– Let’s get started by removing the two 4 mm T5 screws that hold the display cable bracket in place.
– Now that the screws are out, you can remove the display cable bracket – easy peasy! If you need help, you can always schedule a repair
Step 9


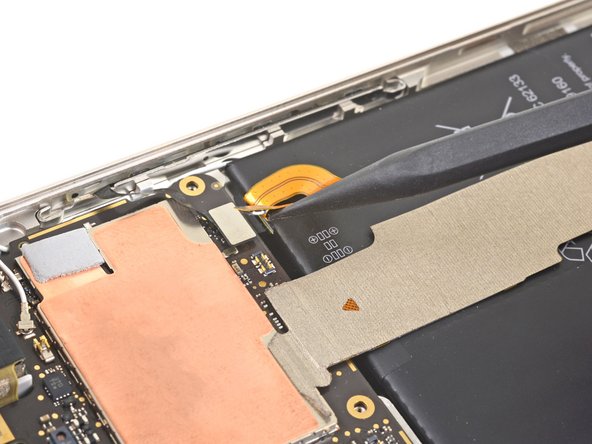
Ready to reconnect those connectors? Here’s how: First, align the connector carefully, then press down gently on one side until you hear that satisfying click! Once that’s done, do the same on the other side. But remember, no pressing down in the middle! If you misalign it, those little pins can bend, and that’s not a good time. If you need help, you can always schedule a repair.
– Grab your trusty spudger and gently nudge up the display cable to disconnect it from its connector. You’ve got this!
Tools Used

Step 10


– Pop off the display assembly.
– Want to reinstall the Pixel XL display? This guide has you covered.
– No speaker grille on your new display? No worries! Grab some tweezers, gently peel the adhesive grille from your old display, and stick it on the new one.
– Before installing a new display, make sure the frame is free of any adhesive. Use a spudger or an opening tool to scrape it off, and isopropyl alcohol to clean up any residue.
– Reusing the same display assembly? Clear out all the old adhesive from the panel and frame before you apply new adhesive.
– Turn on your phone and test your repair before adding new adhesive and sealing up the phone.
– During the boot-up after reassembly, the screen will go through a calibration. Don’t touch it, or you might mess up the touch calibration and cause touch issues.

Step 11

– Let’s get those screws out so we can access the midframe! Here’s what you need to do:
– Unscrew seven sleek black 4 mm T5 screws – they’re just waiting to be removed.
– And don’t forget the two shiny silver 3 mm T5 screws – they’re just as important!
Step 12

– The midframe is snugly held in place by plastic clips that clip into the edge of the back case. If you need help, you can always schedule a repair.
Step 13


– Locate the tiny notch in the bottom left corner of the frame and gently insert an opening pick. You’ve got this!
– Now, slide that opening pick along the bottom edge of your device towards the bottom right corner and just let it chill there.
Step 14


This may be tricky because of the tight spaces, so don’t hesitate to use a bit of muscle. Having a hard time? Slip in a playing card and give it a go. And remember, if you need help, you can always schedule a repair
– Slide an opening pick into the right edge of the phone near the bottom.
– Gently push the pick along the seam until you hear the first clip pop free.
– Keep the pick in place to prevent the midframe from closing up again.
Step 15


You don’t need to insert the pick more than 2 mm into the edge. If you go all the way in, you might risk damaging those delicate flex cables.
By now, the right edge of the midframe should be free from the case. If not, slide an opening clip up and down along the right edge.
– Get that opening pick in on the right edge of the phone and slide it up to the top right clip.
– Gently glide the pick past the clip to pop it free from the frame. If you need help, you can always schedule a repair
Step 16


– Grab the right edge of the midframe by the corners and gently lift it up like you’re opening a treasure chest.
– Once the left edge starts to feel a bit loose, pause your lifting and raise the midframe upwards with care.
– Now, go ahead and remove the midframe like a pro.
– To put the midframe back in place, align it with the case and give it a gentle squeeze around the edges until all the clips snap back into their happy homes. When you’re done, the midframe should sit nice and flat.
Step 17

– Grab your trusty spudger and gently pry up to disconnect that battery connector. You’ve got this!
– Give the battery flex cable a little bend to keep it from accidentally making friends with the motherboard. Safety first!
Tools Used


Step 19

– Slide your spudger into the headphone jack port and gently lift up to pop the port free from its socket. If you need help, you can always schedule a repair
Tools Used
Step 20


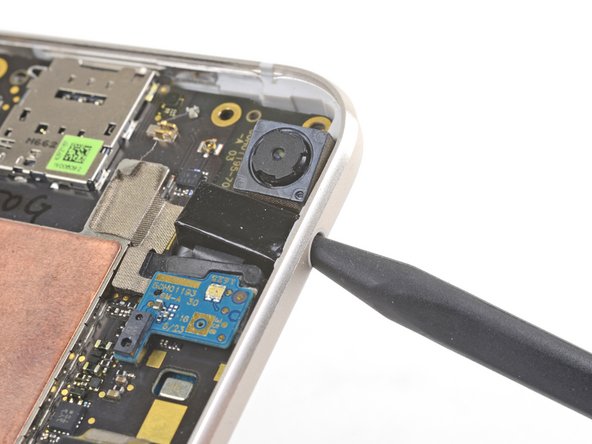
Watch out for those tiny surface mount components! Give the spudger a gentle touch—no pushing here!
– Gently slide the tip of your spudger under the proximity sensor board and give it a little nudge to disconnect it.
– Now, go ahead and lift out the proximity sensor board.
Tools Used
Step 21


Watch out for those tiny surface mount components! Give them a little space and don’t nudge them out of place.
– Gently glide the edge of your trusty spudger under the headphone jack connector and lift it up to disconnect it. You’ve got this!
– Now, go ahead and take out that headphone jack module like a pro!
Tools Used