Google Pixel XL Teardown
Duration: 45 minutes
Steps: 19 Steps
Let’s dive into the first-ever teardown of the Pixel XL. At first glance, it looks similar to an iPhone, but we’re excited to explore what’s inside. Get ready to learn how to repair this smartphone. Follow us on Facebook, Instagram, or Twitter for the latest repair news. If you need help along the way, you can always schedule a repair.
Step 1


– The early buzz around these phones has been glowing—and with specs like these, it’s no shocker:
– A 5.5″ AMOLED display rocking a crisp QHD 1440 x 2560 resolution (534 ppi) and topped off with sleek 2.5D Gorilla Glass 4.
– A zippy quad-core, 64-bit Qualcomm Snapdragon 821 processor (2.15 GHz + 1.6 GHz) paired with 4GB LPDDR4 RAM—this thing’s got some serious horsepower.
– Snapping selfies or capturing moments? You’ve got a 12.3-megapixel, f/2.0 main camera equipped with phase and laser detection autofocus, plus an 8 MP front camera for those all-important selfie sessions.
– Choose between 32 GB or 128 GB of built-in storage to keep all your stuff handy.
– Say hello to the Pixel Imprint back-mounted fingerprint sensor—it’s like your phone’s secret handshake.
– Connectivity made easy with a USB Type-C port and the trusty 3.5 mm headphone jack.
– And running it all? The smooth Android 7.1 Nougat experience.
Step 2


– This Pixel may claim to be all about that tech vibe, but it seems to have borrowed a dash of fruity flair.
– Now, let’s get into the nitty-gritty of what makes the Pixel XL unique, even with its pretty pink competition:
– Oh, and guess what? It proudly flaunts a headphone jack right up top—no need to worry about fancy adapters here!
– No home button in sight—our sleek design goes for on-screen buttons, giving the front face a clean and minimalist look.
– Check out the back-mounted fingerprint scanner and a single rear-facing camera that knows how to keep things smooth (minus the bulky bump).
– It’s got two speaker slits instead of those old-school grilles, and don’t forget the USB-C port—no proprietary nonsense here!
Step 3


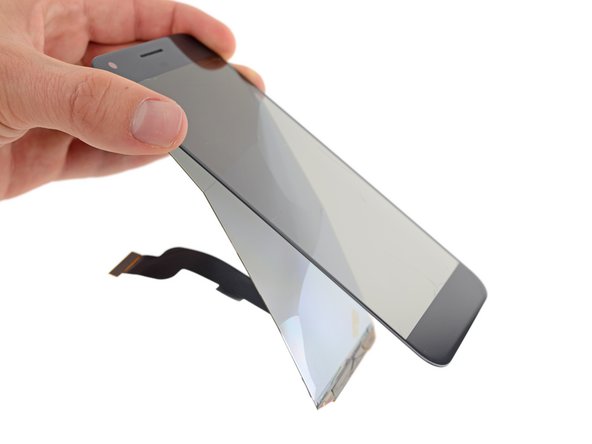
– With this familiar iPhone look-alike in our hands, we’re feeling pretty confident as we channel our inner repair pros. Let’s heat up an iOpener and grab our trusty opening tool!
– After giving it a minute of warmth and a bit of gentle prying, we carefully lift the phone from the top, ready to unveil its inner secrets.
– But wait! A pesky bracket securing the display cable is putting a stop to our fun. Time to grab our screwdriver and dig a little deeper!
Tools Used

Step 4


The display made by Samsung has the part number AMS546KD09.
– Time to tackle this step! First, remove the bracket to liberate the display—tools from the 64 Bit Driver Kit make those T5 Torx screws a breeze to handle.
– We like to say we take things apart so you don’t have to. That’s exactly what went down here today. Teardowns give us the lowdown on how a device is assembled—so we can whip up guides with repeatable, safe steps for everyone to follow.
– In this instance, the OLED panel came away from the digitizer glass a little easier than we’d like. With ultra-thin components and no frame or bezel behind the display, removal gets tricky—but don’t worry, we’re already brainstorming a smoother approach for next time.
– Oh, and hitching a ride on the back of the display panel: the Synaptics ClearPad S3708 touch controller, a nifty little feature we uncovered.
Step 5


We learned something new: ‘rigid’ doesn’t always mean ‘no bend’. Whoops! Luckily, it springs back into shape.
The daughterboard has a pretty standard blue-green color – no surprises there!
– This sleek and sturdy midframe is probably crafted from magnesium, fitting snugly onto the phone’s body.
– On the left side, we’ve got a curious ribbon connector hanging out with the earpiece speaker.
– On the right side, behold the rest of the phone featuring a motherboard with a chic matte black finish!
Step 6


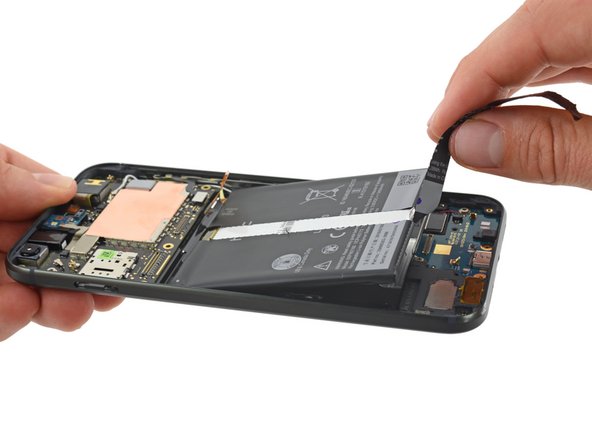
Just a fun fact – the infamous Samsung Galaxy Note7 came with a zippy 13.48 Wh battery before it met its dramatic end.
– There’s a sneaky little trick for getting that battery tab off: it’s a perforated strip on the sleeve! Just peel it away, and voila! You’ve got a nifty pull tab ready to roll.
– This HTC-made battery is like a superhero, held in place by two strong adhesive strips. Don’t worry, that pull tab is your trusty sidekick—no heat required! (And who knows? It might even serve as a tamper-evident seal!).
– Boasting a robust 13.28 Wh, this battery gives the 11.1 Wh iPhone 7 Plus a solid run for its money, but don’t let it fool you! The Galaxy S7 Edge comes in hot with a whopping 13.86 Wh powerhouse.
Step 7


We’re big fans of modular design! Since these small components can be swapped out individually, you’ll find that replacement parts are easy to come by and won’t break the bank.
– Let’s get started! First, we’ll remove a unique part – a combination laser autofocus and microphone board.
– Next, we’ll take out the 3.5 mm headphone jack. Yes, it’s still a standard port!
– Now, it’s time to remove the 8-megapixel front-facing camera, perfect for all your selfie needs.
– If you need help along the way, don’t worry, you can always schedule a repair with Salvation Repair.
Step 8


Tiny components can be sneaky! Some devices keep them neatly separated, while others cram them all together on the main board. The more modular the design, the easier (and cheaper) the fix—because no one wants to swap out an entire motherboard for just one misbehaving part or take on a nerve-wracking microsoldering challenge.
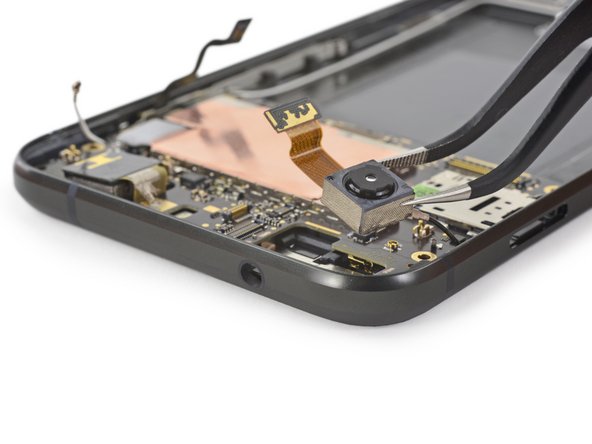
– Let’s take a closer look at this motherboard, but first, we need to navigate around the fingerprint sensor cable – it’s a bit of a challenge, but don’t worry, it’s easy to work with!
– Next up, we have a mini board that’s home to the microphone and the rangefinder, which enables the XL’s laser autofocus. Pretty cool, right?
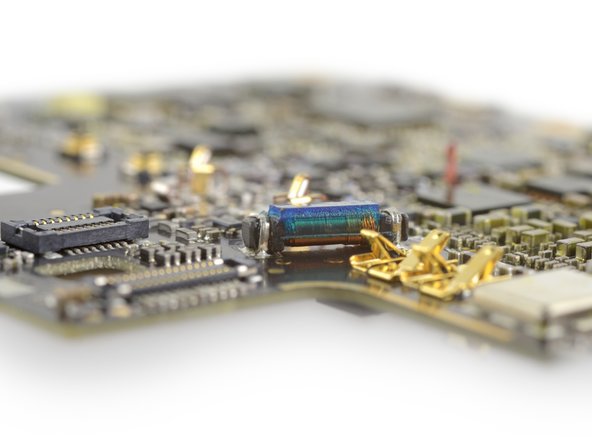
– Now, let’s talk about this mysterious blue component near the main camera. After a closer look, it’s likely a passive inductor – check out those two solder pads and the copper wire coil!
Step 9

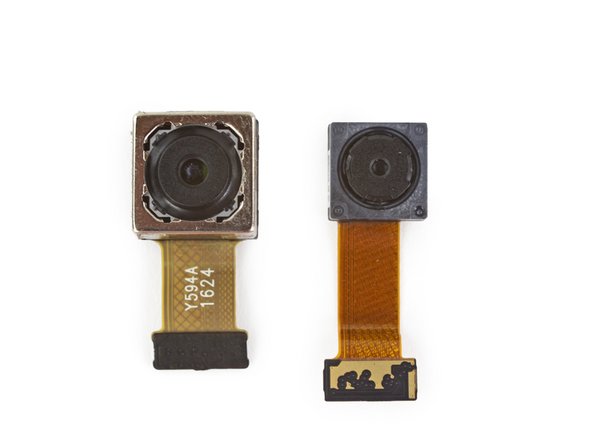
– Alright, it’s time to bid farewell to the rear-facing camera! At 12.3 megapixels, it’s still bringing solid performance—though it skips the optical image stabilization that we’ve seen in this season’s top contenders.
– Here’s a side-by-side of the rear- and front-facing cameras, just for a little size check.
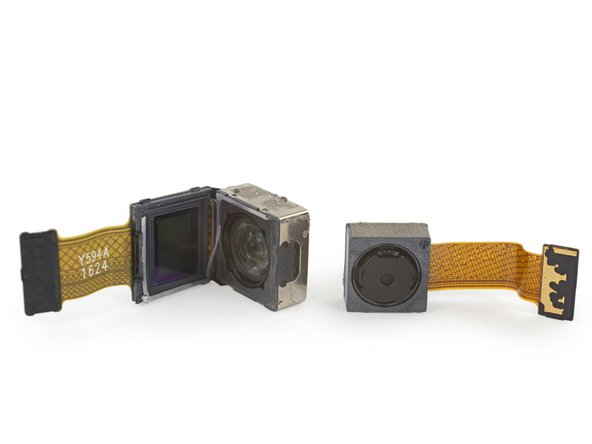
– Take a closer look at the sensor and optics from the main camera—pretty neat stuff!
– And here’s a cool X-ray view of the primary camera, thanks to the awesome tech over at Creative Electron!
Step 10

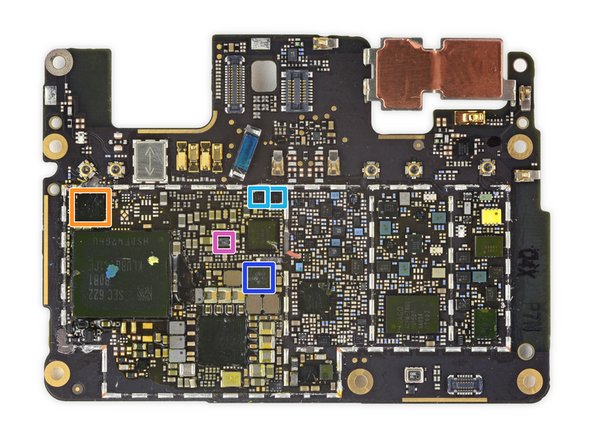
– Front motherboard chips:
– Samsung K3RG2G20BM-MGCJ 4 GB LPDDR4 mobile DRAM is hanging out with a quad-core Qualcomm Snapdragon 821 processor chilling beneath it (two cores strutting at 2.15 GHz and two at a cool 1.6 GHz).
– Qualcomm PMI8996 power management IC, plus the Qualcomm SMB1350 Quick Charge 3.0 IC keeping everything powered up.
– NXP Semiconductor TFA9891 smart audio amplifier, making sure your sound is top-notch.
– Qualcomm WTR4905 LTE RF transceiver, helping you stay connected.
– 3207RA G707A (it’s got that Wi-Fi vibe).
– NXP 55102 1807 S0622 (could be the PN551?) NFC controller for your contactless needs.
– Bosch Sensortec BMI160 low power IMU, adding some smart sensing to the mix.
Step 11

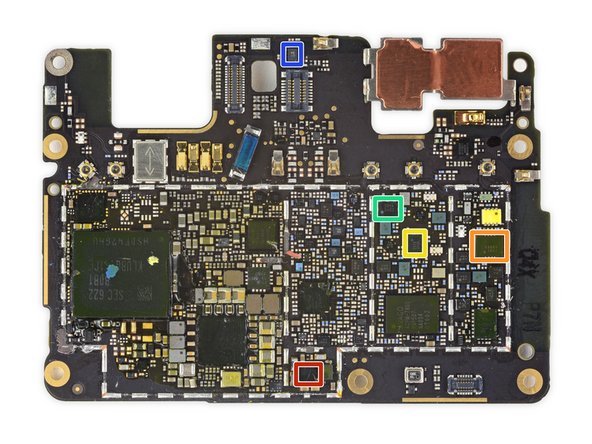
– Now, let’s check out the back of the device:
– We’ve got the Samsung KLUBG4G1CE-B0B1 32 GB Universal Flash Storage (UFS) 2.0, ready to rock your data needs.
– Say hello to the Qualcomm PM8996 Power Management IC, your power buddy!
– The Avago ACPM-7800 power amplifier is here to boost up those sound waves.
– Next up, the Qualcomm WTR3925 LTE RF transceiver and the Qualcomm RF360 Dynamic Antenna Matching Tuner (QFE2550) – a duo that keeps you connected.
– Don’t forget the Qualcomm WCD9335 audio codec, giving you the tunes you love.
– Wave hi to the Skyworks SKY77807 Quad-Band Power Amplifier Module (PAM) – ensuring your signals come in clear.
– And last but not least, the Bosch Sensortec BMP280 -series barometric pressure sensor, keeping tabs on your environment!
– If you run into any snags, no worries! You can always schedule a repair.
Step 12

– Let’s dive into the tech treasure chest! First up, we’ve got the AKM Semiconductor AK09915C, your trusty 3-axis electronic compass to keep you on the right path. Next, say hello to the STMicroelectronics STM32F412RG, a powerful 32-bit ARM Cortex-M4 with a generous 1 Mb flash, likely ready to take on any task.
– Then we have the Texas Instruments TPA2011D1, a 3.2 W mono class-D audio amplifier to pump up your sound. Don’t forget the ON Semiconductor FSA3000L10X, a two-port USB-2.0 MHL DPDT switch that’s all about versatility.
– Next, meet the Maxim Integrated MAX14589E, your go-to DPDT analog switch, and the Texas Instruments TPS65633B, which manages power for that stunning AMOLED display. Lastly, we have the ABLIC, Inc. S-1000C17-I4T1U, a voltage detector that operates at 1.7 V, ensuring everything runs smoothly.
– If you find yourself in a pickle or need a helping hand, don’t hesitate to schedule a repair! You got this!
Step 13


– Let’s Identify the ICs, Part 3!
– Meet the ON Semiconductor FPF2281BUCX-F130, your over-voltage protection load switch superhero!
– Next up, we have the Texas Instruments TPS61240, a 450 mA boost converter that’s ready to save the day!
– Now, let’s talk about the Texas Instruments TLV707285P, a 200 mA LDO regulator that’s all about keeping things stable!
– Say hello to the Ricoh RP115L171B5, a 500 mA LDO regulator that’s got your back!
– Last but not least, we have the ON Semiconductor NCP134AMX110TCG, another 500 mA LDO regulator that’s part of the dream team!
Step 14

– IC Identification, pt. 4:
– Meet the Qualcomm QFE3100 envelope tracker, your little helper in signal strength.
– Introducing the Sony CXM3642K SP12T + SP9T antenna switch module, the party planner for your antenna connections.
– Say hello to the Qorvo TQQ1013 band 13 SAW duplexer, crucial for keeping those signals in check.
– Don’t forget the Qorvo TQM963014 BC14/BC1/B25 BAW duplexer—it’s the unsung hero of frequency management.
– Also on the team is the Sony CXA4416 SP6T antenna switch (likely), helping to switch things up with style.
– And we have our mysterious friend, the antenna tuner (likely), making sure everything tunes in perfectly.
Step 15

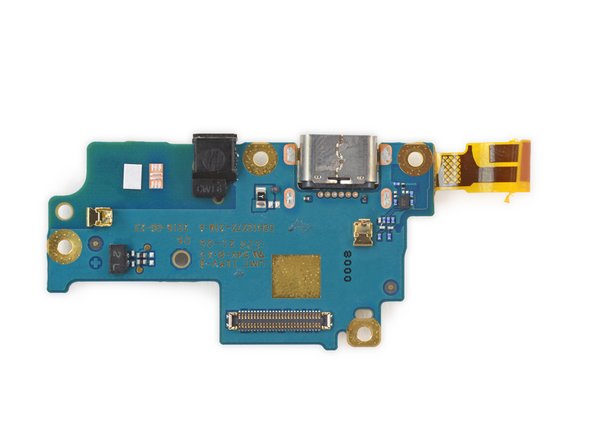

– The daughterboard easily pops out of the rear case, giving us access to the USB Type-C port and the microphone. Not too tricky, right?
– This part is pretty basic, meaning you’ll find some affordable USB port replacements. USB ports have historically been a common trouble spot, though USB Type-C might be a bit more reliable in this case.
– We spotted a few interesting bits of silicon on the daughterboard:
– Sadly, USB-C has had its own share of quirks.
– Qualcomm QFE2550 dynamic antenna matching tuner.
– AKM Semiconductor AK8789 Hall-effect sensor.
– NXP Semiconductor PTN36241G USB 3.0 redriver.
– ON Semiconductor FUSB340 USB 3.1 SuperSpeed 10 Gbps switch.
Step 16

With most of the phone parts out in the open, it’s hard to believe this beauty is an HTC product. No signs of its origin here!
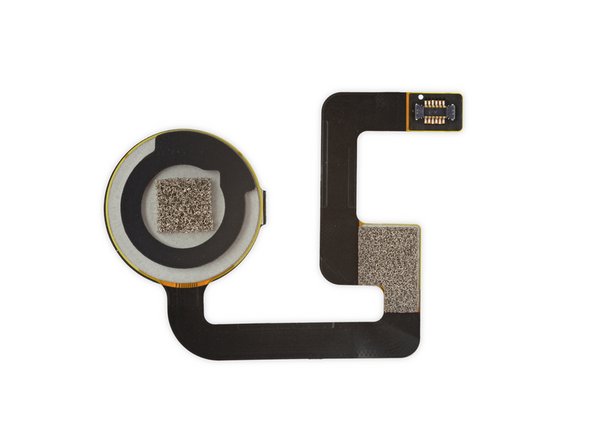
– Let’s give that Pixel Imprint fingerprint sensor a gentle nudge, just like popping a hatch off the back case!
– Taking a closer look, it may have a different vibe, but it definitely brings back memories of fingerprint sensors from phones we know and love.
– While HTC is usually a big name on its own, this time, their influence seems to be just on the battery. As a quiet collaborator, they’ve taken a back seat, sharing the spotlight with others.
Step 17
– The Pixel XL’s chassis is still home to the oscillating linear vibration motor—and that’s exactly where it should be. A bit of X-ray wizardry lets us see it in motion, which is pretty cool.
– There’s a neat video out there showing the Pixel XL motor in action alongside the latest Taptic Engine from the iPhone 7 Plus. Definitely worth a look!
Step 18


Disclaimer: Armed with our trusty X-Ray images, we ventured forth and found exactly what we anticipated: a tiny weight nestled between some even tinier springs.
– Teardown Update: You asked, we listened—here’s a closer, smoother shot of that vibrating motor in action.
– The vibrator’s shiny metal casing didn’t quite impress us, so we decided to make it a bit more interesting with a rotary tool—science, right?
– The technical term for the magic behind the vibration is ‘linear oscillator.’ It’s a fancy way of saying there’s a weighted magnetic core that shakes between two springy metals. This creates the sensation of a click without any moving parts, giving you that satisfying tactile feedback.
Step 19

– Here’s a super snazzy snapshot of some top-notch Pixel parts, just for you!
Success!