How to apply new adhesive on the Apple Watch Series 1
Duration: 45 minutes
Steps: 10 Steps
Ready to freshen up that Apple Watch Series 1 with some new adhesive? This guide will walk you through the steps after you've opened it up or had the Force Touch Sensor swapped out. It's a simple fix, and if you need a hand, you can always schedule a repair!
Step 1


- Grab your trusty plastic opening tool and gently nudge it to peel away that sticky adhesive from the back of the screen. You've got this!
Step 2


Once you’ve cleared away all the adhesive bits, grab a q-tip dipped in a little alcohol and give the back of the screen a quick clean to wipe away any leftover gunk.
- Grab your tweezers and gently lift the adhesive—it should start to peel right up.
Tools Used

Step 3


If you're finding the double-sided adhesive a bit tricky to handle, why not check out this video for some handy tips?
Take it easy when working with the adhesive tape—no folding, bending, or stretching, please! Doing so might make it too thick and could leave an unsightly ridge between the screen and the case.
- Grab your trusty tweezers and gently peel away the outer ring from one of those adhesive strip pads. It's like unwrapping a present, but way more satisfying!
- Make sure to snag both the double-sided adhesive and the brown backing paper. We want everything to come off smoothly!
Tools Used
Step 4


- Let's get started by applying the backed adhesive tape to the Force Touch sensor, making sure it's aligned nicely around the edge of the case where the screen will sit.
- Begin in a corner, placing the tape as close to the corner wall as possible - this will help you get a smooth, even application.
- Now, use a plastic opening tool to gently press down on the brown backing paper, securing the adhesive all the way around the perimeter. If you're not feeling confident, don't worry - it's an easy step, but if you need help, you can always schedule a repair with the experts at Salvation Repair.
Step 5


Hands off the contacts! Getting your finger oils on them can block the connection and cause weird issues.
- Grab your trusty plastic opening tool and carefully reconnect those display data and digitizer cable connectors. You've got this!
Step 6


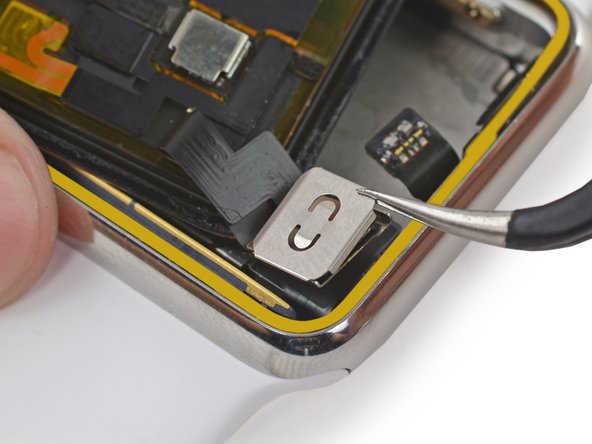
- To put the metal bracket back, line up the single tab with its slot at the top of the lower section, then slide it down into place. Next, snap the upper bracket into position. If you need assistance, you can always schedule a repair.
Step 7


- Align the battery connector with its matching mate on the cable inside the watch body - make sure they're ready to reunite!
- Use tweezers to gently press the two-connectors together.
Tools Used
Step 8


- Swing the battery back into place, making sure it fits snugly in its home.
- Give the battery a gentle press so it sticks back down onto the S1, just like before.
If your replacement battery came with sticky stuff already in place, peel off that protective tab now to reveal the adhesive. This is the perfect moment to power on your watch and see if it springs to life—if not, just double-check all three connectors and give it another go. Need a hand? You can always schedule a repair with Salvation Repair.
Step 9

- Grab your tweezers and coax that adhesive backing strip off like you're peeling a sticker from your favorite notebook.
- Fold the backing halfway up, give it a quick snip with scissors, then slide the rest off smoothly—no tangles, no drama.
Tools Used
Step 10


For extra stick, grab some screen vice clamps and gently secure them around the edges of your device while the new adhesive sets up.
- You're all set! If you need help, you can always schedule a repair.